
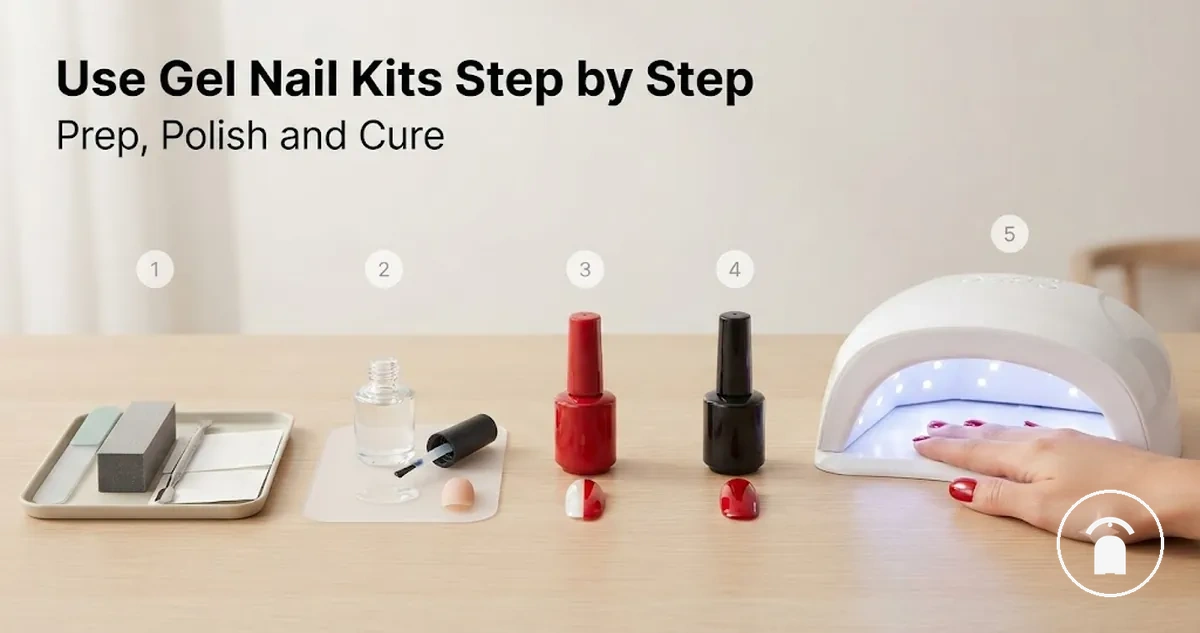
How to Use a Gel Nail Kit at Home
Use a gel nail kit at home by preparing a clean, dry nail surface, applying each gel polish layer in the correct order, and curing every layer before continuing. Standard gel nail kits use a UV LED nail lamp because the base coat, color coat, and top coat do not air-dry like conventional nail polish. The complete application sequence is kit setup, nail prep, base coat, thin color coats, top coat, curing between layers, final cleaning when required, and finishing care.
Standard gel nail kits use a UV LED nail lamp because the base coat, color coat, and top coat do not air-dry like conventional nail polish.
Place the gel polish bottles, prep tools, lint-free wipes, and curing lamp within reach before starting, then follow the cure time stated for the specific gel formula and lamp. Gelish specifies 5 seconds in its 18G LED Light for its Foundation base gel, followed by 30 seconds for each thin color coat and 30 seconds for its Top It Off sealer; the same manufacturer specifies 1 minute, 2 minutes, and 2 minutes respectively when those layers are cured with its compatible UV system. OPI specifies 30 seconds per thin base, color, and top-coat layer in its Star Light Gel Lamp, showing why cure time must come from the matched kit instructions rather than a universal timing rule.
Set up the complete gel nail kit first so nail prep can begin without interrupting the step-by-step application.
Preventable mistakes include applying thick layers, leaving dust or oil on the nail surface, and allowing uncured gel to contact the surrounding skin. OPI instructs users to leave a small free margin around the nail perimeter, cap the free edge, and cure each thin layer before applying the next one; these conditions support even coverage and keep the gel application confined to the nail plate. Set up the complete gel nail kit first so nail prep can begin without interrupting the step-by-step application.
Table of Contents
Set Up the Gel Nail Kit Before Application
Set up the gel nail kit by placing every required application item on a clean, dry, stable surface before nail prep begins. Arrange the prep tools and cleanser pads first, followed by the base coat, color gel, top coat, and compatible UV LED nail lamp. A complete setup prevents the application from being interrupted after the first gel layer is applied.
A complete setup prevents the application from being interrupted after the first gel layer is applied.
A ready working area keeps lint-free wipes separate from used files or dusty tools and places the gel polish bottles outside the curing lamp’s direct light. The tools needed from the kit must match the gel system’s instructions because the required cleanser, final wiping step, lamp type, and cure settings are formula-specific. OPI’s GelColor instructions, for example, use a base coat, two thin color coats, a top coat, an OPI Star Light lamp, and a cleanser-saturated nail wipe after the final cure. :contentReference[oaicite:0]{index=0}
This is a readiness check, not a full kit-selection guide.
Set Up the Gel Nail Kit Before Application by checking each item’s role and usable condition before opening the gel bottles. This is a readiness check, not a full kit-selection guide.
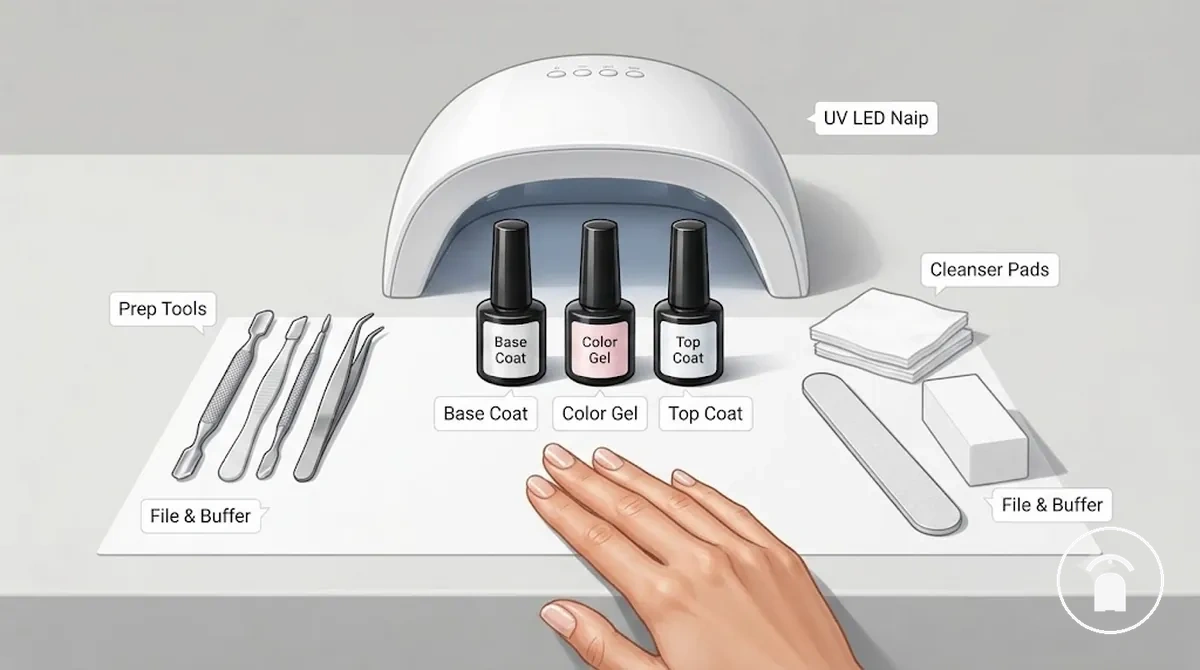
- Gel nail kit: Place the application items on a stable surface and arrange the gel products in base coat, color gel, and top coat order.
- Prep tools: Confirm that the nail file, buffer, and cuticle pusher are clean, intact, and free from residue before they contact the natural nails.
- Cleanser pads: Prepare unused cleanser pads or lint-free wipes so oil and filing dust can be removed without leaving visible fibres on the nail surface.
- Base coat: Confirm that the base coat belongs to the gel system being applied and keep the bottle closed until nail prep is complete.
- Color gel: Select the intended color gel before starting and position the bottle outside direct UV LED nail lamp exposure.
- Top coat: Check whether the formula is a wipe-off or no-wipe top coat; Gelish instructs users to cleanse its Top It Off residue with Nail Surface Cleanser and a lint-free wipe, while OPI identifies its GELement product as a no-wipe formula. :contentReference[oaicite:1]{index=1}
- UV LED nail lamp: Plug in the lamp, confirm that its timer operates, and verify compatibility with the gel formula in the kit instructions before application begins.
Prepare Natural Nails for Gel Polish
Prepare natural nails for gel polish by ensuring the nail plate is clean, dry, lightly buffed, and free from oil, dust, and old polish before applying the base coat. Professional gel systems from manufacturers such as OPI and Gelish specify that correct nail prep improves base-coat adhesion and helps reduce premature lifting by creating a suitable bonding surface. Preparing the nail correctly supports smoother gel application without guaranteeing a specific wear time.
Preparing the nail correctly supports smoother gel application without guaranteeing a specific wear time.
Preparation problems usually result from leftover polish, surface oil, moisture, or gel contacting the cuticle edge and sidewalls. If the natural nails are noticeably oily, repeat the cleanser step before applying the base coat rather than adding extra buffing. Prepare Natural Nails for Gel Polish by following the sequence below so each preparation step supports adhesion before gel polish is applied.
It highlights the preparation tools and the clean, dry nail condition needed before the base coat.
The image below demonstrates how Prepare Natural Nails for Gel Polish changes the nail surface before gel polish application. It highlights the preparation tools and the clean, dry nail condition needed before the base coat.
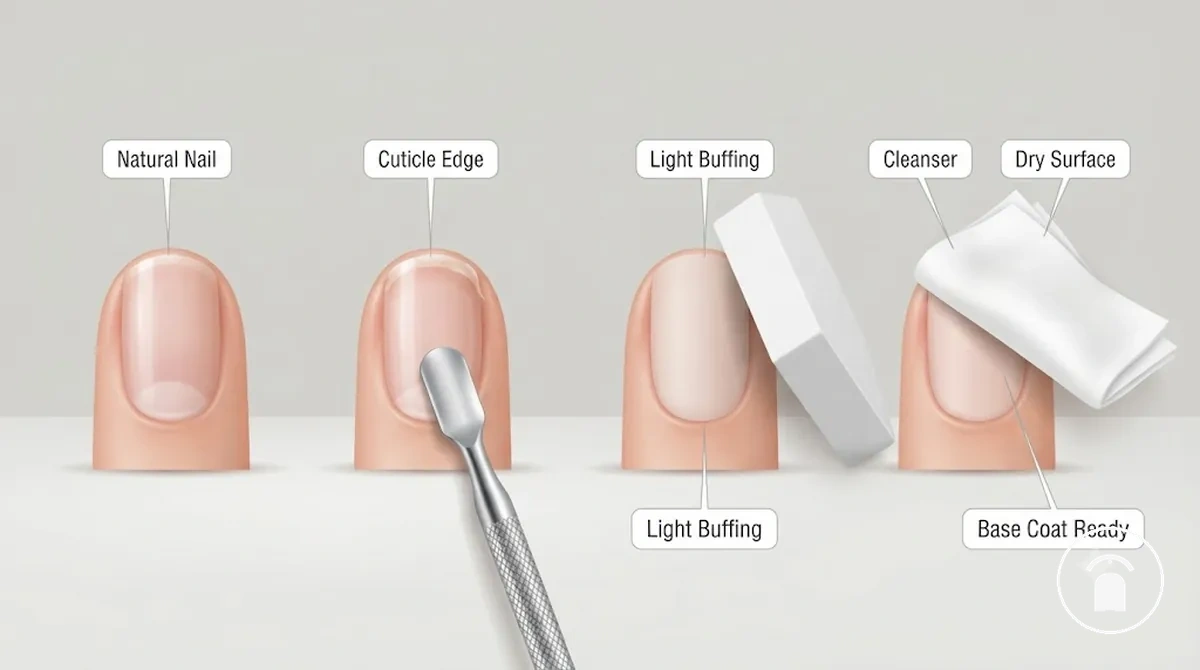
- Remove leftover polish and shape the natural nails. Remove every trace of previous polish, then file the free edge to the desired shape. A clean nail edge and polish-free surface provide an even foundation for gel polish adhesion.
- Push back the cuticle edge. Use a cuticle pusher to gently clear the cuticle edge from the nail plate without damaging surrounding skin. Keeping gel polish away from the cuticle edge and sidewalls helps reduce lifting after curing.
- Lightly buff the nail surface. Buff only enough to remove the natural shine instead of thinning the nail plate. According to Gelish and OPI application instructions, light buffing creates a smoother bonding surface for the gel base coat.
- Remove oil and dust with cleanser. Wipe each nail using the system's recommended cleanser and a lint-free wipe until the surface is completely clean and dry. If the nails are naturally oily, repeat this cleansing step before continuing because residual oil can reduce adhesion.
- Confirm a clean, dry surface before the base coat. Check that no moisture, dust, or cleanser residue remains and that gel polish will not touch the surrounding skin during application. For more detailed guidance on each preparation technique, see nail preparation.
Shape, Buff, and Clean the Nail Surface
Shape, Buff, and Clean the Nail Surface by filing the nail edge, lightly buffing the nail surface until the natural shine is removed, and cleaning away all dust and oil with a lint-free wipe and cleanser before applying the base coat. According to Gelish and OPI application instructions, a clean, lightly buffed nail surface provides the recommended condition for base-coat adhesion and helps reduce the risk of premature lifting without unnecessarily thinning the natural nail.
Shape, Buff, and Clean the Nail Surface uses separate actions for shaping, shine removal, and cleansing.
Shape, Buff, and Clean the Nail Surface uses separate actions for shaping, shine removal, and cleansing. Stop buffing as soon as the surface appears evenly matte because additional buffing removes more natural nail without improving the preparation stage.
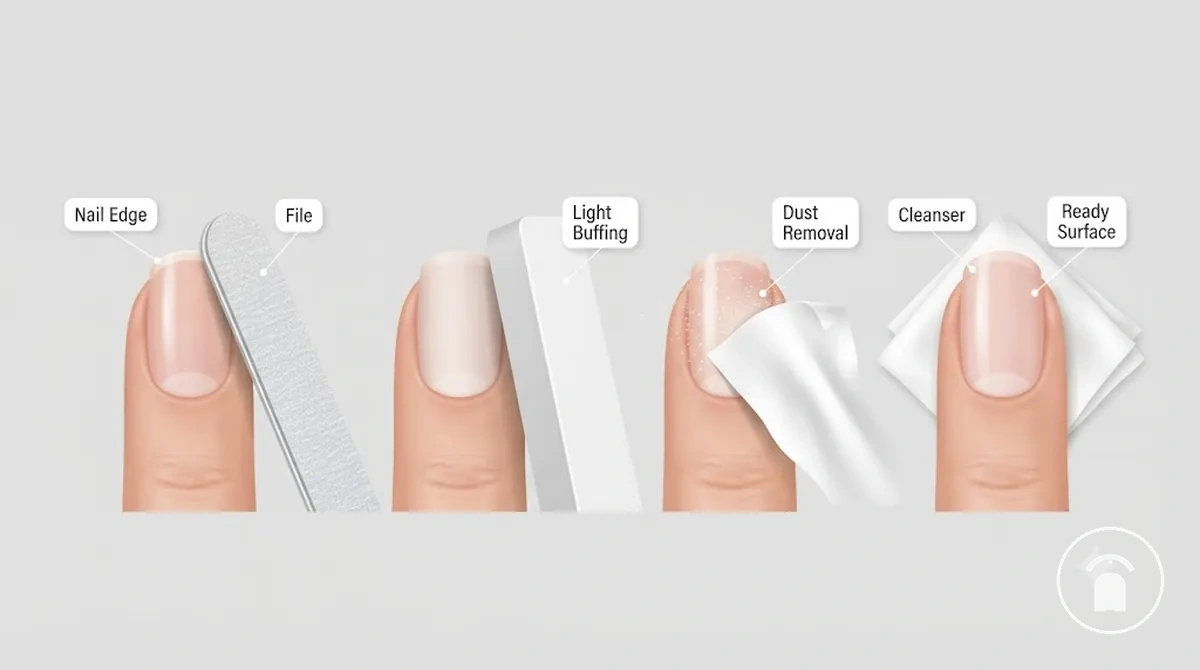
- Shape the nail edge. Use a fine nail file to create the desired length and smooth the free edge. Stop when the nail edge is even and free from rough corners.
- Buff away the surface shine. Use a fine buffer with light pressure until the natural gloss disappears and the nail surface has a uniform matte finish. Gelish and OPI both instruct light buffing rather than aggressive filing before gel application.
- Remove dust completely. Wipe away all visible filing dust with a clean lint-free wipe before using cleanser. A dust-free nail surface allows the base coat to contact the nail evenly.
- Clean the nail surface with cleanser. Saturate a lint-free wipe with the cleanser recommended for the gel system and wipe each nail until no dust, oil, or moisture remains. The nail surface is ready when it is visibly clean, dry, and free from residue.
Push Back Cuticles and Keep Gel off the Skin
Push Back Cuticles and Keep Gel off the Skin by gently moving the cuticles away from the nail plate, clearing loose non-living skin from the nail surface, and applying gel polish only to the nail plate. According to Gelish and OPI professional application instructions, creating a clean cuticle border before the base coat helps reduce product flooding onto the sidewalls and cuticle edge, which can increase the risk of lifting. The nail edge is the application boundary where gel should stop before reaching the surrounding skin.
The nail edge is the application boundary where gel should stop before reaching the surrounding skin.
If gel polish floods the cuticle edge or sidewalls before curing, remove the uncured product with a clean detailing brush or orangewood stick before continuing. Keeping the correction local preserves a clean polish border instead of applying additional gel over the flooded area.
Keeping the correction local preserves a clean polish border instead of applying additional gel over the flooded area.
Push Back Cuticles and Keep Gel off the Skin is illustrated below to show the nail edge boundary where gel polish should remain on the nail plate without contacting the surrounding skin.
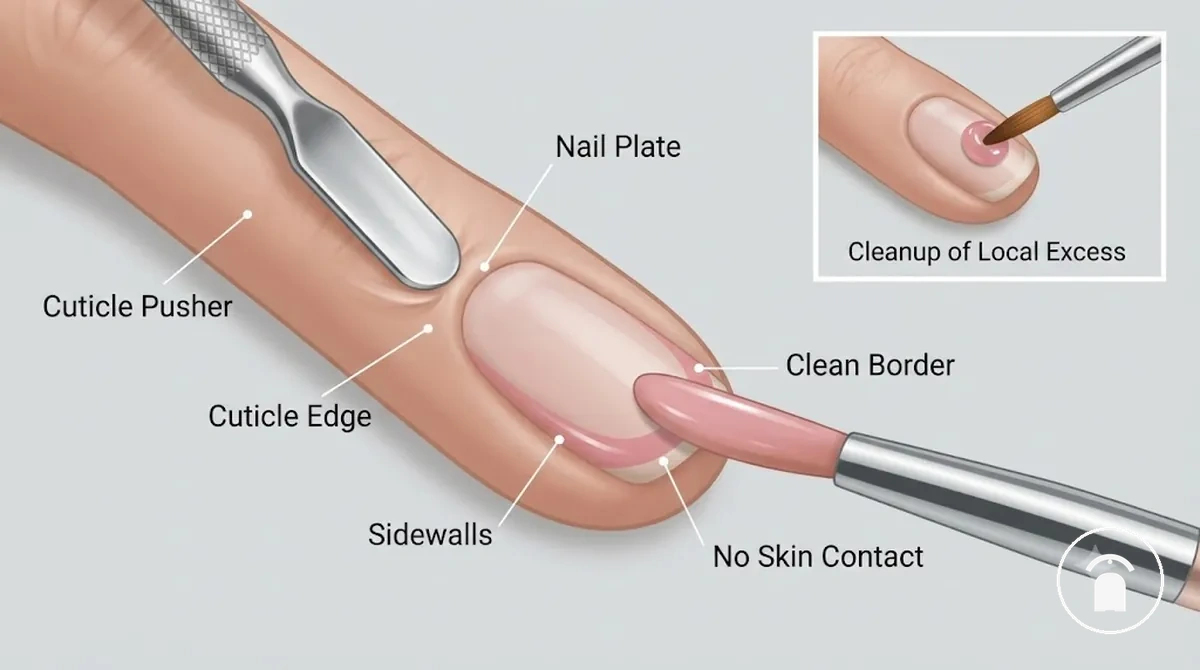
Caution checklist: Push Back Cuticles and Keep Gel off the Skin by following these checks to prevent product flooding at the nail edge.
- Push cuticles gently: Use a cuticle pusher with light pressure until the cuticle edge is clearly visible. A visible nail boundary helps keep gel polish off the surrounding skin.
- Clear loose skin: Remove only loose, non-living skin resting on the nail plate. Loose skin left beneath gel polish can contribute to lifting around the cuticle edge.
- Control the brush near the sidewalls: Apply thin gel layers that stop just short of the sidewalls. A clean border indicates the product has not flooded the skin.
- Remove uncured flooding immediately: If gel polish touches the cuticle area or surrounding skin, clean it away before curing. Gel polish should remain only on the nail plate to maintain a clean application boundary.
Apply Gel Polish Layers in the Correct Order
Apply Gel Polish Layers in the Correct Order by following the standard sequence of base coat → gel color coat → top coat, curing each layer with a compatible UV LED nail lamp before applying the next one. Professional application instructions from Gelish, OPI, and The GelBottle identify this sequence as the standard process because the base coat promotes adhesion, the gel color coat builds coverage, and the top coat provides the sealing layer. Standard gel systems follow the base-color-top sequence, while all-in-one gel formulas should be applied according to the manufacturer's instructions.
For example, OPI and Gelish both instruct users to apply two thin gel color coats rather than one heavy layer, curing each layer before continuing.
Applying a thin layer at each stage helps the gel cure more evenly, while capping the free edge helps seal the manicure and reduce edge lifting during wear. For example, OPI and Gelish both instruct users to apply two thin gel color coats rather than one heavy layer, curing each layer before continuing. Detailed curing durations differ by gel formula and compatible UV LED nail lamp, so this section focuses on the application order rather than specific cure times.
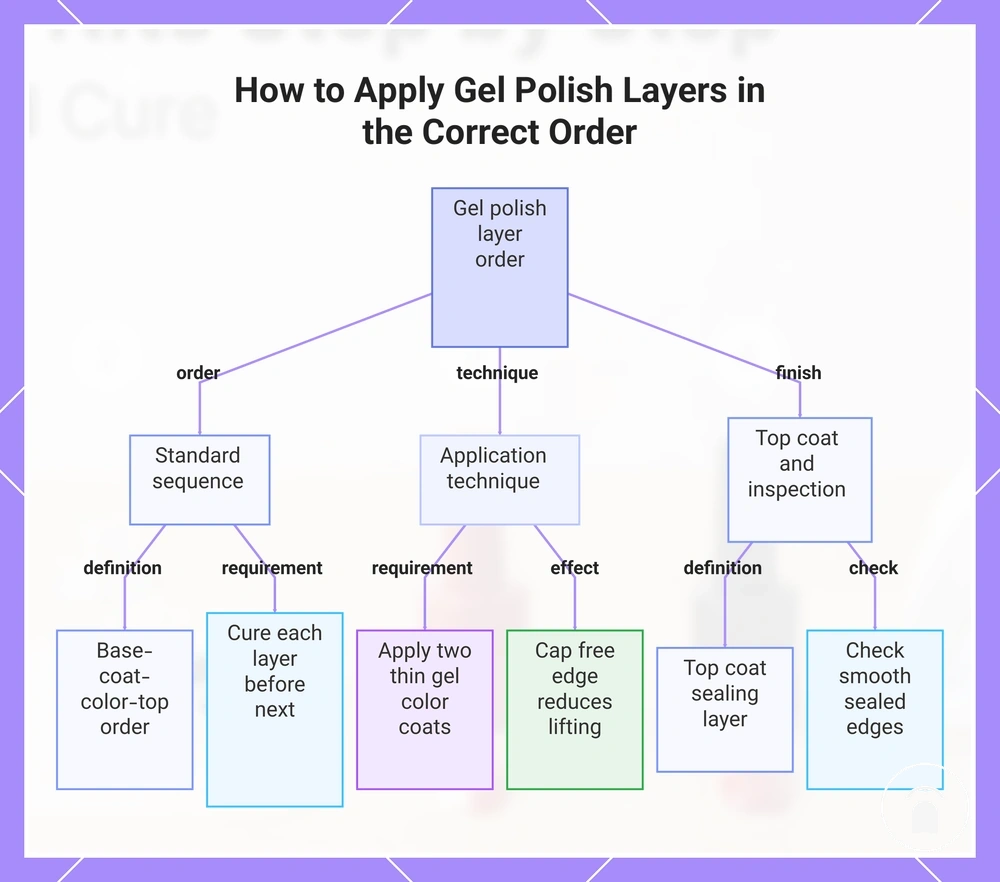
- Apply the base coat. Cover the nail plate with one thin layer of base coat, cap the free edge, check that no gel touches the surrounding skin, and cure the layer with the compatible UV LED nail lamp. The base coat creates the adhesion layer for the gel system.
- Apply the first gel color coat. Brush on a thin gel color coat from the cuticle area toward the free edge using controlled strokes for even coverage. Cap the free edge and cure the layer before applying additional color.
- Apply the second gel color coat. Apply a second thin gel color coat when additional opacity is needed for the selected shade. Keep the layer even, seal the free edge again, and cure before moving to the finishing layer.
- Apply the top coat. Brush on a thin top coat across the entire nail, including the free edge, to create the sealing and gloss layer. Cure the top coat according to the kit instructions before handling the nails.
- Inspect the completed gel application. Confirm that each layer is smooth, the free edge remains sealed, and no uncured gel is present on the surrounding skin. If the gel system uses a wipe-off top coat, complete the final cleansing step only after the final cure, following the manufacturer's instructions.
This chart shows the standard gel polish layering sequence, the key technique rules, and the top coat and inspection stage.
Base Coat for Adhesion
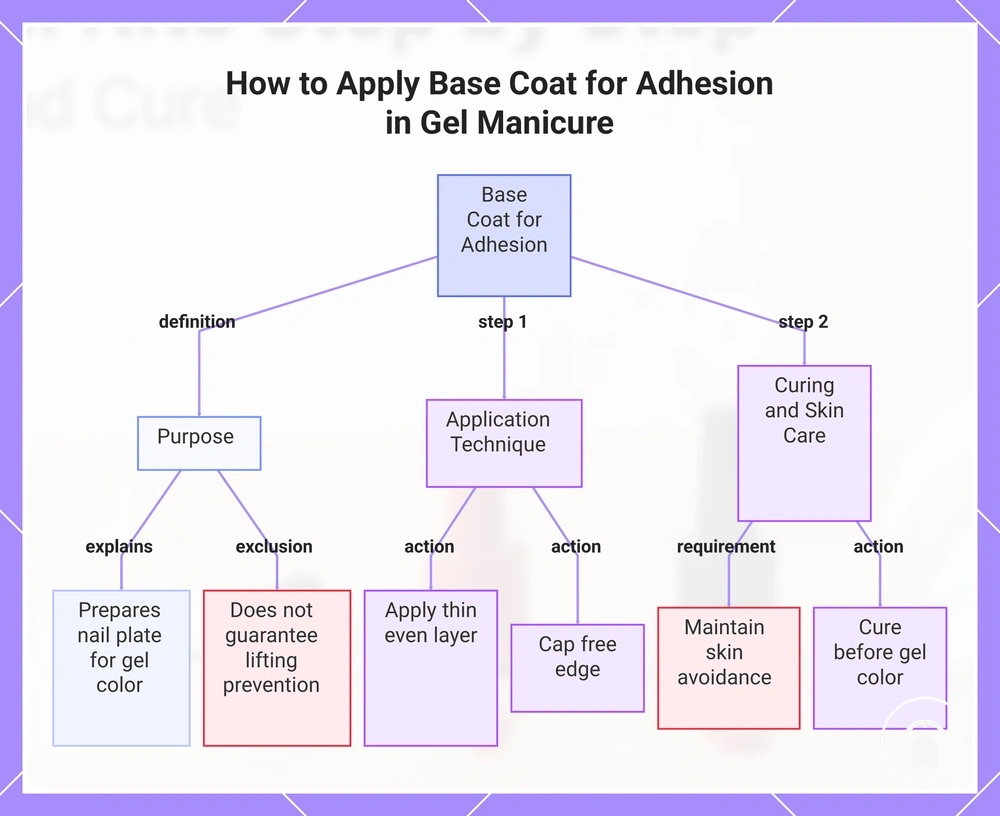
Base coat is the first gel layer in a standard gel manicure system and forms the bonding layer between the nail plate and the later gel color coat. Gelish and OPI application instructions specify a thin, even base coat followed by curing with the compatible UV LED nail lamp before color is applied. This first layer prepares the nail plate for the gel color layers without guaranteeing complete prevention of lifting.
- Apply a thin layer. Brush the base coat evenly across the nail plate and avoid visible pooling. The layer is ready when the surface has consistent coverage without raised areas.
- Cap the free edge. Sweep a small amount of base coat across the free edge to continue the bonding layer over the nail tip. The edge should appear coated without a bead of excess product.
- Maintain skin avoidance. Keep the base coat inside the cuticle edge and sidewalls because cured product on the surrounding skin can disrupt the clean border and contribute to lifting. The nail is ready when the base coat remains entirely on the nail plate.
- Cure before gel color. Cure the base coat with the compatible UV LED nail lamp for the duration stated in the kit instructions before applying gel color. Continue only after the specified cure cycle is complete; use a separate base coat unless the kit instructions identify an all-in-one formula.
This chart shows the purpose of the base coat and the key steps for applying it correctly to ensure proper adhesion and avoid lifting.
Thin Gel Color Coats
Apply each gel color coat as a thin, even layer with controlled brush strokes so the color builds without excess bulk. Gelish, OPI, and The GelBottle application instructions recommend curing each thin layer before applying another because thicker gel layers are more likely to wrinkle, cure unevenly, or remain under-cured. Thin coats therefore cure more reliably than thick coats.
Thin coats therefore cure more reliably than thick coats.
A first gel color coat may look sheer even when the application is correct. Add a second coat only when the cured first layer lacks the required opacity for that gel formula and shade.
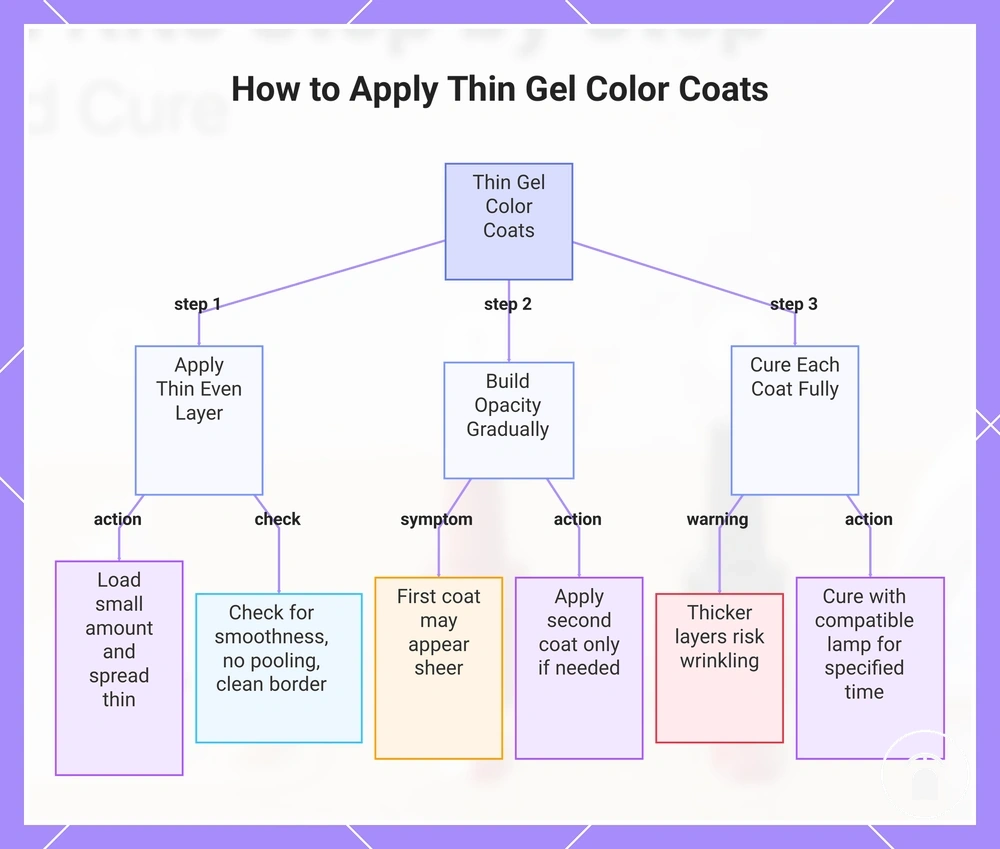
- Control the amount. Load a small amount of gel color onto the brush and spread it into a thin layer across the nail plate. The coat is ready to cure when it appears smooth and has no visible pooling.
- Use steady brush control. Guide the brush from near the cuticle toward the free edge using even strokes. The coverage should look consistent without ridges or heavy patches.
- Keep a clean skin edge. Stop the gel color coat before the cuticle line and sidewalls. The nail is ready when a narrow, clean border remains around the polish layer.
- Build opacity gradually. Cure the first coat, inspect the finish, and apply a second thin coat only when more coverage is needed. The required opacity and coat count remain specific to the formula and shade.
- Cure before continuing. Cure each gel color coat with the compatible UV LED nail lamp for the time stated in the kit instructions. Apply another layer only after the previous coat has completed its specified cure cycle.
This chart outlines the key steps for applying thin gel color coats, including application technique, opacity management, and curing requirements.
Top Coat for Sealing
Top coat is the final gel layer that seals the cured color layer and creates the final finish in a standard gel manicure system. Gelish and OPI application instructions specify applying a thin layer with full coverage, sealing the free edge, and curing it with the compatible UV LED nail lamp before any formula-specific cleansing step. Effective sealing depends on complete coverage and the required cure rather than the top coat alone.
Top-coat application checklist:
- Cover the full color layer. Apply a thin top coat across the entire cured color surface so no exposed area remains. The layer is ready when coverage is even and no product has pooled.
- Seal the free edge. Sweep the top coat across the free edge to continue the seal over the nail tip and reduce the lifting risk at the edge. The tip should appear coated without a raised bead.
- Keep a clean skin border. Stop the top coat before the cuticle line and sidewalls. Remove any uncured product from the skin edge before curing so the final finish remains confined to the nail plate.
- Cure the final layer. Cure the top coat with the compatible UV LED nail lamp for the duration stated in the kit instructions. Continue only after the specified cure cycle is complete.
- Check the finish type. Leave a no-wipe top coat untouched after curing, but remove the tacky residue from a wipe-off formula with the cleanser specified by the manufacturer. The completed surface should match the formula's stated gloss and finish condition.
Cure Each Gel Layer With the Nail Lamp
Cure each gel layer with the compatible UV LED nail lamp after the base coat, after every color gel layer, and after the top coat. Use the timer setting specified for the matched gel formula and lamp type rather than applying one universal cure time. Each gel layer must complete its required cure before the next layer is applied.
Cure time changes with the gel formula, lamp type, and layer thickness.
Cure time changes with the gel formula, lamp type, and layer thickness. Gelish specifies 5 seconds for its Foundation base gel and 30 seconds for each thin color layer and top coat in the Gelish 18G LED Light, while OPI specifies 30 seconds for each thin base, color, and top-coat layer in the OPI Star Light Gel Lamp; these model-specific values must not be transferred to another system. Young Nails explains that excessive layer thickness can restrict light penetration and contribute to wrinkling or under-curing, so apply thin layers and use the timer stated in the kit instructions.
See the detailed curing requirements for formula-specific lamp compatibility and timing guidance.
Keep the hand flat inside the lamp and position the thumb so its entire nail surface receives direct lamp exposure; cure the thumb separately when its angle leaves an edge outside the illuminated area. A tacky surface is not by itself proof of under-curing because some formulas retain an inhibition layer after the correct cycle. See the detailed curing requirements for formula-specific lamp compatibility and timing guidance.
| Layer | What to check | Timing source | Risk if missed |
|---|---|---|---|
| Base coat | The layer is thin, the full nail is inside the UV LED nail lamp, and the selected cycle finishes before color gel is applied. | Use the base-coat time specified for the matched gel formula and lamp type. | An incomplete cure leaves an unstable bonding layer beneath the color gel. |
| Color gel | Each thin color layer is cured separately, with no pooling, wrinkling, or hidden thick areas. | Use the color-gel timer setting in the kit instructions for the compatible lamp. | Excess thickness or shortened exposure increases under-curing and uneven-finish risk. |
| Top coat | The full surface and free edge receive direct lamp exposure before any formula-specific cleaning step. | Use the top-coat cycle specified by the manufacturer for that formula and lamp. | An incomplete final cure can leave the surface soft or inconsistent with the stated finish. |
| Thumb placement | The thumb lies level and its centre, sidewalls, and free edge remain inside the illuminated area. | Use the same formula-specific cycle unless the kit instructions require separate thumb curing. | Partial lamp exposure can produce uneven curing across the thumbnail. |
Base, Color, and Top Coat Cure Times
Base, color, and top coat cure times differ by gel layer, gel polish formula, compatible lamp type, and the manufacturer's lamp instructions, so there is no single timer that applies to every system. According to Gelish, Foundation Base Gel cures for 5 seconds in the Gelish 18G LED Light, while thin Color Gel and Top It Off cure for 30 seconds in the same lamp; these values are model-specific and must not be applied to other brands or lamps. Use the table below to compare layer-specific timing variables, then confirm the required timer in your own kit instructions. :contentReference[oaicite:0]{index=0}
| Gel layer | Timing depends on | Check before next step | Avoid |
|---|---|---|---|
| Base coat | Compatible lamp type, base-coat formula, selected timer, and a thin application layer. | Complete the cure cycle specified for the base coat before applying the first color coat. | Using the color-coat timer or applying the base coat too thickly. |
| Color coat | Gel polish formula, pigment concentration, layer opacity, compatible lamp, and timer. | Cure each thin color coat separately and confirm the surface is smooth before adding another coat. | Replacing two thin coats with one thick coat or shortening the cure cycle. |
| Top coat | Top-coat formula, compatible lamp, timer setting, and whether the finish is no-wipe or wipe-off. | Finish the complete cure cycle before handling the nails or removing residue from a wipe-off formula. | Assuming every top coat follows the same finishing procedure. |
| Sticky inhibition layer | Finish type specified by the gel polish formula rather than cure time alone. | Clean the sticky inhibition layer only when the manufacturer specifies a wipe-off top coat; leave a no-wipe finish untouched after curing. | Treating every tacky layer as evidence of incomplete curing or cleaning a no-wipe finish unnecessarily. |
Sticky Gel Layers After Curing
A sticky layer on cured gel can be normal when the gel polish formula leaves an inhibition layer after lamp exposure. The residue is expected only when the layer type or kit instructions identify a wipe-off finish; a no-wipe top coat should instead match the dry final finish specified by its manufacturer. This distinction separates expected tackiness from a possible curing problem. :contentReference[oaicite:0]{index=0}
This distinction separates expected tackiness from a possible curing problem.
Check the finish instructions before using cleanser pads or repeating the cure cycle. Incomplete lamp exposure, excessive layer thickness, or an incorrect timer setting can produce softness, wrinkling, movement, or uneven residue that is more consistent with under-curing than a uniform inhibition layer. Use the following checks to compare the cured gel condition with the kit instructions.
Check the finish instructions before using cleanser pads or repeating the cure cycle.
Sticky Gel Layers After Curing checklist:
- Check the gel layer. A base coat or color gel may retain an inhibition layer when the system is designed for the next gel layer to bond over it. Treat the sticky layer as expected only when the gel polish formula identifies that condition.
- Check the finish type. A wipe-off top coat may leave residue for removal with cleanser pads after the final cure, while a no-wipe top coat should not require that cleaning step. Follow the finish condition stated in the kit instructions.
- Check lamp exposure. Confirm that the complete nail surface, side edges, and thumb remained inside the compatible lamp for the full timer cycle. Partial exposure increases the likelihood of under-curing in the area that received less light.
- Check layer thickness. A pooled or visibly thick gel layer is more likely to cure unevenly than a thin layer because the light must pass through more product. Wrinkling, movement, or softness beneath the surface indicates a different condition from a uniform tacky residue.
- Check the cleanser instruction. Use cleanser pads only when the final cured gel is specified as a wipe-off layer. If the surface remains soft, wrinkled, or mobile after the instructed cure and cleaning step, stop adding gel layers and recheck the lamp, timer, formula compatibility, and layer thickness.
Finish the Gel Manicure After Curing
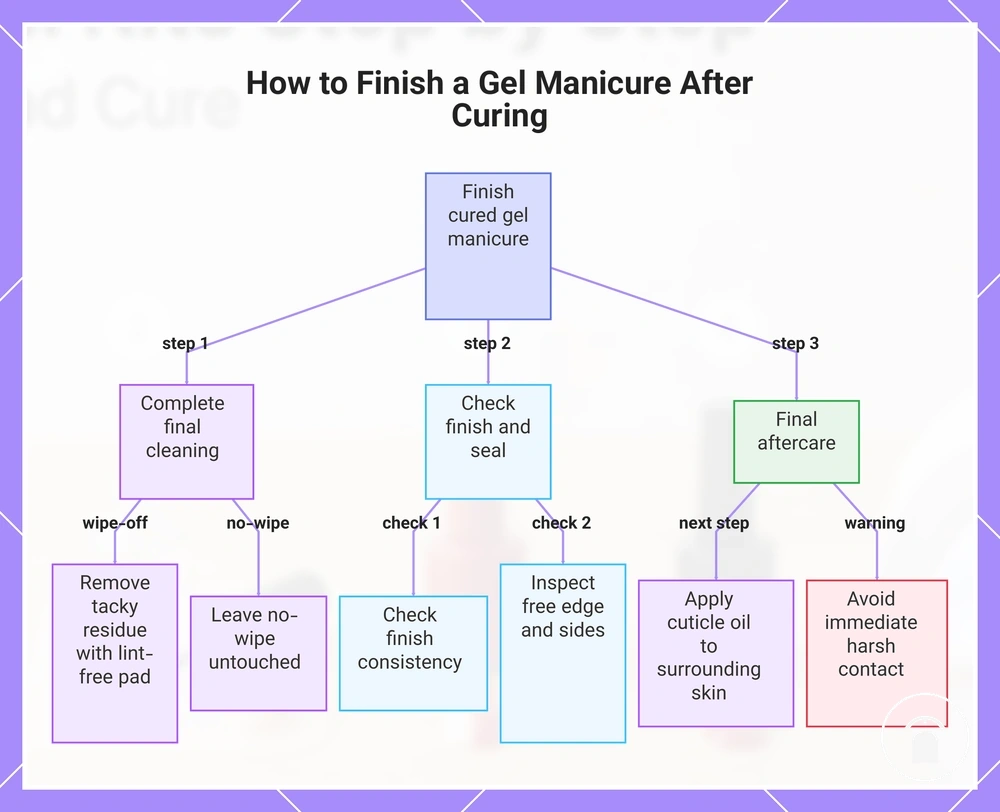
Finish the gel manicure after the final cure by completing the formula-required cleaning, checking the sealed edges, and applying cuticle oil to the surrounding skin. Use cleanser only when the top coat leaves tacky residue and the kit instructions identify a wipe-off finish. The correct finishing action depends on the top-coat type and kit instructions. :contentReference[oaicite:0]{index=0}
The correct finishing action depends on the top-coat type and kit instructions.
If the manicure uses a no-wipe top coat, leave the cured surface untouched after the specified lamp cycle. If the formula requires cleanser, remove the residue before applying cuticle oil, then limit immediate harsh contact that could mark the surface or stress the free edge; broader aftercare and wear guidance remain outside this finishing sequence.
If the manicure uses a no-wipe top coat, leave the cured surface untouched after the specified lamp cycle.
Finish the Gel Manicure After Curing with these final checks:
- Complete the final cleaning. When the kit instructions specify a wipe-off top coat, use cleanser and a lint-free pad to remove the tacky residue after the final cure. The finished surface should match the smooth or glossy condition stated for that formula.
- Leave a no-wipe top coat untouched. When the formula is identified as no-wipe, do not apply cleanser because no residue-removal step is required. Check that the cured finish feels consistent across the full nail.
- Perform a final edge check. Inspect the free edge and side boundaries for exposed color, raised gel, or visible residue. The top-coat seal should remain continuous and confined to the nail plate.
- Apply cuticle oil after curing. Apply cuticle oil to the surrounding skin only after the final cleaning step is complete. Keep the oil off any area that still requires inspection or correction.
- Avoid immediate harsh contact. Keep the finished gel nails away from abrasive cleaning, strong household chemicals, and forceful edge pressure immediately after finishing because these conditions can mark the surface or stress the free-edge seal.
For guidance beyond final cleaning and the edge check, see longer-lasting results.
For guidance beyond final cleaning and the edge check, see longer-lasting results .
This chart shows the final cleaning, edge checks, and after-care steps for a cured gel manicure.
Gel Nail Application Mistakes to Avoid
Gel Nail Application Mistakes to Avoid by keeping the nail plate clean, applying thin gel layers, sealing the free edge, and curing each layer with the compatible lamp according to the kit instructions. The most common application mistakes are flooding, thick coats, skipped prep, weak edge sealing, under-curing, and contamination because these conditions are associated with visible signs such as lifting, peeling, wrinkling, uneven coverage, or trapped debris. Most application mistakes are easier to prevent and correct before curing than after the manicure is complete. :contentReference[oaicite:0]{index=0}
Most application mistakes are easier to prevent and correct before curing than after the manicure is complete.
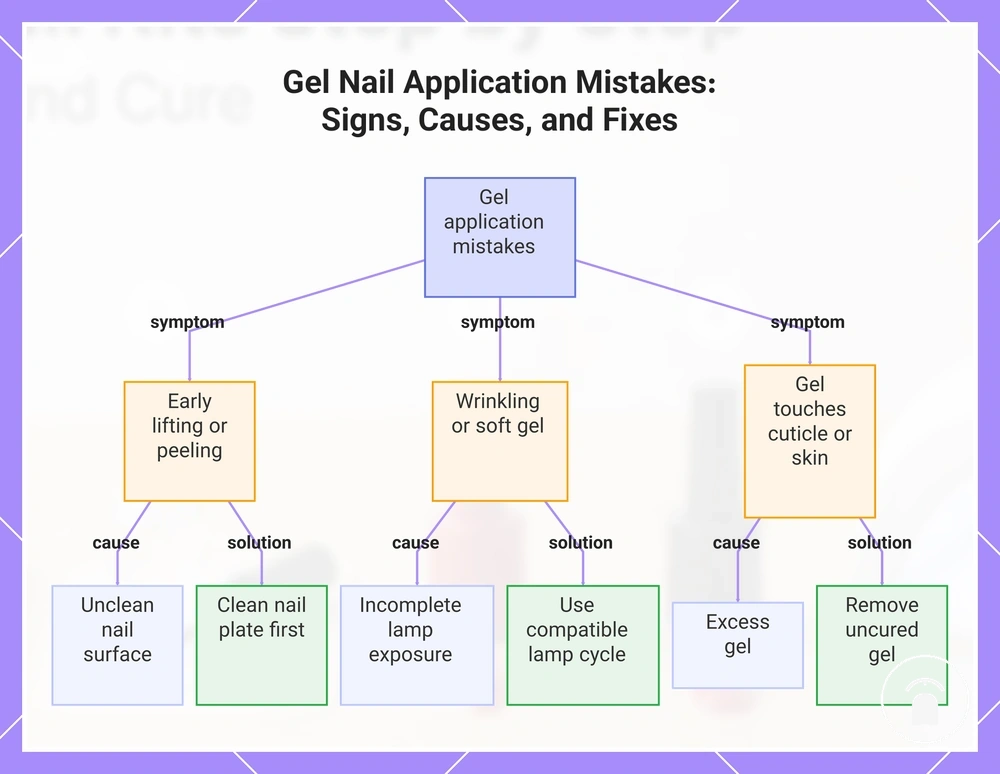
If gel floods the cuticle edge or sidewalls before curing, remove the uncured product immediately and continue only after the nail surface is clean. By contrast, if lifting, peeling, or cure problems remain after the completed manicure, more than one cause may be involved, so further diagnosis belongs in troubleshooting rather than application. The checklist below connects each application mistake with its visible sign, likely cause, and immediate correction decision. :contentReference[oaicite:1]{index=1}
The checklist below connects each application mistake with its visible sign, likely cause, and immediate correction decision.
Gel Nail Application Mistakes to Avoid diagnostic checklist:
- Flooding: Visible sign: Gel touches the cuticle edge or surrounding skin. Likely cause: Excess gel or poor brush control. Immediate prevention: Remove uncured gel before curing so the polish remains only on the nail plate.
- Thick coats: Visible sign: Wrinkling, uneven coverage, or soft gel after curing. Likely cause: Applying one heavy layer instead of multiple thin coats. Immediate prevention: Apply thin layers and cure each layer separately before adding the next.
- Skipped prep: Visible sign: Early lifting or peeling from the nail surface. Likely cause: Oil, dust, moisture, or residue remaining before the base coat. Immediate prevention: Clean and prepare the nail plate completely before gel application.
- Weak edge sealing: Visible sign: Chipping or lifting beginning at the free edge. Likely cause: The gel layers do not fully cover the nail tip. Immediate prevention: Seal the free edge with each gel layer while avoiding excess product.
- Under-curing: Visible sign: Soft, wrinkled, or unevenly cured gel. Likely cause: Thick coats, incomplete lamp exposure, or an incorrect curing cycle. Immediate prevention: Use the compatible lamp and complete the manufacturer's specified curing cycle for every thin layer.
- Contamination: Visible sign: Lint, dust, or particles trapped beneath the gel. Likely cause: Touching the prepared nail or applying gel to an unclean surface. Immediate prevention: Remove contamination with cleanser before applying the next layer.
If the mistake is visible before curing, stop and perform the correction immediately because uncured gel is easier to adjust than cured gel. If the manicure still shows lifting, peeling, or curing defects after application, see fix application problems for a deeper diagnosis. :contentReference[oaicite:2]{index=2}
This chart connects three common gel nail application warning signs to their likely cause and the immediate correction before curing.
This chart connects three common gel nail application warning signs to their likely cause and the immediate correction before curing.
Thick Layers and Uneven Coverage
Thick layers and uneven coverage make gel polish harder to cure evenly because greater product depth reduces consistent lamp exposure through the full layer. The visible result can include wrinkling, patchy color opacity, heat spikes, or under-cured centers, depending on the gel formula, lamp exposure, product amount, and brush pressure. Thin coats provide better control over curing and surface finish than one heavy layer. :contentReference[oaicite:0]{index=0}
- Excess product amount: A bulky coat can wrinkle on the surface while remaining soft underneath. Remove excess uncured gel and replace the heavy layer with thin coats before continuing.
- Uneven brush pressure: Pressing harder in one area can create ridges, streaks, or uneven coverage. Use steady brush pressure so the gel remains level and color opacity develops consistently.
- Under-cured centers: A thick layer can appear set at the surface while the center remains soft or mobile. Stop adding gel when movement, softness, or wrinkling remains after the specified cure cycle, then correct the layer thickness before continuing.
- Heat spikes: A heavy gel layer can produce sudden warmth or discomfort during curing because more product is polymerising at once. Stop the lamp exposure if discomfort occurs, check the product amount, and continue only after correcting the thick layer.
- Patchy color opacity: Uneven product distribution can leave translucent areas beside darker patches. Apply controlled thin coats rather than loading extra gel onto the lighter area, because local buildup increases uneven curing and surface distortion.
Skipped Prep and Poor Edge Sealing
Skipped prep and poor edge sealing increase the risk of lifting, peeling, and early wear because oil, dust, moisture, cuticle contact, and an unsealed free edge reduce adhesion between the gel system and the nail plate. Professional application guidance from Gelish and OPI specifies applying gel to a clean, dry nail surface and sealing the free edge with every layer because contamination and weak edge sealing are recognised contributors to premature lifting. These conditions increase early lifting risk, although peeling can have more than one cause. :contentReference[oaicite:0]{index=0}
Cause-and-prevention checklist:
- Skipped prep: Visible result: Lifting begins across the nail surface. Risk factor: Oil, dust, or leftover residue reduces base-coat adhesion. Prevention: Clean the nail plate thoroughly and apply gel only after the surface is dry and free of contamination.
- Moisture before the base coat: Visible result: Peeling develops after curing. Risk factor: Moisture remaining on the nail plate interferes with the bonding layer. Prevention: Allow cleanser to evaporate completely and confirm a dry surface before applying the base coat.
- Cuticle contact: Visible result: Lifting starts around the cuticle edge or sidewalls. Risk factor: Gel floods onto surrounding skin instead of remaining on the nail plate. Prevention: Remove uncured gel before curing and maintain a narrow, clean border around the cuticle.
- Poor edge sealing: Visible result: Peeling begins at the free edge because daily nail tip wear exposes the gel edge. Example: If the free edge is left unsealed during the base coat, colour coat, and top coat, the exposed nail tip is more likely to show early edge wear than a fully sealed tip. Prevention: Seal the free edge with every gel layer while keeping the application thin and even.
- Persistent lifting: Visible result: Lifting continues despite correct preparation and edge sealing. Risk factor: Application mistakes are only one possible cause. Prevention: Treat persistent lifting as a broader troubleshooting issue rather than assuming skipped prep or poor edge sealing is the sole cause.