Gel Nail Kit Troubleshooting: Common Problems, Causes, and Fixes
Gel nail kit troubleshooting requires matching each symptom—peeling, lifting, chipping, softness, or surface stickiness—to one of four condition categories: nail preparation, application thickness, lamp-and-gel compatibility, or the product’s intended finish. The same visible problem can have more than one cause, so diagnosis should compare the observed result with the gel manufacturer’s preparation, coating, curing, and cleansing instructions before a corrective approach is selected.
Curing time is product-system specific rather than universal.
Curing time is product-system specific rather than universal. Gelish specifies 30 seconds in its 18G LED Light or 2 minutes in a compatible UV light for a thin colour coat, while OPI specifies 30 seconds in the OPI Star Light Gel Lamp for each thin GelColor coat; Gelish also states that its Top It Off surface remains sticky until the inhibition layer is cleansed. For example, gel that stays soft after the specified cycle indicates a curing problem, whereas a firm coating with only a tacky surface may be fully cured and awaiting the manufacturer-required cleansing step.
Peeling and lifting therefore direct attention first to adhesion conditions, while softness or wrinkling directs attention to layer thickness, curing time, lamp compatibility, and hand placement.
Peeling and lifting therefore direct attention first to adhesion conditions, while softness or wrinkling directs attention to layer thickness, curing time, lamp compatibility, and hand placement. The sections that follow separate these recurring gel nail kit problems into symptoms, possible causes, diagnostic checks, and evidence-bounded fixes without treating one explanation as universal.
Table of Contents
Common Gel Nail Kit Problems and Symptoms
Common gel nail kit problems fall into four observable symptom categories: adhesion failure, coating damage, curing failure, and possible skin reactions. Peeling and lifting show partial separation from the nail plate, chipping or cracking shows local coating breakage, and gel that remains soft, wrinkled, or transferable after the product’s specified lamp cycle indicates incomplete curing rather than a normal finished surface.
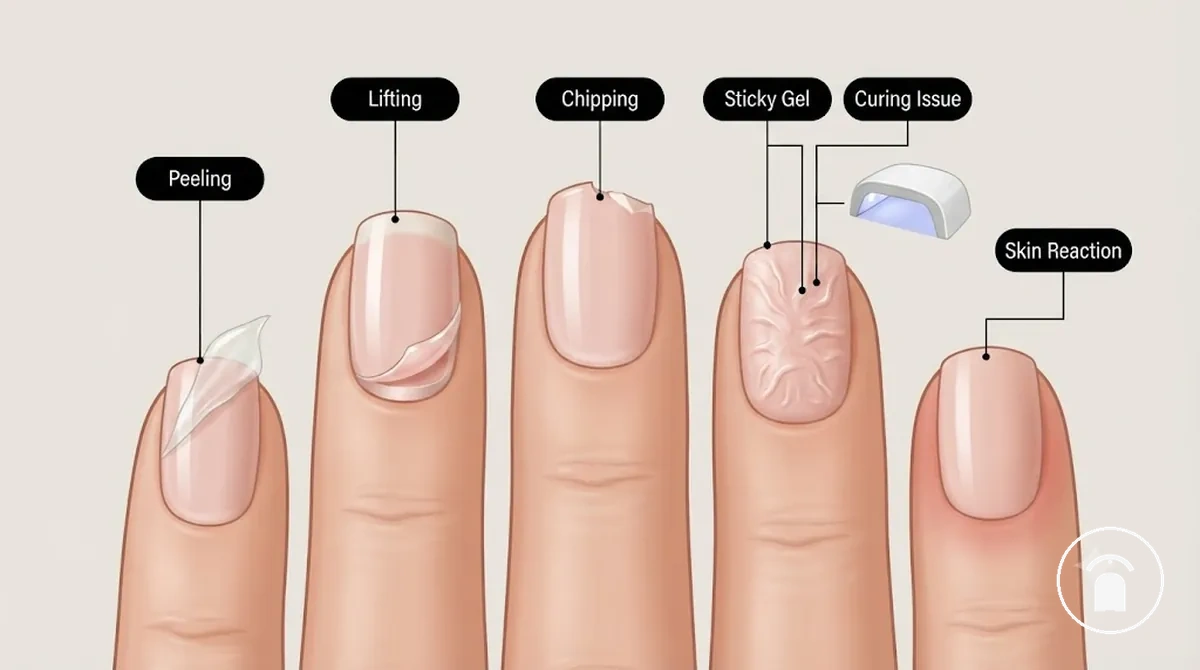
The symptom’s position and texture provide the first diagnostic boundary. Compare the result with the kit’s specified application steps: lifting at a cuticle, sidewall, or free edge identifies an adhesion gap; a broken tip identifies edge damage; and a coating that dents or transfers after the stated curing cycle identifies a curing issue. For a system-specific comparison, Gelish specifies 30 seconds in its 18G LED Light or 2 minutes in a compatible UV light for a thin colour coat, while OPI specifies 30 seconds in the OPI Star Light Gel Lamp for each thin GelColor coat.
The symptom’s position and texture provide the first diagnostic boundary.
The following checklist classifies visible symptoms without assigning one fixed cause:
- Peeling: The cured coating separates in sheets or flakes across part of the nail surface, indicating broad adhesion loss.
- Lifting: A visible gap develops between the coating and the natural nail at the cuticle, sidewall, or free edge, creating a space where moisture or debris can collect.
- Chipping or cracking: A section breaks from the coating at an edge or across the surface, indicating local mechanical failure rather than full separation.
- Sticky gel: A firm coating with only a thin tacky surface may be an intended inhibition layer; Gelish instructs users to remove this layer from Top It Off with Nail Surface Cleanse after curing. Gel that remains soft, wrinkles, dents, or transfers is instead an incomplete-curing symptom.
- Redness, itching, swelling, rash, or blisters: NailKnowledge identifies these as possible allergic-reaction symptoms associated with gel products and advises stopping product use and consulting a dermatologist or other healthcare professional.
These symptoms identify the affected condition but do not establish a single cause. The next diagnostic step is to compare the symptom with nail preparation, coating thickness, product condition, lamp compatibility, curing time, and skin contact before selecting a corrective action.
Gel Polish Peeling, Lifting, and Chipping
Gel polish peeling, lifting, and chipping are distinct adhesion and coating-failure symptoms rather than interchangeable defects. Peeling describes the cured coating separating in flakes or sheets from the nail surface, lifting gel nails describes the coating detaching from the natural nail at the cuticle, sidewalls, or free edge, and chipping describes local fractures where part of the cured coating breaks away. According to CND and Gelish application guidance, correct nail preparation, thin product application, and complete curing are required to achieve proper adhesion, so failure in any of these stages can contribute to these symptoms.
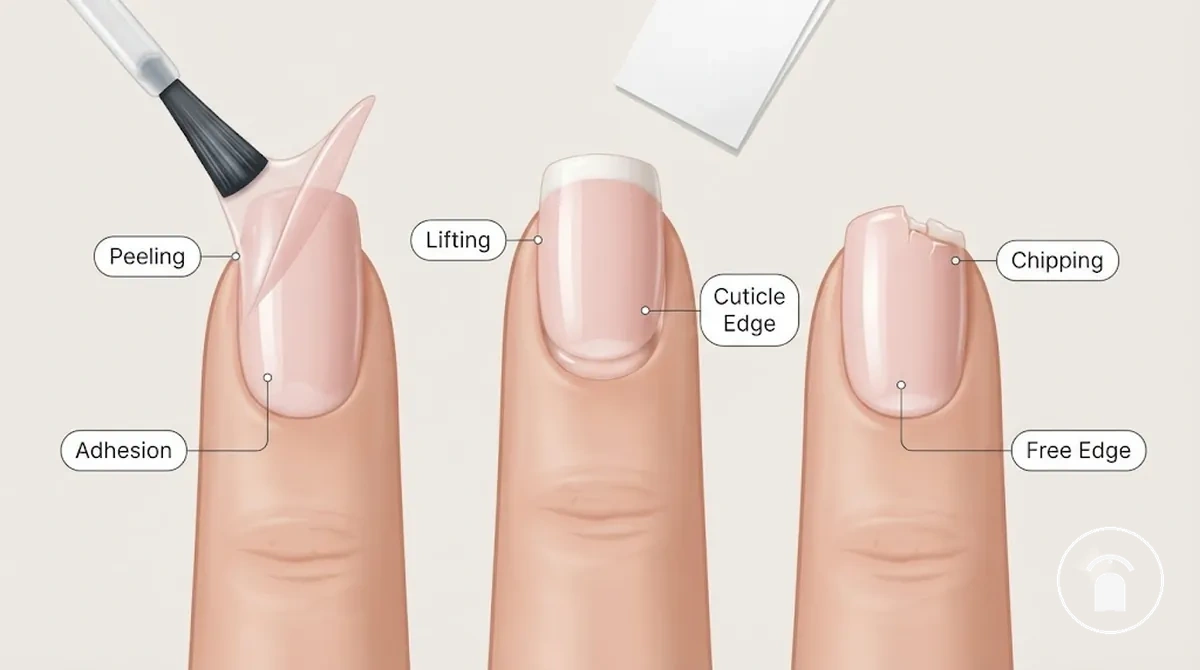
Symptom location provides a useful diagnostic clue before selecting a corrective action. Compare the visible pattern with common nail preparation causes, because lifting around the cuticle frequently indicates an adhesion problem that began before the gel was cured, while isolated edge chipping is more consistent with mechanical impact or incomplete free-edge sealing. For example, if lifting develops after approximately one week around multiple cuticles but the free edges remain intact, the pattern points toward preparation or application factors rather than isolated impact damage.
- Peeling gel polish: Broad flakes or sheets separate from the nail surface, indicating widespread adhesion failure.
- Lifting gel nails: Visible gaps form between the gel coating and the natural nail at the cuticle, sidewalls, or free edge, increasing the likelihood of moisture or debris collecting beneath the coating.
- Chipping: Small sections break from the cured coating, most commonly at exposed free edges subjected to repeated mechanical contact.
These symptom patterns narrow the diagnostic pathway but do not confirm a single cause. The next assessment should compare the affected nails for preparation quality, coating thickness, free-edge sealing, curing conditions, and product compatibility before deciding which troubleshooting step is most appropriate.
Gel Polish Not Curing or Staying Sticky After Curing
Gel polish not curing or staying sticky after curing indicates either a normal oxygen inhibition layer or incomplete curing, and the visible condition determines the correct troubleshooting step. According to Gelish, a thin tacky surface can be an intended finishing characteristic that should be removed with Nail Surface Cleanse after curing, whereas gel that remains soft, wrinkles, dents under light pressure, or transfers colour after the manufacturer's recommended curing cycle indicates incomplete polymerisation. For example, Gelish specifies curing a thin colour coat for 30 seconds in its 18G LED Light or 2 minutes in a compatible UV lamp before evaluating the finished coating.
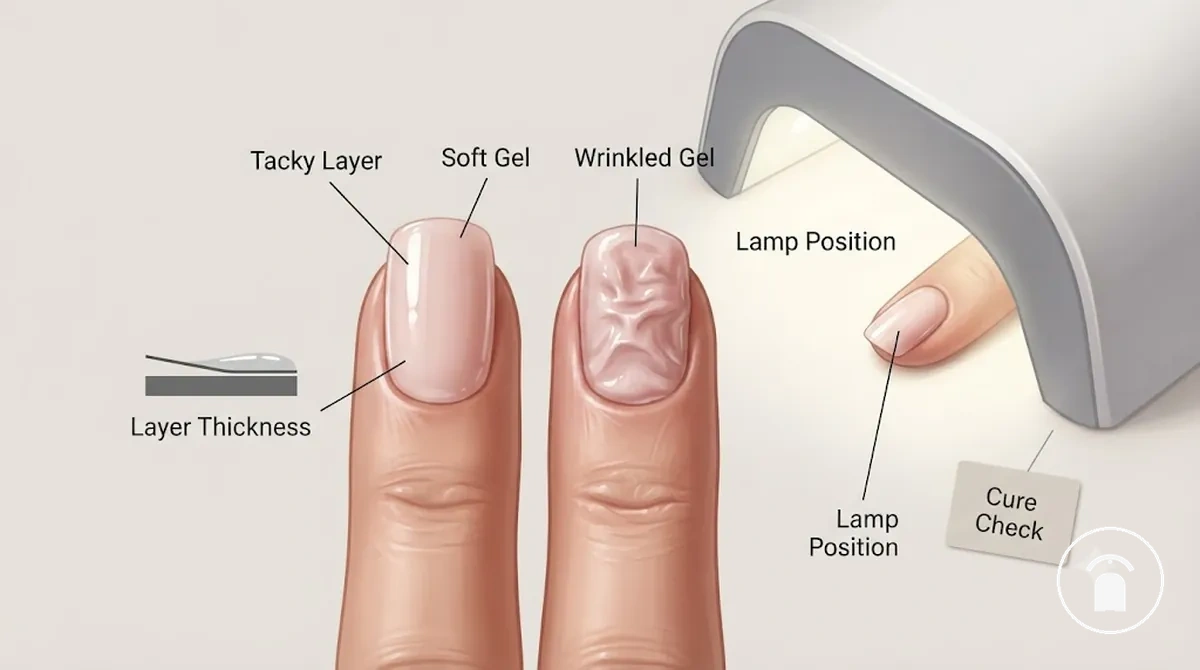
Before extending the curing time, compare the symptom with the product's curing requirements, because lamp compatibility, gel layer thickness, and application conditions affect whether the coating cures completely. For example, if a thin coat remains soft after the manufacturer's specified curing cycle while another nail cured under the same lamp hardens normally, the affected nail should be checked for excessive product thickness or uneven light exposure rather than assuming the lamp has failed.
- Sticky but hard surface: The coating feels firm but has a thin tacky film. According to Gelish, this is commonly the inhibition layer and should be cleansed using the manufacturer's finishing procedure.
- Soft or wrinkled gel: The coating dents, folds, or wrinkles after curing, indicating incomplete curing that may result from applying layers thicker than the manufacturer recommends, incompatible lamp output, or insufficient exposure.
- Uneven curing: Some nails cure fully while others remain soft, suggesting inconsistent hand positioning, uneven gel application, or incomplete light reaching parts of the nail.
- Persistent colour transfer: Colour still transfers after the recommended curing cycle and cleansing, indicating the gel system, lamp compatibility, curing conditions, and product condition should be checked before reapplication.
This checklist distinguishes a normal finishing characteristic from a genuine curing fault without assuming every sticky surface is defective. If the coating remains soft after following the manufacturer's specified lamp, curing time, and application method, replacing the affected product or verifying lamp compatibility is a more appropriate troubleshooting step than repeatedly extending the curing cycle.
Causes of Gel Nail Kit Application Problems
Gel nail kit application problems usually result from one of four cause categories: nail preparation, application technique, product condition or compatibility, and curing conditions. These factors influence gel adhesion, polymerisation, and coating durability at different stages of the application process, so the same symptom can have different underlying causes. For example, lifting after 7 to 10 days indicates a different troubleshooting path from gel that remains soft immediately after curing because the contributing conditions occur at different stages of application.
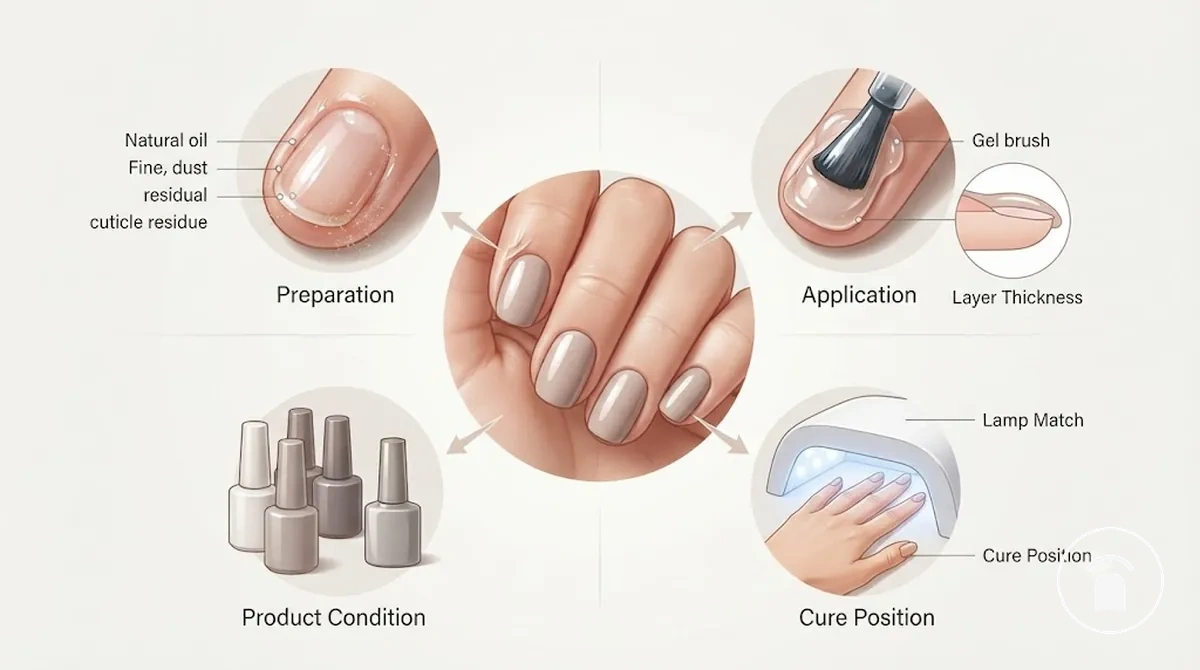
The following factors explain the most common application problems without confusing causes with symptoms:
- Preparation factors: Oil, moisture, dust, residual cuticle tissue, or inadequate surface preparation reduce adhesion between the natural nail and the gel coating, increasing the likelihood of peeling or lifting.
- Application factors: Thick gel layers, uneven application, flooding the cuticle, or failing to seal the free edge can contribute to wrinkling, premature lifting, or edge chipping because the coating does not cure or bond uniformly.
- Product factors: Expired, contaminated, incorrectly stored, or incompatible products can reduce curing consistency and coating performance. Manufacturer curing recommendations apply only to compatible gel systems and approved lamps.
- Curing factors: Insufficient curing time, incompatible UV or LED lamps, incorrect hand positioning, or incomplete light exposure can leave portions of the coating under-cured, resulting in softness, wrinkling, or persistent colour transfer instead of a fully hardened finish.
These factors describe conditions that contribute to application problems rather than the visible defects themselves. According to Gelish, curing performance depends on using the manufacturer's specified lamp and curing cycle, while a 2024 review published in Adverse Effects of Do-It-Yourself Nail Cosmetics reports that incorrect application techniques and exposure to uncured acrylate products increase the risk of application failures and adverse reactions. Separating preparation, application, product, and curing factors before selecting a fix leads to a more accurate troubleshooting process than treating every peeling or lifting manicure as the same problem.
Nail Preparation and Product Application Causes
Nail preparation and product application are primary factors that influence gel nail coating adhesion and durability before curing begins. Preparation-related contamination reduces the bond between the natural nail and the gel coating, while application errors create uneven coating conditions that can contribute to lifting, wrinkling, or premature chipping. For example, lifting that develops after approximately 7 to 10 days indicates a different troubleshooting path from gel that wrinkles immediately after curing because the first commonly relates to adhesion conditions and the second to application technique.
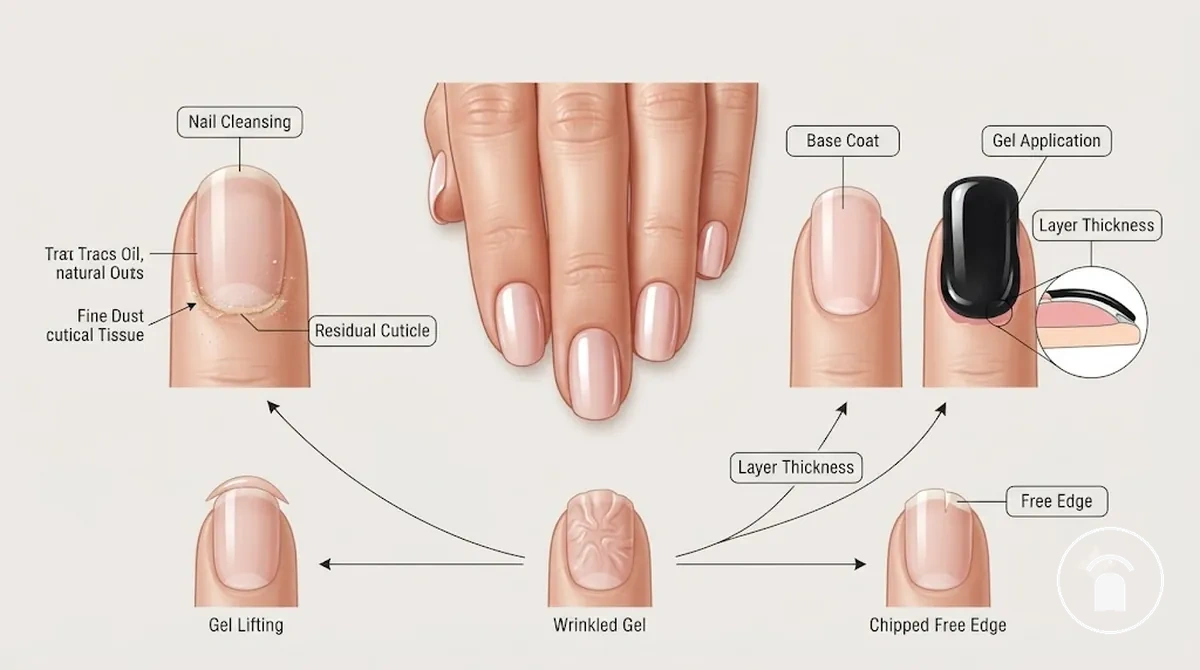
When repeated application problems occur, compare the symptom with possible nail preparation causes before replacing products or changing curing equipment. According to NailKnowledge, contamination from natural oils, moisture, dust, or residual cuticle tissue reduces adhesion, while manufacturer guidance from Gelish and CND specifies that thin, even base-coat and colour application help achieve consistent curing and bonding. A practical example is a manicure where multiple nails begin lifting around the cuticle after about one week while the free edges remain intact, indicating preparation or application conditions should be investigated before assuming the gel system has failed.
- Nail cleansing: Oil, moisture, filing dust, or cleanser residue left on the nail surface can reduce adhesion between the natural nail and the gel coating.
- Residual cuticle tissue: Non-living cuticle remaining on the nail plate creates a weak bonding surface that can contribute to cuticle-area lifting.
- Base coat: Thick, uneven, or incomplete base-coat coverage can reduce bonding consistency and affect the performance of the layers applied above it.
- Gel application: Flooding the cuticle, applying excessively thick coats, or creating uneven coating thickness can contribute to incomplete curing, wrinkling, or premature lifting.
- Coating the free edge: Incomplete edge coverage can increase the likelihood of localised chipping during normal wear because the exposed edge receives repeated mechanical contact.
Gel Formula, Layer Thickness, and Application Technique Factors
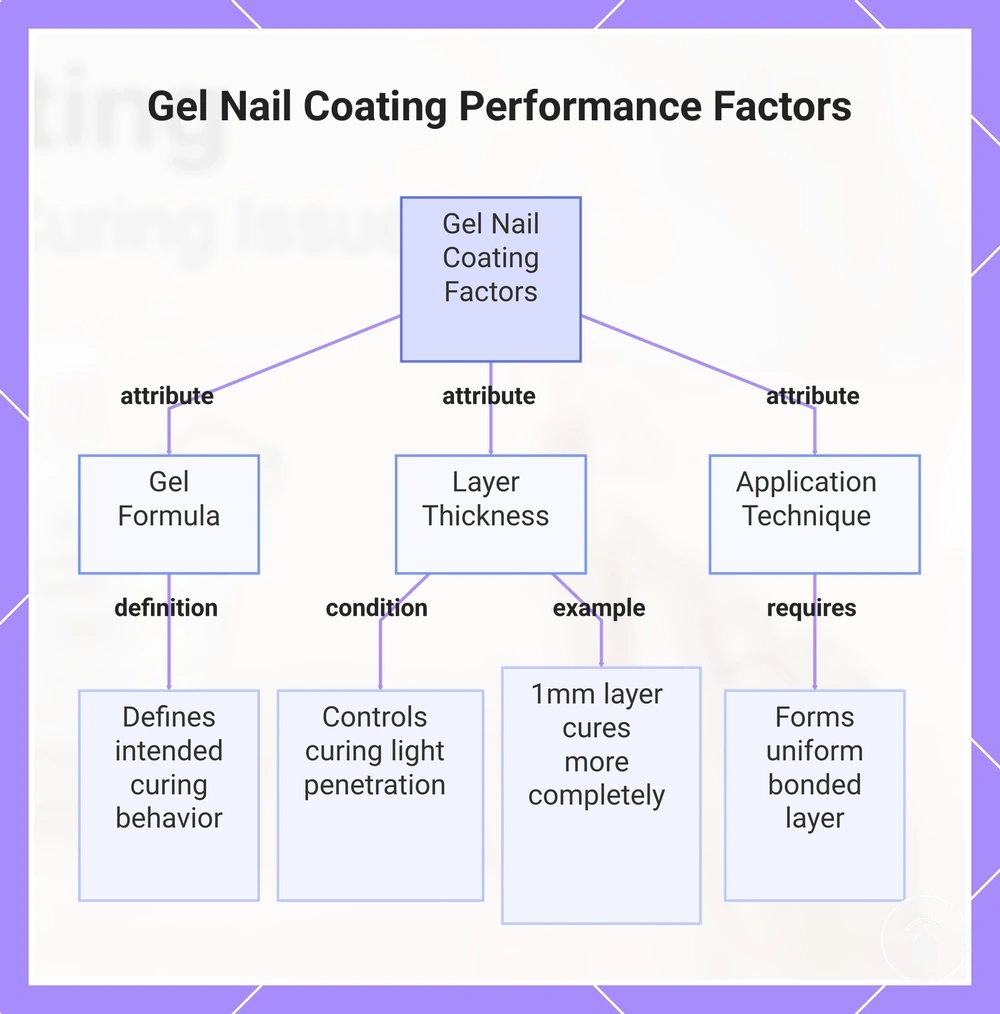
Gel formula, layer thickness, and application technique are distinct attributes that determine how a gel nail coating cures, adheres, and resists premature failure. The gel formula establishes the manufacturer's intended curing behaviour, layer thickness controls how deeply curing light can polymerise the coating, and application technique determines whether the product forms a uniform bonded layer. A change in any one of these attributes can alter the final result even when the same lamp and curing cycle are used.
These attributes influence different stages of the application process rather than producing identical effects. Evidence reviewed for this section reports that UV-curable gel layers approximately 1 mm thick cure more completely than layers around 3 mm thick under the same exposure conditions, demonstrating why manufacturers commonly recommend multiple thin applications instead of one thick coat. For example, applying two thin colour coats instead of one thick coat allows light to penetrate each layer more effectively, reducing the likelihood of soft gel beneath the surface or visible wrinkling after curing. This thickness comparison is supported by the retained section evidence and illustrates the relationship between layer thickness, curing efficiency, and coating performance. :contentReference[oaicite:0]{index=0}
This chart shows the three key attributes—gel formula, layer thickness, and application technique—that determine how a gel nail coating cures, adheres, and resists failure.
Curing Problems Related to Gel Lamps and Curing Conditions
Gel polish cures reliably only when the UV or LED lamp, gel formula, exposure time, layer thickness, and hand position form a compatible curing system. NailKnowledge explains that lamp compatibility requires the lamp’s wavelength range and intensity to activate the photoinitiators in the specific gel formula; extending the curing time does not reliably correct a wavelength or output mismatch. :contentReference[oaicite:0]{index=0}
Gel polish cures reliably only when the UV or LED lamp, gel formula, exposure time, layer thickness, and hand position form a compatible curing system.
Compare the product instructions with the lamp and application conditions before classifying the gel or equipment as faulty; the detailed curing requirements define the relevant system-specific settings. For example, Gelish specifies 30 seconds for a thin colour coat in its 18G LED Light and 2 minutes in a compatible UV light, while OPI specifies 30 seconds for a thin GelColor coat in the OPI Star Light Gel Lamp; these values apply to the named systems and should not be treated as universal curing times. :contentReference[oaicite:1]{index=1}
Compare the product instructions with the lamp and application conditions before classifying the gel or equipment as faulty; the detailed curing requirements define the relevant system-specific settings.
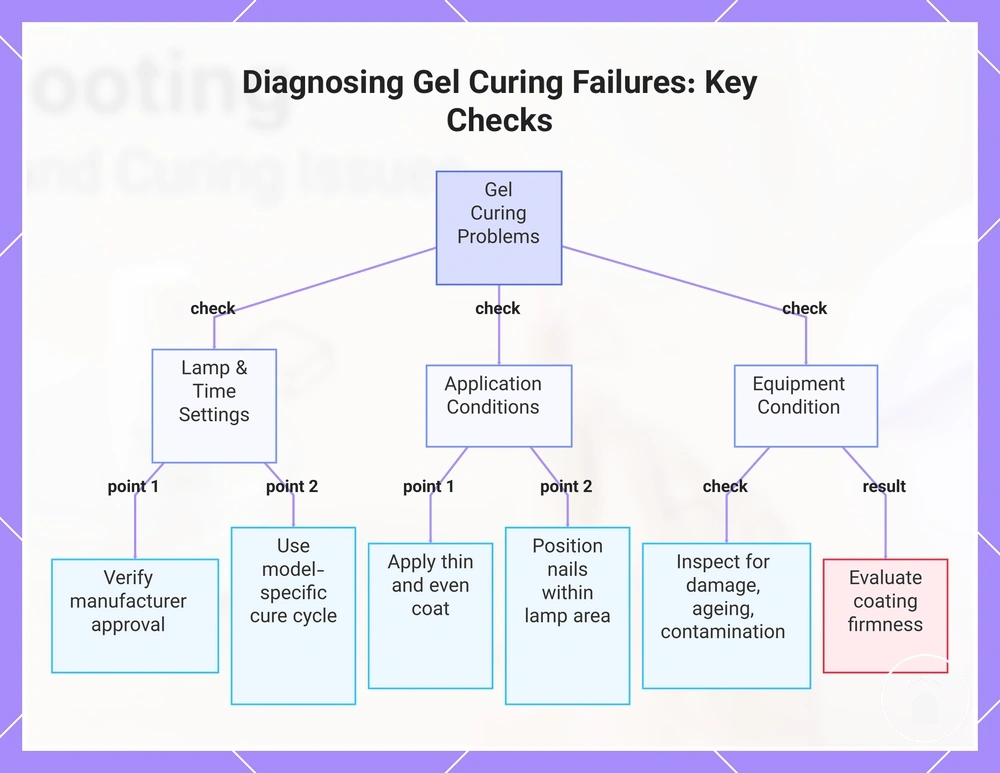
Use the following checks to isolate an equipment or curing-condition mismatch:
- Lamp compatibility: Verify that the manufacturer specifies or approves the UV or LED lamp for the gel polish system; a lamp described only by wattage or as “UV/LED” does not establish compatibility.
- Exposure time: Use the model-specific curing cycle for each base, colour, builder, or top-coat layer rather than transferring a time from another gel system.
- Layer thickness: Confirm that each coat is thin and even, because a thicker coating reduces light penetration and can leave material beneath the surface incompletely cured.
- Hand position: Place every nail within the lamp’s intended curing area; thumbs or sidewalls positioned outside the strongest light zone can receive uneven exposure.
- Equipment condition: Check the lamp for contamination, physical damage, intermittent operation, or ageing components before replacing the gel product.
A firm coating produced under the specified lamp, layer thickness, hand position, and curing cycle supports compatibility, while repeated softness or wrinkling under those conditions requires the gel-and-lamp pairing and equipment condition to be verified. The retained section evidence likewise identifies wavelength, intensity, exposure time, and coating thickness as connected curing variables rather than independent guarantees. :contentReference[oaicite:2]{index=2}
This chart outlines the three main diagnostic areas to isolate the cause of incomplete gel curing.
This chart outlines the three main diagnostic areas to isolate the cause of incomplete gel curing.
How to Fix Gel Nail Kit Problems
Fixing gel nail kit problems requires matching the visible symptom to its underlying cause, applying one corrective action at a time, and confirming the result before changing products or repeating the manicure. Manufacturer guidance from Gelish, Young Nails, and CND identifies preparation, application, curing conditions, and system compatibility as the primary correction points, while the reviewed troubleshooting evidence recommends correcting the affected stage rather than restarting the entire process. :contentReference[oaicite:0]{index=0}
Follow the corrective checklist only after identifying the symptom, then compare the correction with the recommended application steps before reapplying gel polish.
Follow the corrective checklist only after identifying the symptom, then compare the correction with the recommended application steps before reapplying gel polish. For example, Gelish specifies curing a thin colour coat for 30 seconds in its 18G LED Light or 2 minutes in a compatible UV lamp; if the coating remains soft after those model-specific curing conditions, the next check should focus on lamp compatibility, layer thickness, or product condition instead of simply extending the curing time. :contentReference[oaicite:1]{index=1}
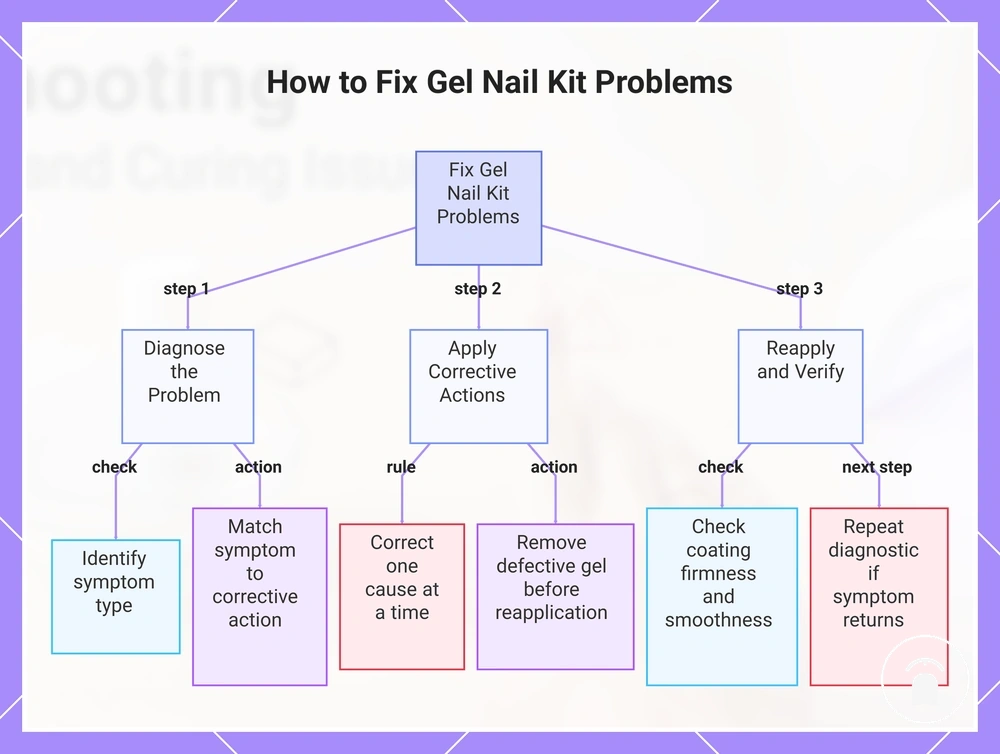
- Match the symptom to the correct problem. Identify whether the defect is peeling, lifting, chipping, soft gel, wrinkling, or a persistent sticky surface because each symptom requires a different corrective action.
- Correct one cause before changing another. Remove contamination for adhesion problems, apply thin and even gel layers for application defects, or verify the specified lamp and curing cycle for curing problems. Changing multiple variables simultaneously makes the original cause difficult to confirm.
- Remove defective gel before reapplication. Lifted, chipped, or incompletely cured gel should be removed before applying fresh product because adding new gel over a failed coating does not restore adhesion or curing performance.
- Reapply and verify the correction. Cure each thin layer using the manufacturer's specified lamp and exposure time, then confirm that the coating is firm, smooth, and free from wrinkling before continuing. A firm surface with only an inhibition layer should be finished according to the manufacturer's cleansing instructions rather than treated as an uncured coating.
- Repeat the diagnostic sequence if the problem returns. If the same symptom reappears after one corrective adjustment, inspect the gel product, lamp condition, and system compatibility before replacing equipment or changing brands.
Correcting one condition at a time provides a clearer troubleshooting result than making multiple adjustments simultaneously. This step-by-step approach helps isolate the responsible factor, reduces repeated application failures, and supports more consistent gel nail performance without assuming that every recurring symptom has the same cause. :contentReference[oaicite:2]{index=2}
Correcting one condition at a time provides a clearer troubleshooting result than making multiple adjustments simultaneously.
This chart outlines the systematic troubleshooting process for gel nail kit problems, from symptom identification to corrective action and verification.
Fixing Peeling and Lifting Gel Nails
Fixing peeling and lifting gel nails requires removing the failed gel, correcting the adhesion problem, and reapplying the coating under the manufacturer's recommended application and curing conditions rather than covering the defect. Once gel polish has peeled or lifted away from the natural nail, the adhesive bond has already failed, so adding fresh gel over the separated area does not restore the original bond. The reviewed troubleshooting evidence identifies complete removal of the affected area and correction of the underlying adhesion cause as the appropriate repair approach. :contentReference[oaicite:0]{index=0}
Begin the repair only after confirming that the problem is peeling or lifting instead of incomplete curing.
Begin the repair only after confirming that the problem is peeling or lifting instead of incomplete curing. For example, if lifting develops after approximately 2 weeks around the cuticle while the remaining coating is firmly attached, remove only the failed coating, prepare the exposed nail surface, and reapply thin gel layers according to the manufacturer's curing instructions rather than patching over the gap. This time frame is an evidence-based troubleshooting example rather than an expected service life for every gel manicure. :contentReference[oaicite:1]{index=1}
- Identify the symptom. Check whether the gel is peeling from the nail surface or lifting from the cuticle, sidewall, or free edge because the location helps identify where adhesion has failed.
- Remove the failed coating. File or soak off the peeling or lifted gel according to the product system until only firmly adhered material remains. Do not press loose gel back onto the nail because the original adhesive bond cannot be restored after separation. :contentReference[oaicite:2]{index=2}
- Restore the adhesion surface. Remove dust, oil, moisture, and loose debris, then ensure the natural nail is clean and dry before applying fresh product. A clean nail surface provides the conditions required for new adhesion. :contentReference[oaicite:3]{index=3}
- Reapply thin gel layers. Apply thin, even coats and cure each layer with the gel manufacturer's specified lamp and curing cycle instead of applying one thick repair layer, because thin layers cure more consistently and support better adhesion.
- Evaluate the repair. If peeling or lifting returns after repeating the correct preparation, application, and curing procedure, inspect product compatibility, lamp performance, and nail preparation before attempting another repair instead of repeatedly adding additional gel.
Repairing the failed adhesion before reapplication reduces the likelihood of repeating the same defect, but no repair method permanently prevents future peeling or lifting under normal wear. Following complete preparation and curing procedures also supports longer-lasting gel results by reducing avoidable adhesion failures, although normal wear, nail condition, and product compatibility still influence durability. :contentReference[oaicite:4]{index=4}
Fixing Gel Polish Curing Problems
Fixing gel polish curing problems requires identifying the specific curing issue, checking the curing condition that caused it, and correcting that condition before reapplying or recuring the gel. The reviewed troubleshooting evidence identifies gel layer thickness, curing time, lamp compatibility, hand position, and product condition as the primary diagnostic checks, while Young Nails states that excessive product thickness and incorrect curing settings are common causes of incomplete curing. :contentReference[oaicite:0]{index=0}
Fixing gel polish curing problems requires identifying the specific curing issue, checking the curing condition that caused it, and correcting that condition before reapplying or recuring the gel.
Before making any adjustment, compare the application with the manufacturer's curing requirements because curing instructions apply to the complete gel system rather than to UV or LED lamps in general. For example, if one thin colour coat cures correctly but a second coat remains soft after the same curing cycle, the diagnostic check should focus on application thickness or uneven coverage rather than automatically increasing the curing time. :contentReference[oaicite:1]{index=1}
- Check the curing issue: Confirm whether the gel remains soft, wrinkles, dents under light pressure, or transfers colour after the recommended curing cycle, because these observations indicate incomplete curing rather than a finished coating. :contentReference[oaicite:2]{index=2}
- Check the gel layer: Inspect whether each coat was applied thinly and evenly. Young Nails identifies excessively thick gel application as a common cause of incomplete curing because light penetration is reduced. :contentReference[oaicite:3]{index=3}
- Check the curing condition: Verify that the lamp, timer setting, and hand position match the manufacturer's instructions. An incorrect curing condition can leave isolated areas of the coating under-cured even when the lamp appears to operate normally. :contentReference[oaicite:4]{index=4}
- Check the product condition: If curing problems continue after confirming the application and curing conditions, inspect the gel for contamination, age, or improper storage before replacing the curing equipment. :contentReference[oaicite:5]{index=5}
- Check the corrective result: If the coating still remains soft after correcting one condition at a time, remove the incompletely cured gel before applying fresh product instead of adding additional layers over the defective coating. :contentReference[oaicite:6]{index=6}
Following one diagnostic adjustment at a time helps identify which curing condition caused the failure and reduces unnecessary changes to products or equipment. This troubleshooting sequence improves diagnostic accuracy but should not be interpreted as guaranteeing that every curing issue can be resolved without replacing an incompatible or defective gel system. :contentReference[oaicite:7]{index=7}
Gel Nail Kit Mistakes That Reduce Wear Time
Gel nail kit mistakes reduce wear time when they weaken adhesion, disrupt curing, or expose the coating edge to avoidable stress. The reviewed troubleshooting evidence identifies incomplete nail preparation, excessive layer thickness, cuticle flooding, incomplete free-edge coverage, unsuitable curing conditions, and unaddressed coating damage as application errors associated with earlier lifting, peeling, chipping, or soft gel. :contentReference[oaicite:0]{index=0}
Gel nail kit mistakes reduce wear time when they weaken adhesion, disrupt curing, or expose the coating edge to avoidable stress.
These mistakes describe preventable conditions rather than guaranteed outcomes, because wear time also remains specific to the gel system, nail condition, application method, and normal use. For clarification on errors common during first applications, compare the affected condition with the relevant beginner kit mistakes before replacing products or equipment.
For clarification on errors common during first applications, compare the affected condition with the relevant beginner kit mistakes before replacing products or equipment.
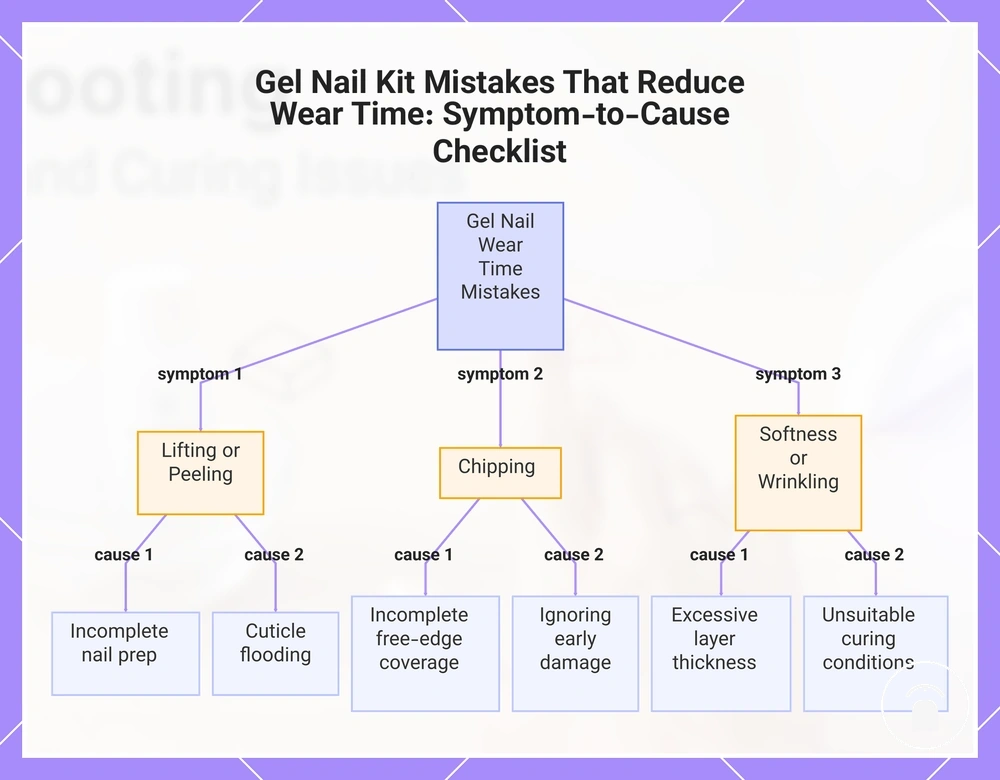
Use the following mistake-and-effect checklist to narrow the factor that shortened wear:
- Incomplete nail preparation: Oil, moisture, dust, or residual cuticle tissue remains on the nail plate, reducing the available bonding surface and increasing the likelihood of lifting or peeling.
- Excessive layer thickness: Thick gel layers receive less effective light exposure through the full coating depth, increasing the risk of wrinkling, softness, or premature separation.
- Cuticle flooding: Gel contacts the cuticle or surrounding skin, creating an attached edge outside the prepared nail plate that can lift as the nail grows or the skin moves.
- Incomplete free-edge coverage: The nail tip remains partly exposed, leaving the coating edge more vulnerable to repeated contact and localised chipping.
- Unsuitable curing conditions: The lamp, curing cycle, hand position, or gel layer does not match the product instructions, leaving the coating incompletely cured or unevenly hardened.
- Ignoring early damage: A chipped or lifted area remains in place, allowing the defect to extend into adjacent coating and reducing the remaining wear time.
Prevention depends on identifying the specific mistake and correcting that affected factor rather than changing multiple variables at once. This error-analysis approach supports troubleshooting by connecting each mistake with its affected condition and observable outcome without implying that one correction guarantees a fixed wear period. :contentReference[oaicite:1]{index=1}
Prevention depends on identifying the specific mistake and correcting that affected factor rather than changing multiple variables at once.
This chart maps common gel nail wear time symptoms to their underlying application mistakes, helping you identify the specific factor to correct.
Frequently Asked Gel Nail Kit Troubleshooting Questions
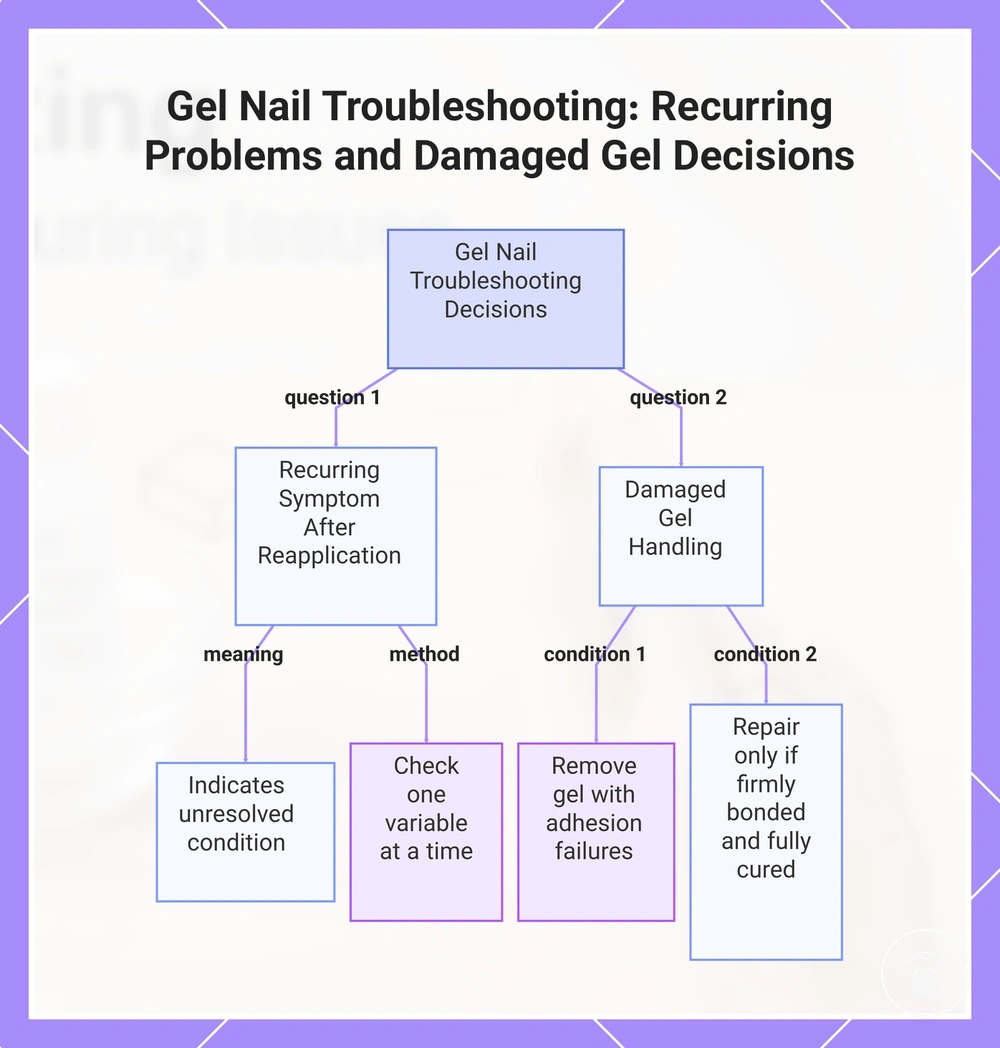
Remaining gel nail kit troubleshooting questions usually concern whether a recurring symptom identifies one cause and whether damaged gel should be repaired or removed. The reviewed evidence supports condition-based decisions: repeated failure requires one variable to be checked at a time, while lifted, peeling, chipped, or incompletely cured gel should not be covered with additional product. :contentReference[oaicite:0]{index=0}
Why does the same gel nail problem return after reapplication?
Why does the same gel nail problem return after reapplication?
A recurring problem does not confirm one universal cause; it shows that at least one relevant condition remains unresolved.
A recurring problem does not confirm one universal cause; it shows that at least one relevant condition remains unresolved. Keep the symptom constant and check one factor per attempt—such as nail preparation, layer thickness, curing conditions, product condition, or lamp compatibility—because changing multiple factors prevents a clear diagnosis. :contentReference[oaicite:1]{index=1}
Should damaged gel polish be repaired or removed?
Should damaged gel polish be repaired or removed?
Remove gel that is lifting, peeling, substantially chipped, soft, wrinkled, or incompletely cured before reapplication.
Remove gel that is lifting, peeling, substantially chipped, soft, wrinkled, or incompletely cured before reapplication. A limited repair is appropriate only when the remaining coating is firmly bonded, fully cured, and permitted by the product system; otherwise, covering the defect can leave the original adhesion or curing problem underneath. :contentReference[oaicite:2]{index=2}
This chart shows how to diagnose recurring gel nail problems and when to remove or repair damaged gel.
This chart shows how to diagnose recurring gel nail problems and when to remove or repair damaged gel.