Gel Nail Kit Safety for Home Use
Gel nail kit safety for home use depends on controlled curing, avoiding skin contact with uncured gel, gentle nail preparation, careful removal, and the user’s individual sensitivity. A gel nail kit does not have a universal safety outcome because risk depends on factors such as UV or LED lamp compatibility, gel formula, application technique, exposure conditions, nail condition, and allergy history.
Food and Drug Administration (FDA) states that some artificial nail products contain ingredients that can cause allergic reactions, particularly when products contact the skin.
The main safety concerns for a gel nail kit are lamp exposure, uncured gel contact, nail plate damage from harsh preparation or removal, and allergy risk from product ingredients. The U.S. Food and Drug Administration (FDA) states that some artificial nail products contain ingredients that can cause allergic reactions, particularly when products contact the skin. The American Academy of Dermatology Association (AAD) identifies nail product allergies as a possible cause of symptoms such as itching, redness, or swelling around the nails and surrounding skin.
For a broader overview of kit types and related decision-support information, see the gel nail kits hub .
Safe home use means using a gel nail kit with controlled curing, keeping uncured gel away from surrounding skin, following product instructions, and removing gel without unnecessary force on the nail plate. These conditions connect the gel nail kit to the main safety factors of curing, skin avoidance, and gentle removal. For a broader overview of kit types and related decision-support information, see the gel nail kits hub.
This example shows why application technique and user sensitivity affect the safety judgment.
A practical home-use example is a user applying gel polish and noticing that gel has spread onto the cuticle area before curing. The safer action is to clean the skin contact area before curing because the gel has moved from the intended nail plate surface to surrounding skin exposure. This example shows why application technique and user sensitivity affect the safety judgment.
- UV or LED lamp use: Follow the gel manufacturer’s curing instructions and use a compatible lamp to reduce curing-related problems.
- Uncured gel contact: Keep gel polish on the nail plate and remove accidental skin contact before curing.
- Nail preparation: Use gentle preparation methods because excessive filing or pressure can contribute to nail surface stress.
- Removal: Remove gel carefully rather than peeling or forcefully scraping the nail surface.
- User sensitivity: Pause use if irritation or unusual skin reactions occur and seek appropriate guidance.
Table of Contents
When At-Home Gel Nail Kits Are Safe Enough to Use
At-home gel nail kits are safe enough to use when the suitable product is used with a compatible lamp, gel stays off the skin, the nails are in suitable condition, and the user follows the product’s curing and removal instructions. The safer-use threshold is based on controlled conditions rather than the assumption that every gel nail kit is safe or unsafe for every person.
A common mistake is treating all at-home gel nail kits as equally suitable for every situation.
A common mistake is treating all at-home gel nail kits as equally suitable for every situation. A safer setup includes a lamp that matches the gel polish curing requirements, intact nails without active irritation or broken skin, correct cure timing, adequate ventilation, and a planned removal method. The U.S. Food and Drug Administration (FDA) states that some artificial nail products contain ingredients that can cause allergic reactions, especially when products contact the skin, so persistent irritation or known acrylate sensitivity changes the conditions for use.
A home user checking a gel nail kit before application should verify the visible conditions that reduce avoidable risk.
A home user checking a gel nail kit before application should verify the visible conditions that reduce avoidable risk. At-home gel nail kits are safe enough to use when the workspace is organised, the nail surface is clean, the lamp and gel polish are compatible, and the user has a removal plan before applying gel.
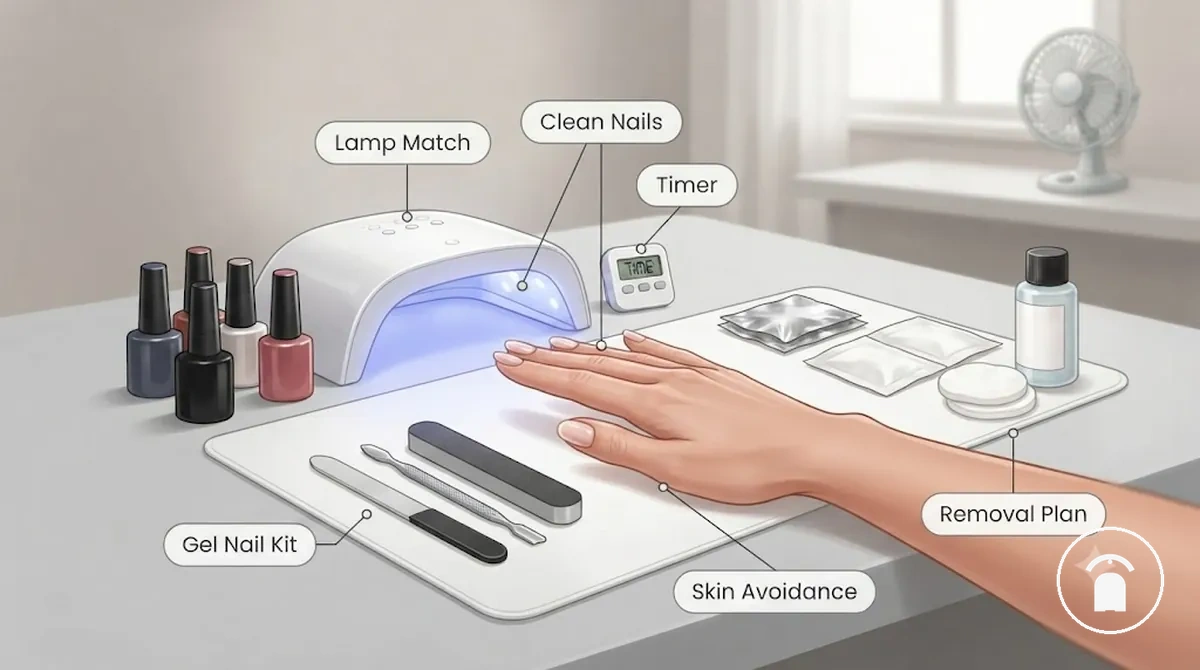
The following checklist verifies safer-use conditions before application:
- Lamp compatibility: The UV or LED lamp matches the gel polish curing instructions supplied with the product.
- Intact nails and skin: Application is delayed when nails or surrounding skin show irritation, broken areas, or a known sensitivity concern.
- Thin coats: Gel polish is applied in controlled layers so the lamp can cure the intended gel thickness according to the product instructions.
- Cleanup before curing: Gel stays off the skin, and accidental contact is cleaned before curing begins.
- Ventilation: The workspace has air movement during gel application and remover use to reduce unnecessary exposure to product vapours.
- Cure timing: The user follows the product’s stated cure time instead of extending lamp exposure without a reason.
- Removal plan: The user prepares for a controlled removal process rather than peeling or scraping cured gel from the nail surface.
Main Risks of Gel Nail Kits at Home
The main risks of gel nail kits at home are lamp exposure, uncured gel contact, nail trauma, and chemical removal concerns. These risk channels describe how a gel nail kit can create different exposure or technique conditions that affect hand skin, the nail plate, or the surrounding application area, so each risk requires a specific safer response rather than a general safety judgment.
Mixing all safety concerns together can hide the cause of a problem.
Mixing all safety concerns together can hide the cause of a problem. Separating the main risks of gel nail kits at home helps users identify whether the concern comes from UV or LED lamp exposure, gel contact with skin, preparation or removal pressure on the nail plate, or remover and ingredient exposure.
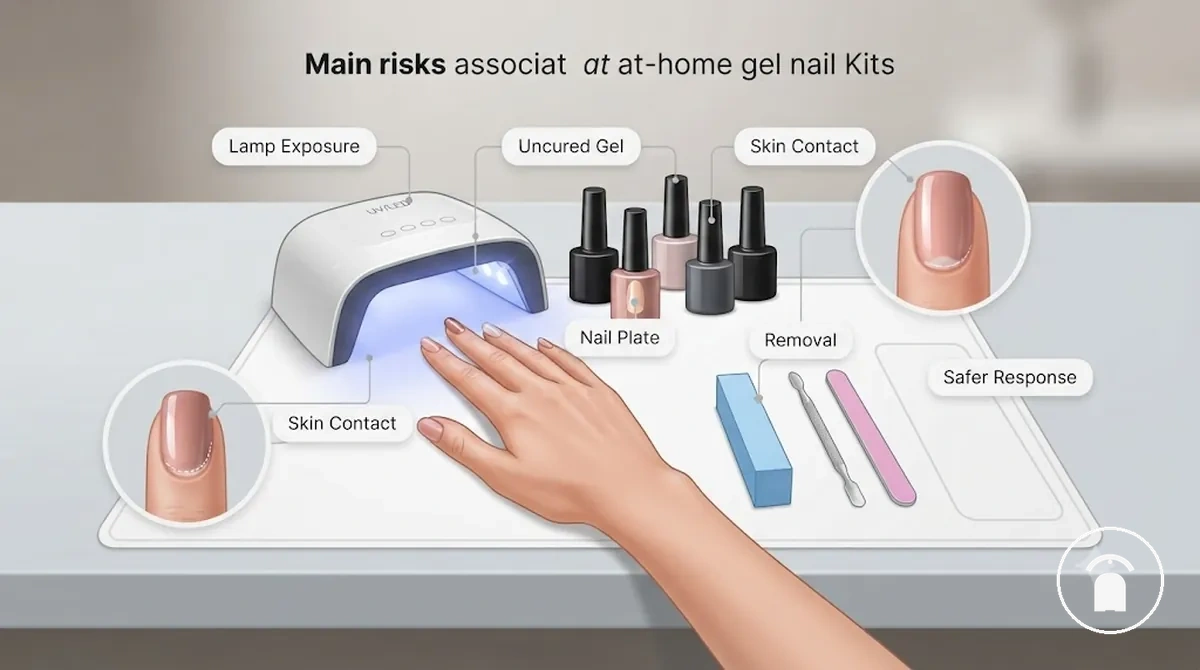
The table below separates the main risks of gel nail kits at home by exposure cause, possible effect, and safer response.
| Risk channel | What causes it | What it can affect | Safer response |
|---|---|---|---|
| Lamp exposure | UV or LED lamp exposure during gel curing | Hand skin exposed during the curing process | Follow the gel product instructions and use the compatible lamp and cure timing. |
| Uncured gel contact | Gel polish touching cuticles or surrounding skin before curing | Skin irritation or allergy risk from gel ingredients, including acrylate exposure | Keep gel on the nail plate and remove accidental skin contact before curing. |
| Nail trauma | Over-buffing, forceful scraping, or peeling cured gel during preparation or removal | Nail plate stress, thinning, soreness, or surface damage | Use gentle preparation and controlled removal methods without excessive force. |
| Chemical removal concerns | Remover exposure, ingredient sensitivity, or limited ventilation during removal | Skin comfort and exposure conditions around the workspace | Follow product instructions, maintain ventilation, and avoid unnecessary skin contact with remover products. |
UV and LED Lamp Exposure
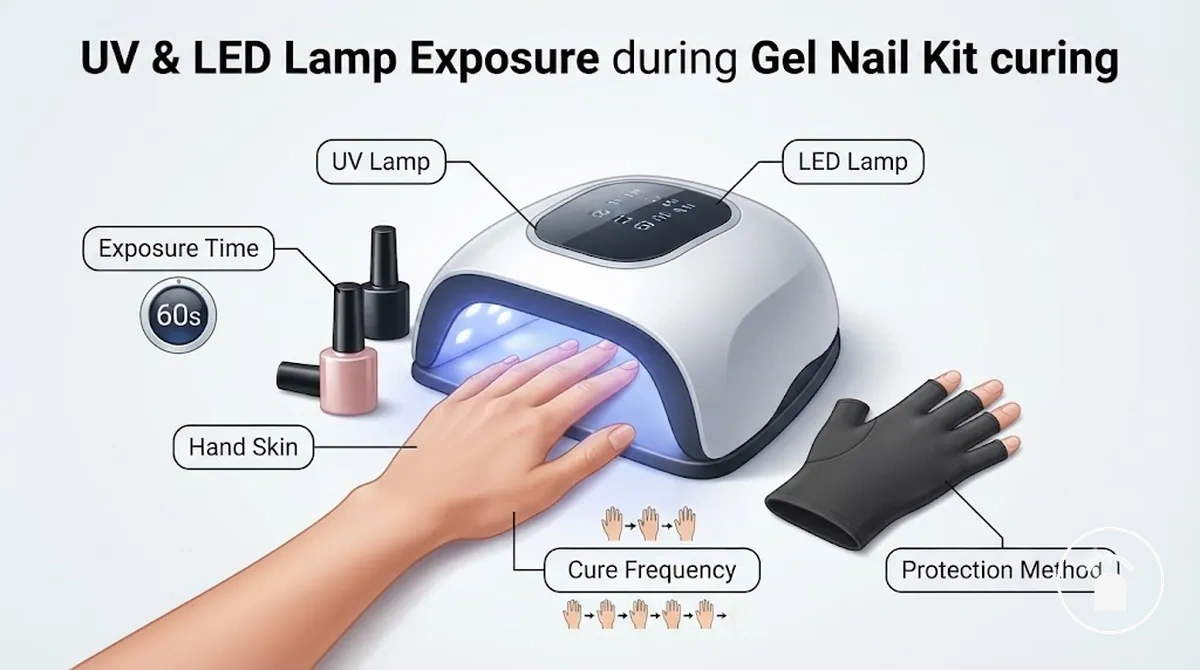
UV and LED lamp exposure refers to the light exposure that occurs during gel nail kit curing when a UV lamp or LED lamp hardens gel polish. Both UV lamps and LED lamps create curing light exposure, so the relevant exposure variables are lamp type, exposure time, cure frequency, and the amount of exposed hand skin rather than lamp type alone.
A common mistake is treating lamp type as the only safety factor.
A common mistake is treating lamp type as the only safety factor. Lamp exposure also depends on how often curing occurs, how long each curing session lasts, whether the gel polish matches the lamp instructions, and which protection method is used for exposed hand skin. The comparison below separates these exposure factors without ranking one lamp type as universally safer.
| Exposure factor | Safety implication |
|---|---|
| UV lamp | Creates light exposure during curing, so exposure time and cure frequency affect the overall hand skin exposure condition. |
| LED lamp | Creates curing light exposure that should also be managed through compatible gel polish instructions, exposure time, and repeated-use frequency. |
| Hand skin exposure | Exposed hand skin is part of the curing environment, so protection methods such as UV protection gloves or covering exposed areas may be considered alongside correct curing practices. |
| Protection method | UV protection approaches are intended to reduce exposure conditions but do not replace following gel polish curing instructions. |
Uncured Gel Polish and Allergy Risk
Uncured gel polish on skin is one of the main avoidable allergy-risk situations in home gel use because skin contact with uncured gel can increase exposure to gel ingredients, including acrylates. Keeping uncured gel polish away from surrounding skin before curing reduces this contact concern, especially when gel residue remains around the cuticle area, sidewalls, or areas affected by incomplete curing.
A common home application mistake is allowing gel polish to flood a sidewall or cuticle area before curing.
A common home application mistake is allowing gel polish to flood a sidewall or cuticle area before curing. In this situation, the concern is repeated skin contact with uncured gel rather than the appearance of the manicure alone. Redness, itching, or swelling can be reaction signals that require stopping use and seeking appropriate advice, but these symptoms do not confirm an allergy diagnosis by themselves.
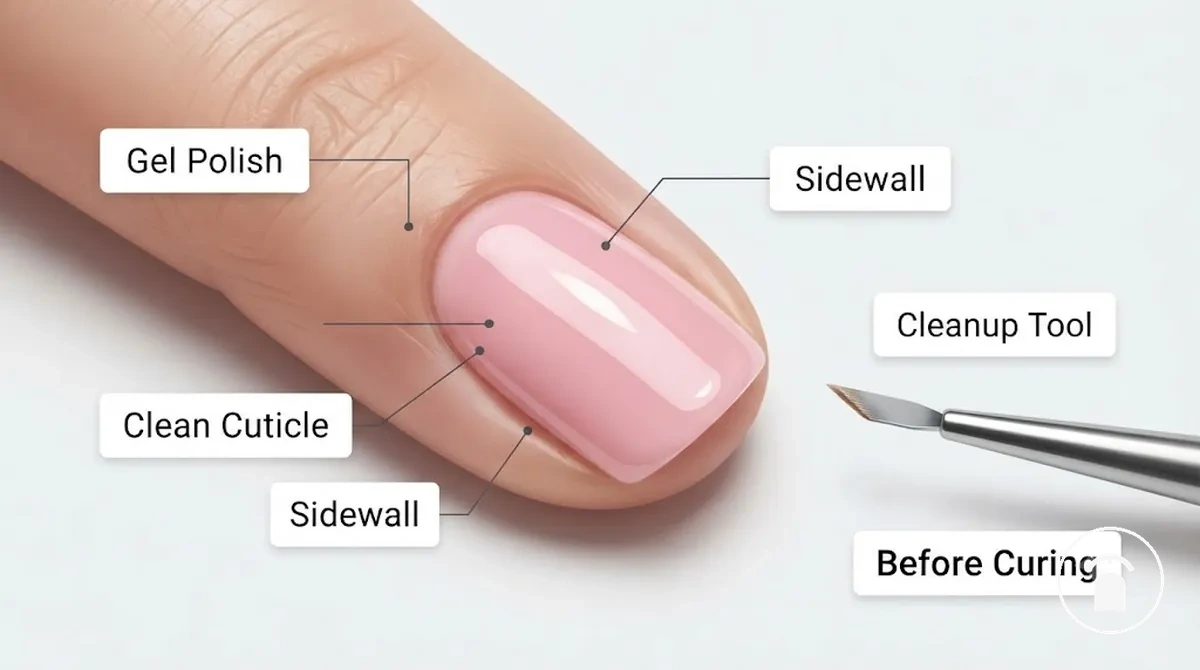
The following checklist highlights contact points and reaction signals related to uncured gel polish and allergy risk:
- Avoid skin contact: Keep uncured gel polish on the nail plate and away from cuticles, sidewalls, and surrounding skin before curing.
- Remove gel residue: Clean accidental skin contact before curing begins so uncured gel does not remain on exposed skin.
- Check incomplete curing: Follow the product curing instructions and avoid curing when gel placement or preparation is incomplete.
- Pause for recurring itching: Repeated itching or irritation signals are a reason to stop use and seek advice rather than self-diagnose.
- Pause for redness or swelling: Redness, itching, or swelling can be warning signals that require caution but do not prove a specific allergy.
Nail Plate Damage from Prep and Removal
Nail plate damage from prep and removal usually comes from technique, file pressure, and repeated stress rather than gel polish alone. Over-buffing, aggressive scraping, peeling, or excessive pressure during removal can place strain on the nail plate, which may contribute to thinning, soreness, or lifting concerns.
A common home-use mistake is peeling or scraping gel when it does not release easily.
A common home-use mistake is peeling or scraping gel when it does not release easily. The concern is the force applied to the nail plate because repeated mechanical stress can affect the natural nail surface. The following points connect common technique issues with possible nail effects and safer restraint.
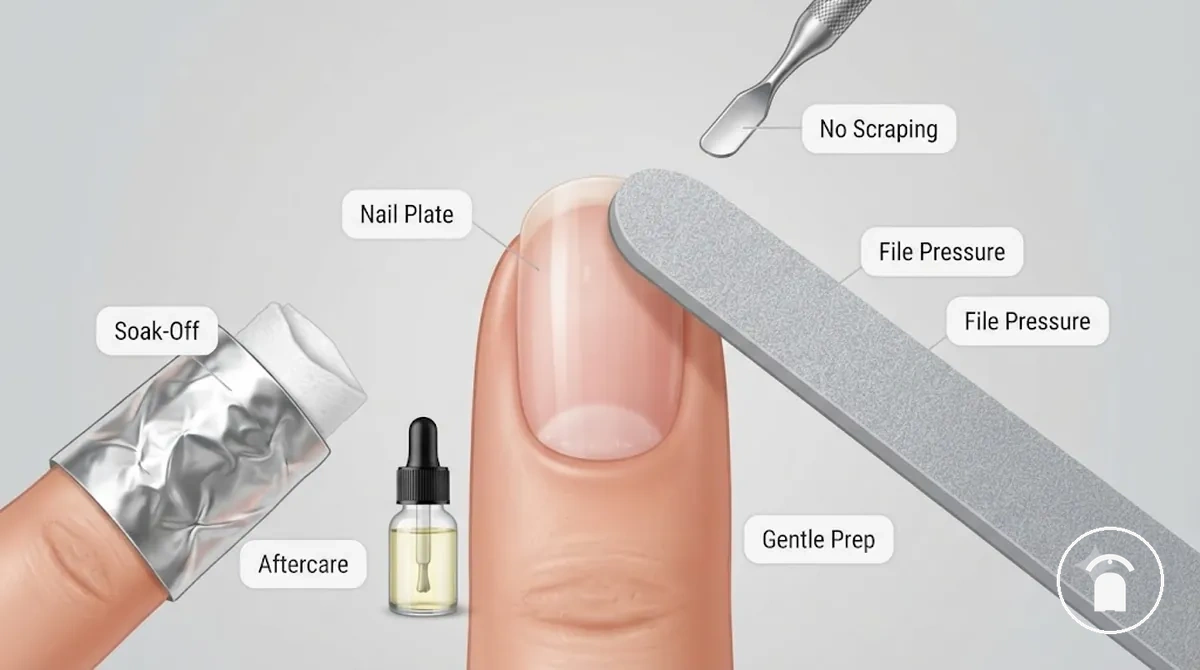
- Over-buffing → thinning risk: Excessive file pressure during prep can reduce the nail surface unnecessarily, so use gentle prep methods to limit avoidable strain.
- Scraping → soreness risk: Forceful scraping during removal can place stress on the nail plate, so avoid using pressure when gel does not release easily.
- Peeling → lifting risk: Pulling cured gel from the nail surface can stress the nail plate, so avoid peeling as a shortcut.
- Repeated removal → nail stress: Frequent prep and removal cycles can create repeated strain on the nail plate, so use caution when repeating stressful techniques.
- Remover exposure → comfort concerns: Repeated contact with remover products can affect nail and surrounding skin comfort, so follow product instructions and avoid unnecessary exposure.
Ingredient and Remover Chemical Concerns
Ingredient and remover chemical concerns in home gel nail kits are mainly exposure-control and label-reading issues involving the gel formula and remover type. The ingredient list, product condition, skin contact, and workspace conditions can influence how users manage chemical exposure without assuming a formula is non-toxic, chemical-free, or safe for all users.
A common mistake is relying on vague safety claims instead of checking product information and handling conditions.
A common mistake is relying on vague safety claims instead of checking product information and handling conditions. Sensitising ingredients, remover exposure, limited ventilation, or damaged packaging can change the exposure situation, so safer handling focuses on label reading, exposure control, and recognising uncertainty before use.
The following checks help identify practical exposure-control points for gel formulas and removers:
- Label reading: Review the ingredient list and product information to understand the gel formula and identify ingredients that may require personal caution.
- Sensitising ingredients: Treat ingredient sensitivity as a user-specific consideration and avoid assuming that one formula has the same effect for every person.
- Remover type: Consider the remover type, including remover liquid characteristics and instructions, when managing exposure during removal.
- Ventilation: Use a workspace with suitable airflow when applying gel products or using removers to support exposure control.
- Damaged packaging: Avoid using products with damaged packaging, leakage, or unclear product condition because the intended product state may be uncertain.
Precautions Before Applying Gel Polish at Home
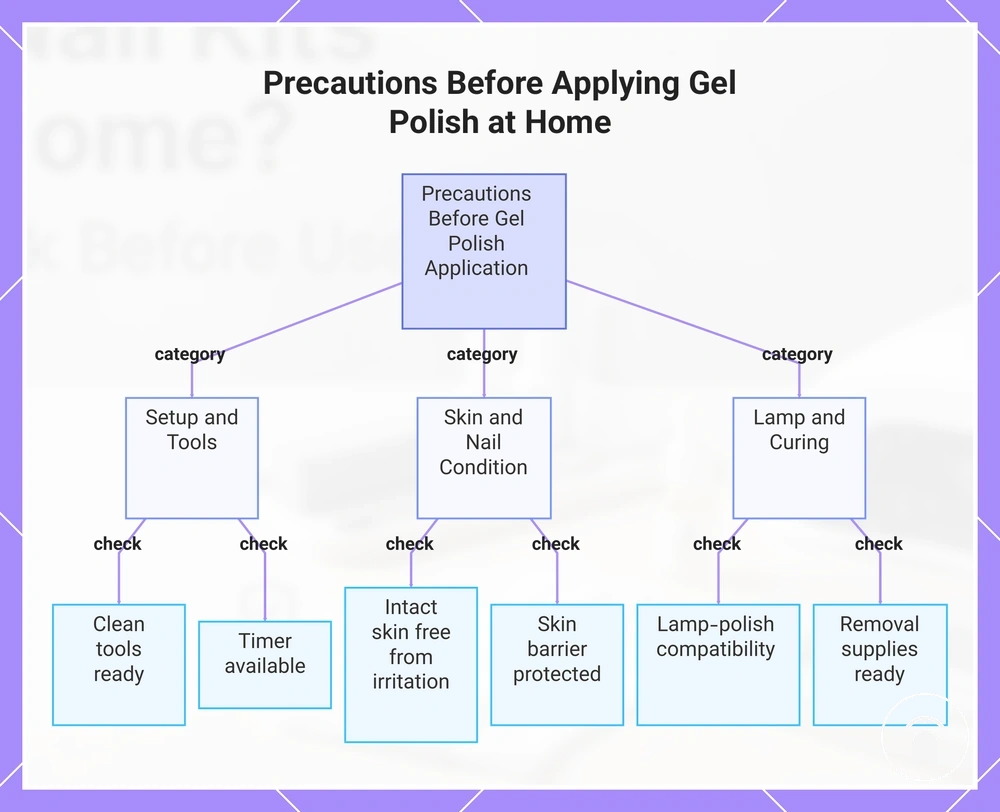
Precautions before applying gel polish at home should be checked before gel touches the nail to reduce avoidable contact, curing, and nail-prep risks. A ready setup includes clean tools, intact skin, light nail prep, correct lamp-polish pairing, and clear curing instructions. These checks verify the main pre-application conditions before the first coat is applied.
These checks verify the main pre-application conditions before the first coat is applied.
Starting before skin, lamp, and removal conditions are ready can create avoidable problems during home gel use. Checking the setup first helps identify when to delay application, such as irritation, soreness, lifting, or uncertainty about curing instructions. The following checklist provides practical verification points before applying gel polish.
- Clean tools: Verify that manicure tools, nail cleanser materials, and lint-free wipes are clean and ready before use.
- Intact skin: Check that the cuticle area and surrounding skin are free from irritation, soreness, or visible damage before applying gel polish.
- Light nail prep: Confirm that the nail surface is ready for application without turning this check into a full preparation routine. For deeper preparation guidance, see nail preparation.
- Lamp-polish pairing: Verify that the lamp and gel polish are compatible and that the curing instructions are available before application.
- Timer: Confirm that a timer is available so curing follows the product instructions rather than relying on estimation.
- Ventilation: Check that the workspace has suitable airflow when using gel products or removers.
- Skin barrier: Keep surrounding skin protected from unnecessary gel contact and delay application if the skin is irritated.
- Cleanup tool: Keep a suitable cleanup tool available to address accidental gel contact before curing.
- Removal supplies: Confirm that removal supplies are available before application so later removal does not rely on unsuitable methods.
This chart shows the main categories of pre-application checks to perform before applying gel polish at home to avoid common risks.
Skin Protection During Application and Curing
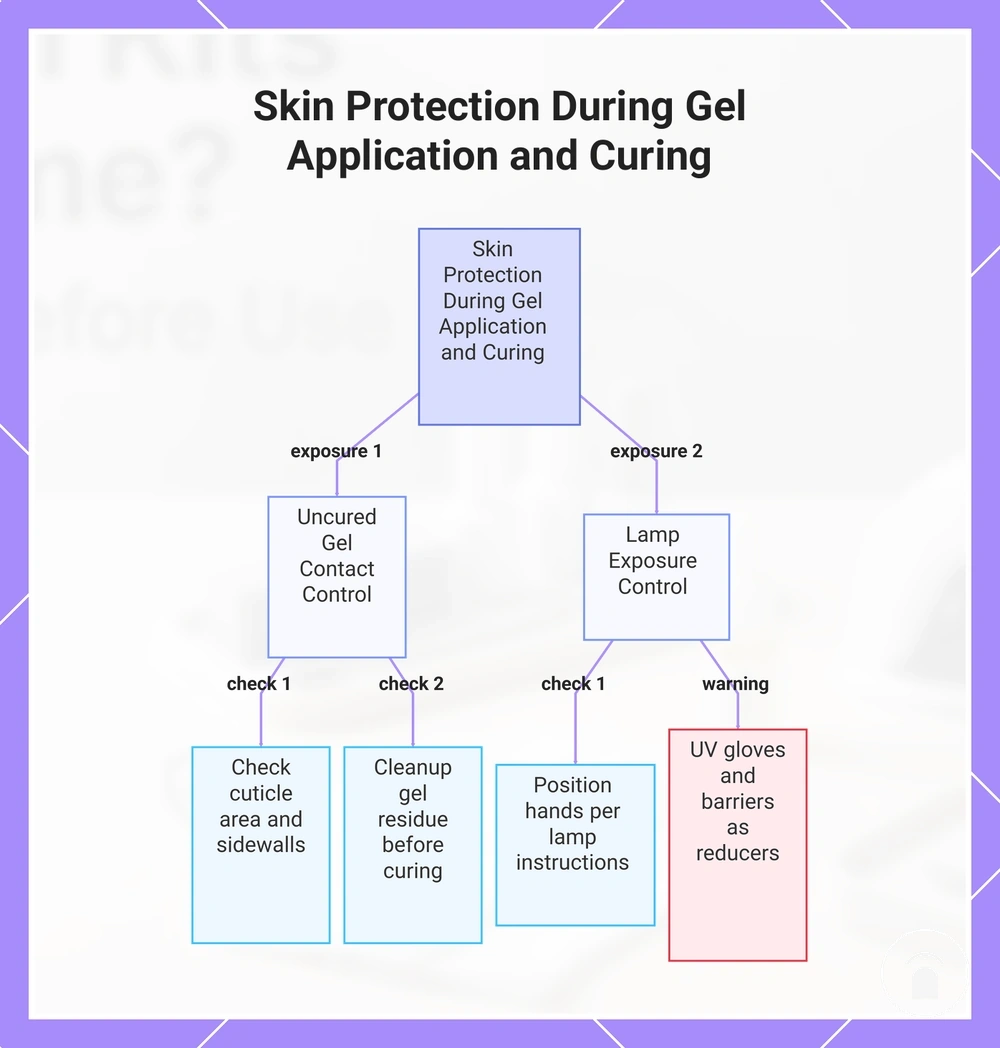
Skin protection during application and curing focuses on two different exposure problems: uncured gel contact and lamp exposure. Uncured gel contact requires controlling gel placement around the cuticle area and sidewalls before curing, while lamp exposure requires managing hand skin exposure during curing. These controls address different parts of skin protection rather than acting as a single protection method.
These controls address different parts of skin protection rather than acting as a single protection method.
A common home application issue occurs when gel polish reaches the cuticle area or sidewalls before curing. Cleanup tools help remove gel residue before the lamp is used because curing with uncured gel on surrounding skin changes the intended application condition. Keeping gel placement controlled before curing is the main distinction between residue control and lamp-exposure control.
Protection aids are exposure reducers, not guarantees of complete protection.
Protection aids are exposure reducers, not guarantees of complete protection. UV protection gloves, sunscreen, hand positioning, and other barriers may support exposure control when used appropriately, but they do not replace correct gel placement, cleanup, or curing instructions.
UV protection gloves, sunscreen, hand positioning, and other barriers may support exposure control when used appropriately, but they do not replace correct gel placement, cleanup, or curing instructions.
The following checklist highlights skin protection checks that help prevent avoidable gel contact and exposure-control problems:
- Cuticle area: Check that uncured gel stays on the nail surface and does not spread into the cuticle area before curing.
- Sidewalls: Inspect the sidewalls for gel residue and clean unwanted contact before placing the hand under the lamp.
- Cleanup tools: Keep cleanup tools available to remove accidental gel contact before curing begins.
- Skin barrier: Consider a skin barrier approach as an exposure-control measure, while keeping correct gel placement as the primary control.
- Thin coats: Apply controlled gel layers according to product instructions to support the intended curing process.
- Hand positioning: Position hands according to lamp instructions so curing occurs under the intended conditions.
- UV protection gloves: Fingerless UV protection gloves may reduce exposed hand skin during lamp use, but they do not replace careful application and curing practices.
This chart shows the two main exposure problems—uncured gel contact and lamp exposure—and the key checks to prevent skin contact and control exposure.
Keeping Uncured Gel Off the Skin
Uncured gel should be removed from skin before curing because gel belongs on the nail plate, not the surrounding skin. Keeping uncured gel away from skin helps maintain the intended application boundary before curing. The nail plate is the target surface, while the cuticle margin and sidewalls require careful control during application.
Gel flooding near sidewalls or cuticles can create unwanted skin contact before curing.
Gel flooding near sidewalls or cuticles can create unwanted skin contact before curing. Brush control and thin coats help keep gel within the nail plate area, while immediate cleanup removes gel residue before the curing stage.
Brush control and thin coats help keep gel within the nail plate area, while immediate cleanup removes gel residue before the curing stage.
Use these local cleanup cues before curing:
- Thin coats: Apply thin coats to improve brush control and help keep gel on the nail plate rather than spreading toward skin.
- Brush control: Guide gel carefully around the cuticle margin and sidewalls to maintain separation between gel and skin.
- Sidewalls: Check sidewalls after application and remove any uncured gel residue before curing.
- Cuticles: Inspect the cuticle area for accidental skin contact and clean the area before placing the nail under the lamp.
- Cleanup tools: Use an orange stick or alcohol wipe to remove unwanted gel from skin areas before curing.
- Curing condition: Cure only after surrounding skin is clean and uncured gel remains on the nail plate instead of the skin.
Sunscreen and UV Protection Gloves
Sunscreen and UV protection gloves may reduce lamp-related hand-skin exposure, but they do not remove all exposure conditions during curing. Sunscreen can cover exposed hand skin, while fingerless UV protection gloves can provide glove coverage while maintaining nail visibility and cure access.
The comparison below separates how each option may support reduced lamp exposure.
Protection methods need to balance hand protection with access to the nail area during curing. Keeping nails visible and following cure instructions remain necessary because sunscreen and gloves are exposure-control aids rather than guarantees of complete protection. The comparison below separates how each option may support reduced lamp exposure.
| Protection option | What it helps with |
|---|---|
| Sunscreen | SPF products may help cover exposed hand skin before lamp exposure, but the level of exposure reduction depends on the product use conditions and does not replace correct curing practices. |
| Fingerless gloves | UV protection gloves may provide glove coverage for parts of the hand while leaving the nail area visible for cure access. |
| Limiting unnecessary exposure time | Following cure instructions and avoiding extra curing beyond the required process may reduce avoidable lamp exposure conditions. |
Safer Curing Habits for Gel Nail Lamps
Curing habits for gel nail lamps describe how lamp matching, polish instructions, layer thickness, and cure time work together to support safe hardening. A suitable curing process depends on using a compatible lamp and polish combination, following the polish instructions, and managing conditions that affect whether gel hardens as intended.
Under-curing and overly thick layers can create incomplete cure risks because the gel may not harden consistently throughout the layer.
Under-curing and overly thick layers can create incomplete cure risks because the gel may not harden consistently throughout the layer. Checking layer thickness, hand positioning, and lamp compatibility helps identify conditions that may affect curing outcomes without relying on a universal cure time.
The table below organises the main curing factors that affect safe hardening.
A practical example is a user feeling heat spikes during curing or feeling uncertain about whether a thicker layer has hardened correctly. In this situation, the user should reassess the curing conditions rather than extend curing beyond the polish instructions. The table below organises the main curing factors that affect safe hardening.
| Curing factor | What to check | Safety reason | What to avoid |
|---|---|---|---|
| Lamp matching | Check that the gel nail lamp is suitable for the polish instructions. | Compatible lamp matching supports the intended hardening process. | Avoid assuming every gel formula cures the same way under every lamp. |
| Cure time | Follow the polish instructions for the required curing period. | Correct timing supports safe hardening without unnecessary curing exposure. | Avoid using a universal cure time across different gel products. |
| Layer thickness | Check that gel is applied in thin layers. | Layer thickness can affect whether the gel cures consistently. | Avoid relying on extra curing time to correct overly thick layers. |
| Hand positioning | Keep hands positioned correctly inside the lamp opening. | Positioning supports more even curing conditions across the nail surface. | Avoid placing nails outside the intended curing area. |
| Heat spikes | Pause and reassess if curing creates uncomfortable heat sensations. | Heat spikes can indicate that curing conditions need review. | Avoid ignoring discomfort or continuing without checking the cause. |
For deeper guidance on lamp-related conditions and curing safety, see lamp and curing safety.
Lamp Matching, Cure Time, and Heat Spikes
Lamp matching, cure time, and heat spikes can change the safety answer because the polish system, lamp compatibility, layer thickness, and curing conditions affect safe hardening. The correct checks are whether the gel nail lamp matches the polish system, whether cure instructions are followed, and whether user sensation indicates a need to pause and reassess.
A heat spike during curing or tacky gel after curing can indicate that curing conditions need review.
A heat spike during curing or tacky gel after curing can indicate that curing conditions need review. Thick coats, under-curing, or an unsuitable lamp match may affect hardening conditions, so checking layer thickness, cure duration, and compatibility helps identify possible causes.
Thick coats, under-curing, or an unsuitable lamp match may affect hardening conditions, so checking layer thickness, cure duration, and compatibility helps identify possible causes.
Use this diagnostic block to connect curing conditions with checks and possible meanings:
- Wrong lamp match
Check: Confirm that the lamp compatibility matches the polish system and cure instructions.
What it means: A mismatch may affect whether the gel reaches the intended hardening condition. - Thick coat
Check: Review layer thickness if gel remains tacky or does not appear fully hardened.
What it means: Excessive layer thickness can affect curing consistency and may contribute to under-curing conditions. - Under-curing
Check: Review cure duration against the polish instructions instead of applying a universal cure time.
What it means: Insufficient curing conditions may leave gel less fully hardened than intended. - Heat spike
Check: Pause and reassess when curing creates uncomfortable heat sensations.
What it means: User sensation is a reason to review curing conditions rather than ignore discomfort.
Safe Removal and Aftercare Limits
Safe removal means limiting nail plate stress and chemical exposure during gel removal, while aftercare limits define what maintenance can and cannot support. Removal safety focuses on reducing unnecessary pressure, filing, and acetone exposure, while aftercare supports nail comfort after removal. Aftercare matters because supportive habits do not guarantee reversal of previous nail stress.
Aftercare matters because supportive habits do not guarantee reversal of previous nail stress.
Peeling gel or applying excessive scraping pressure can place unnecessary force on the nail plate. Removing gel by forcing the product away from the surface can increase the chance of soreness or thinning concerns. Soak-off wraps and controlled removal time support a gentler approach by reducing the need for force.
For more detailed removal guidance, see safe gel removal .
A stubborn gel removal situation can make users more likely to increase scraping pressure when the product does not release easily. Removal criteria should focus on reducing force, controlling acetone exposure, and recognising when the process needs to pause. For more detailed removal guidance, see safe gel removal.
These limits also help users make gel nails last safely through careful maintenance.
Aftercare supports recovery conditions but cannot guarantee reversal of damage caused by previous stress. Cuticle oil, hydration, and rest periods may support nail comfort, while signs of overuse require stopping stressful removal habits and reassessing the approach. These limits also help users make gel nails last safely through careful maintenance.
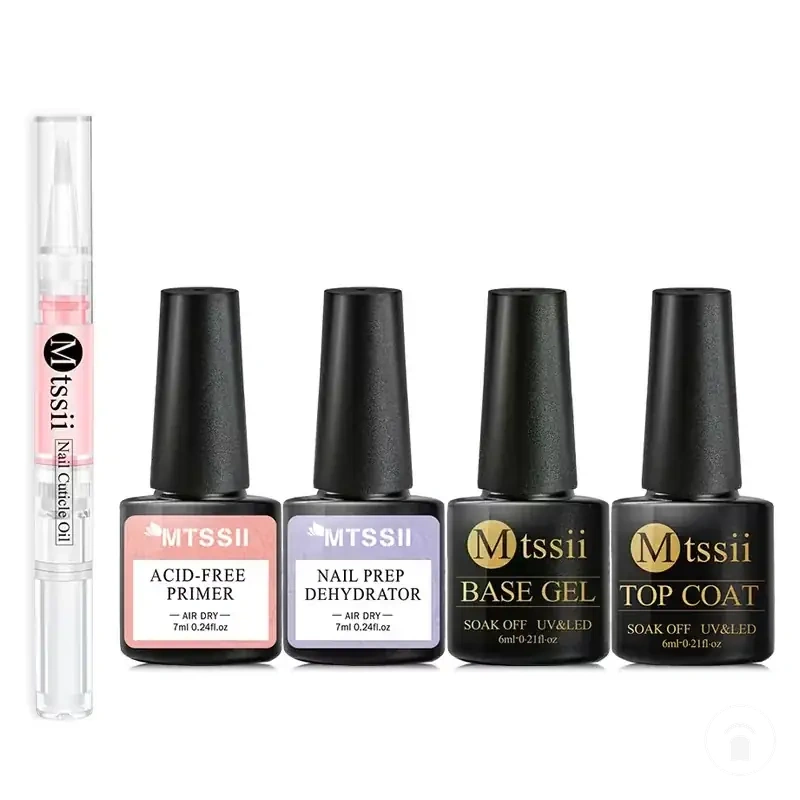
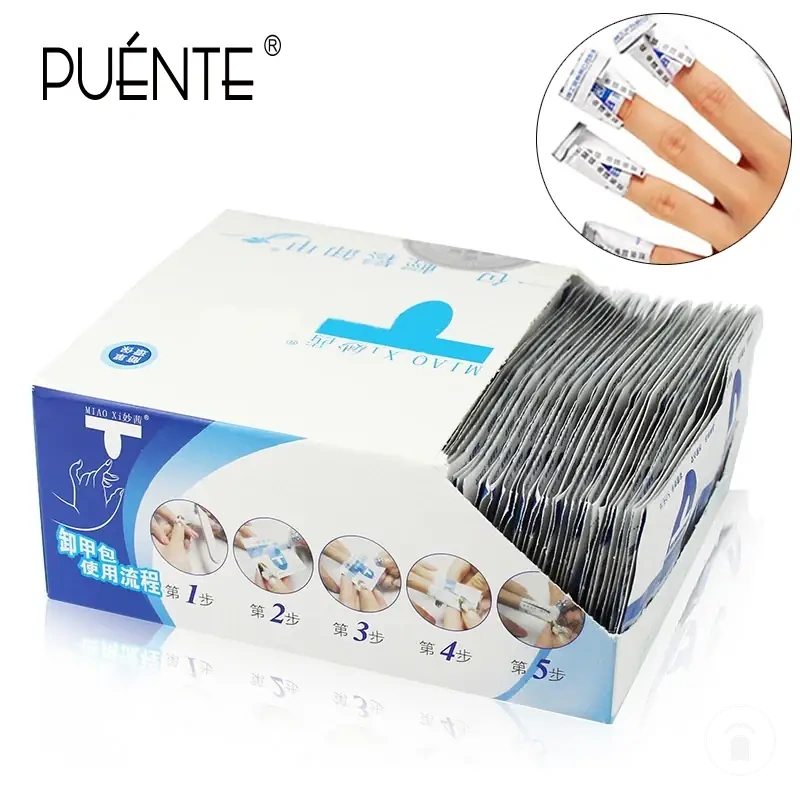
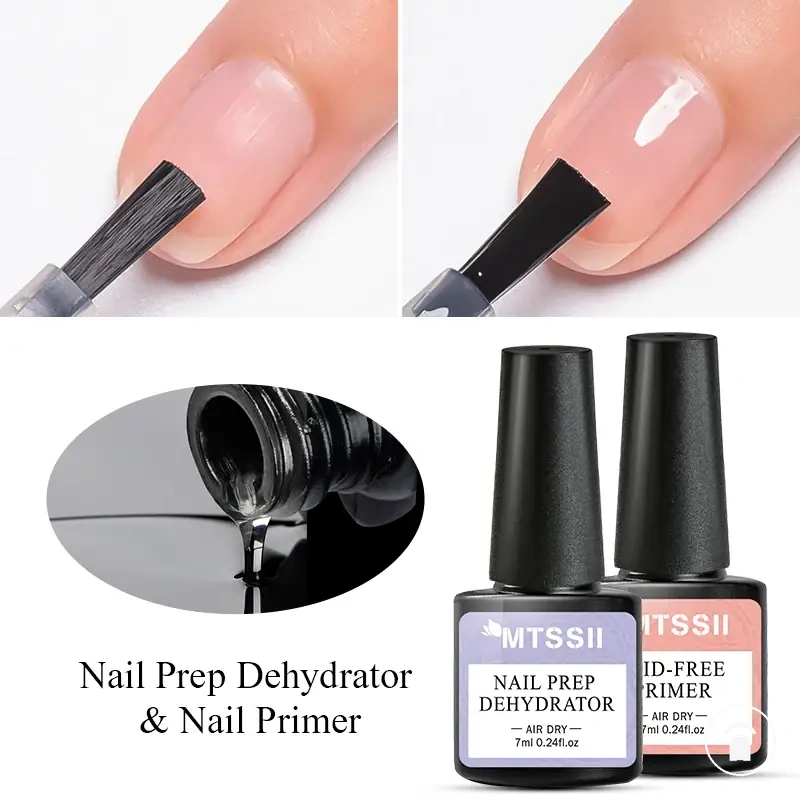
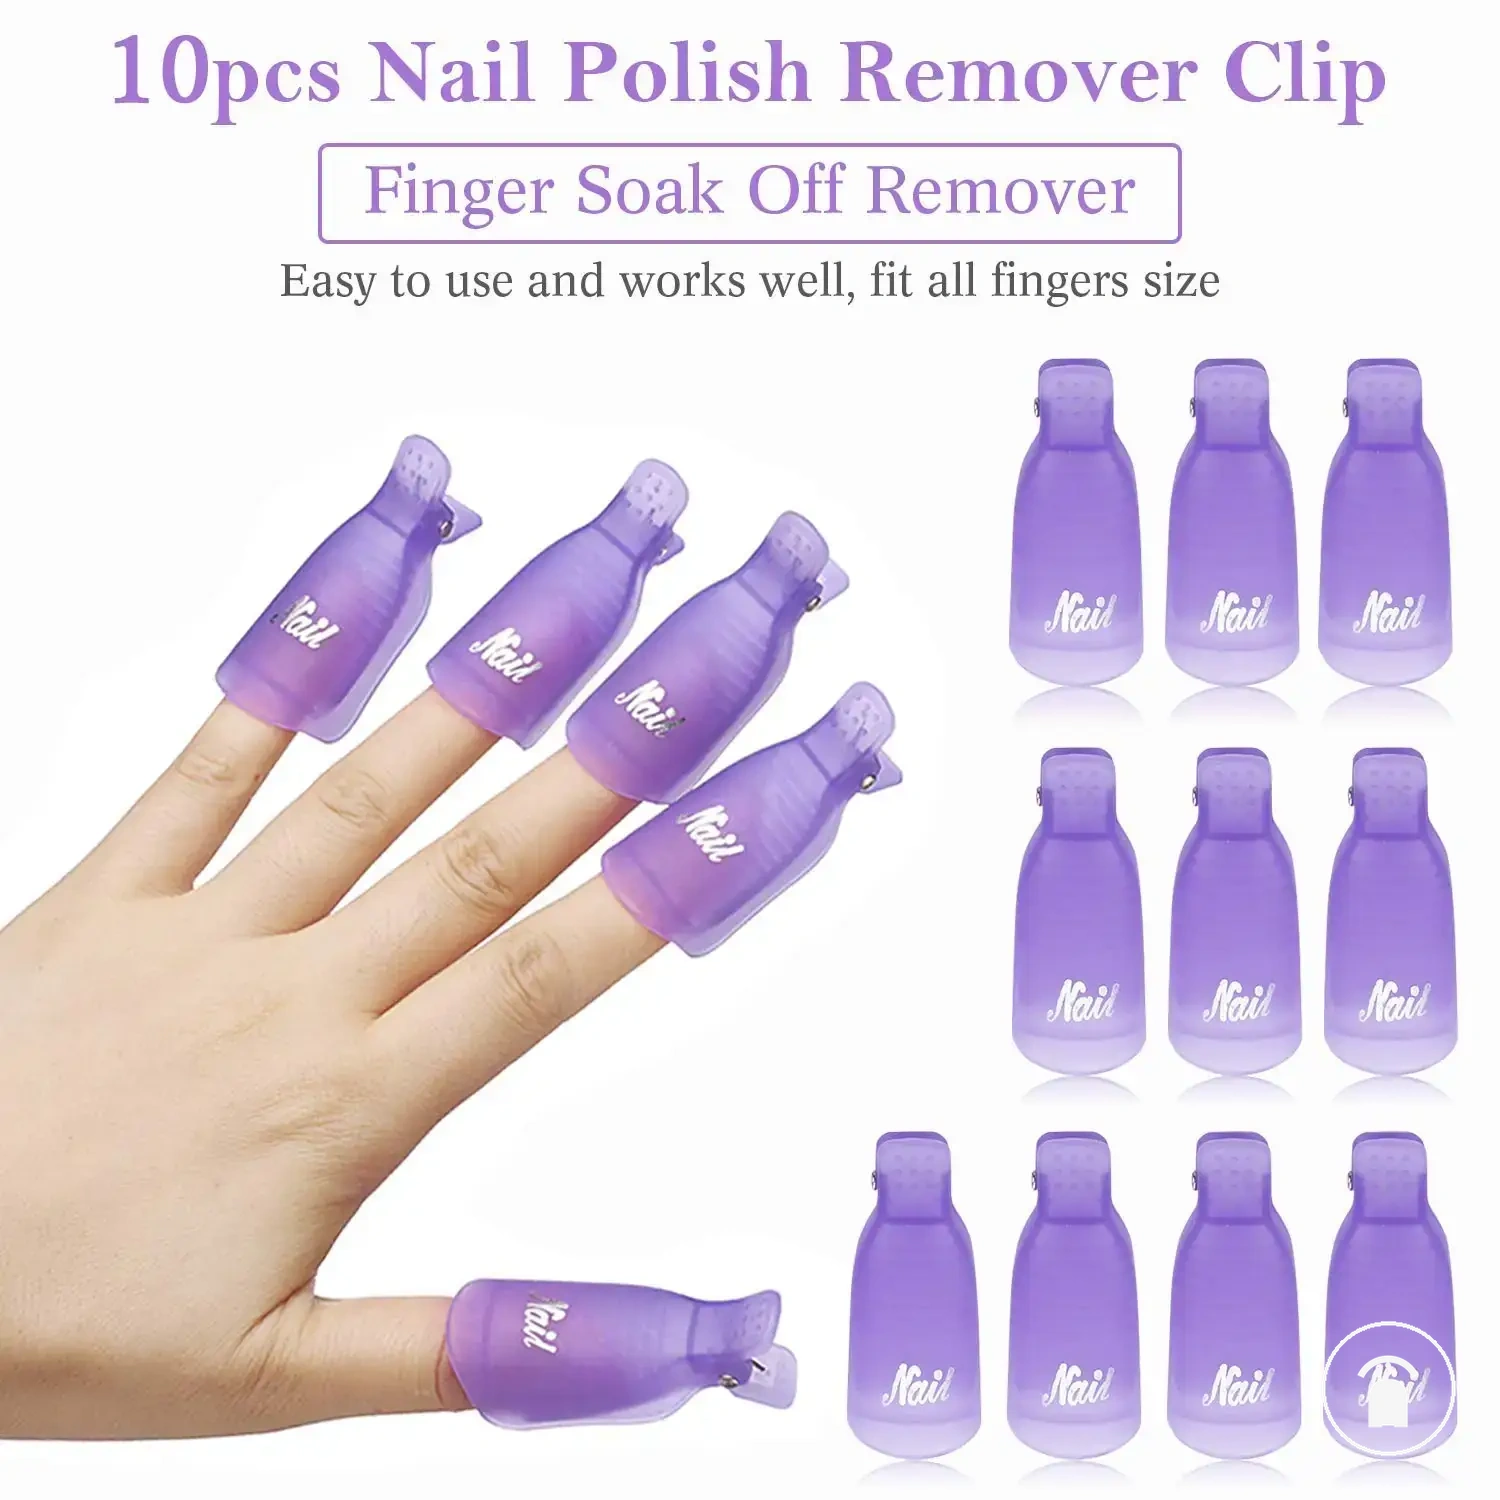
Here are product examples that may make comparison easier.
Here are product examples that may make comparison easier. Before buying, always review the compatibility criteria, essential features, and product details.
The following checklist protects the nail plate by applying safe removal and aftercare limits:
- File only the surface shine: Remove only the surface shine needed for removal preparation and avoid unnecessary filing of the nail plate.
- Use soak-off wraps: Allow gel to soften with soak-off wraps rather than forcing cured gel away from the nail surface.
- Limit scraping pressure: Avoid strong scraping pressure because repeated force on the nail plate can contribute to soreness or thinning concerns.
- Manage acetone exposure: Use remover with suitable ventilation and avoid unnecessary exposure during the removal process.
- Apply cuticle oil: Use cuticle oil and hydration practices to support surrounding nail-area comfort after removal.
- Allow rest periods: Pause gel use when nails feel sore or stressed so repeated removal cycles can be reassessed.
- Watch signs of overuse: Monitor signs such as lifting, pain, or ongoing discomfort and stop stressful removal practices when these appear.
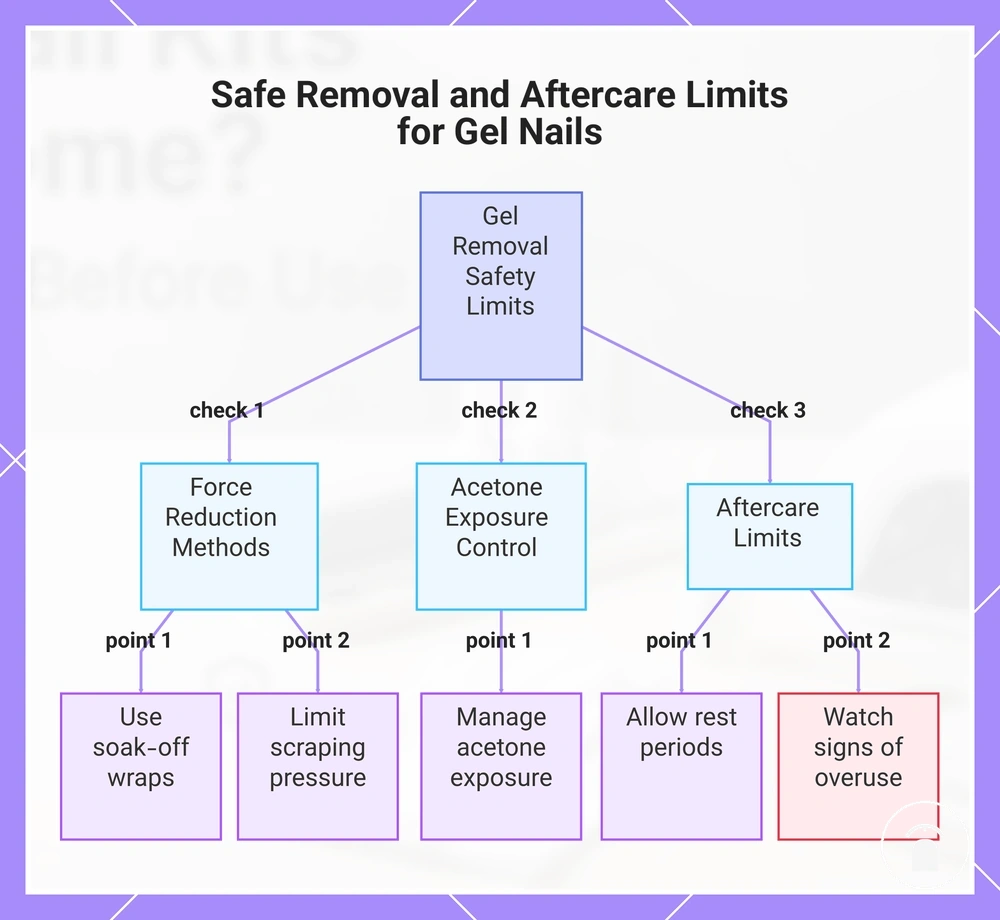
This chart shows the key safe removal and aftercare limits for gel nails, focusing on force reduction, acetone control, and aftercare monitoring.
Avoiding Aggressive Scraping and Unsafe Liquid Removers
Aggressive scraping and harsh remover shortcuts can increase nail and skin stress during gel removal. Force-based removal can increase tool pressure on the nail surface, while remover exposure may contribute to skin irritation when removal conditions are unsuitable. Gentle soak-off loosening is the safer direction because it reduces the need for force.
Gentle soak-off loosening is the safer direction because it reduces the need for force.
When gel will not lift easily, increasing scraping force can place unnecessary pressure on the nail surface. A pause to reassess soak time, wrap use, tool pressure, and skin condition helps avoid forcing removal when the gel has not loosened sufficiently.
When gel will not lift easily, increasing scraping force can place unnecessary pressure on the nail surface.
Use these checks to identify removal shortcuts that can increase stress:
- Aggressive scraping: Avoid scraping harder because repeated tool pressure on the nail surface may contribute to thinning or soreness concerns.
- Peeling gel: Avoid pulling cured gel away from the nail surface because forced removal can increase stress on the natural nail.
- Unsafe liquid removers: Avoid unverified liquid remover shortcuts because remover exposure can create skin irritation concerns, especially when ventilation and skin condition are not considered.
- Insufficient soak time: Allow gentle soak-off loosening to occur instead of increasing pressure when gel remains attached.
- Excessive tool pressure: Reduce scraping force and reassess the removal approach when the nail surface shows signs of stress or discomfort.
When to Stop Using Gel Products
Gel products should be paused when irritation, pain, swelling, or nail damage appears because these signs can change the safe-use threshold. Pause gel use when symptoms such as itching, redness, open skin, or worsening discomfort occur rather than continuing the manicure through the reaction. These stop-points help identify when reapplication should be avoided and the situation should be reassessed.
Mild discomfort can differ from recurring or worsening reactions.
Mild discomfort can differ from recurring or worsening reactions. For example, a brief sensation that resolves is different from repeated symptoms that continue after use or return with each application. Recurring symptoms matter because they can indicate that continuing gel use requires caution.
The checklist below identifies common stop-points and safer responses.
Product uncertainty or repeated heat spikes can also require a pause before continuing. Unclear curing conditions, possible skin contact, or repeated discomfort are reasons to reassess the application rather than immediately reapply gel. The checklist below identifies common stop-points and safer responses.
- Itching: Pause gel use if itching appears because the skin response requires reassessment before further application.
- Swelling: Stop using gel products when swelling appears and avoid reapplication until the situation has been reviewed.
- Burning: Stop curing and reassess when burning sensations occur instead of continuing through discomfort.
- Redness: Pause gel use when redness appears, especially when it persists or becomes more noticeable.
- Lifting: Reassess lifting when it occurs with pain or changes to the nail surface rather than covering the area with new gel.
- Pain: Stop using gel products when pain occurs because continuing through pain can increase stress on the nail area.
- Nail thinning: Pause further gel use when the nail surface appears thinner or feels weakened after repeated use or removal.
- Open skin: Avoid applying gel over open skin because exposed areas can increase contact concerns.
- Heat spikes: Pause and reassess repeated heat spikes during curing because recurring discomfort requires review of the curing conditions.
- Product uncertainty: Avoid reapplication when the product condition, curing process, or exposure situation is unclear until the cause can be better understood.
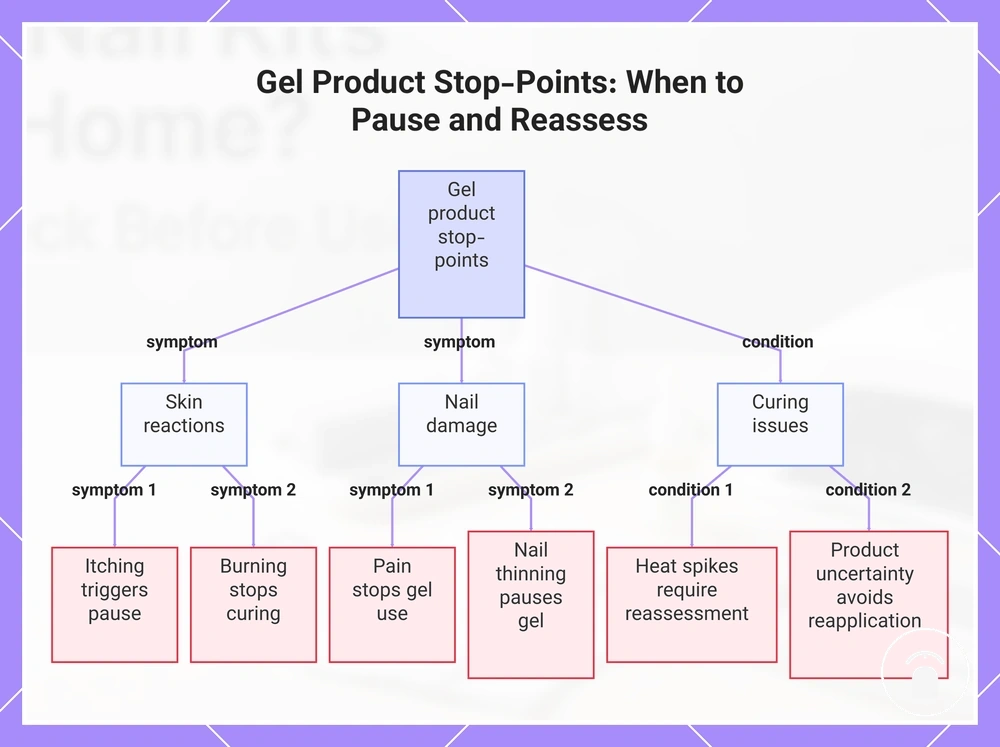
This chart shows the main categories of stop-points for gel product use, including skin reactions, nail damage, and curing issues, with specific symptoms that require pausing or stopping.
Who Should Be More Cautious With Gel Nail Kits
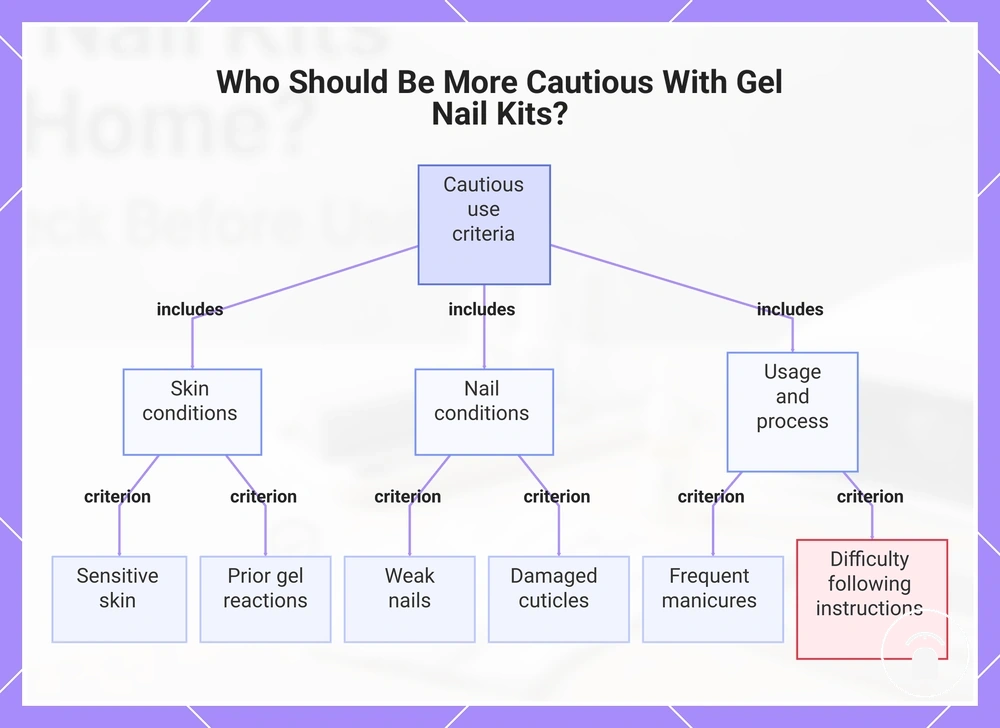
Some users need a stricter safety threshold with gel nail kits rather than a different universal rule for everyone. Users with sensitive skin, prior gel reactions, weak nails, damaged cuticles, or difficulty following curing instructions and removal instructions may need to assess their situation more carefully before use. This approach uses criteria-based caution rather than assuming gel nail kits are suitable or unsuitable for an entire group.
Sensitive skin, prior reactions, or weak nails can change how carefully gel nail kits should be approached.
Sensitive skin, prior reactions, or weak nails can change how carefully gel nail kits should be approached. These situations do not automatically determine suitability, but they can increase the need to monitor irritation, avoid unnecessary exposure, and reassess use when concerns appear. Users with weak, thin, or easily damaged nails can review gel nail kits for weak nails when considering their nail condition.
The following checklist helps identify situations where a more cautious decision may be appropriate.
Frequent manicures or difficulty following curing instructions and removal instructions can create a stricter safety threshold. Repeated use, incomplete processes, or forceful removal habits may increase stress on the nail surface, so users should consider whether they can follow the required care steps consistently. The following checklist helps identify situations where a more cautious decision may be appropriate.
Safer support items are aids rather than guarantees of protection.
Safer support items are aids rather than guarantees of protection. Items such as gloves, cuticle oil, or remover wraps may support specific parts of gel nail kit use, but they do not replace careful application decisions or correct curing and removal practices.
Before buying, always review the compatibility criteria, essential features, and product details.
Here are product examples that may make comparison easier. Before buying, always review the compatibility criteria, essential features, and product details.
The following criteria checklist helps decide which situations require a more cautious approach:
- Sensitive skin: Users with sensitive skin may need extra caution because skin contact or irritation concerns can require pausing gel use and reassessing the situation.
- Prior gel reactions: Users with previous reactions after gel use should consider that history because recurring concerns may require a stricter safety threshold before further use.
- Weak nails: Users with weak, thin, or easily damaged nails may need more caution because preparation and removal can add stress to the nail surface.
- Damaged cuticles: Users with damaged cuticles should avoid applying gel over broken skin because exposed areas can increase contact concerns.
- Frequent manicures: Users who apply gel frequently may need to consider rest periods and nail condition because repeated cycles can increase maintenance stress.
- Curing instructions: Users who cannot reliably follow curing instructions may need to reconsider use because incorrect curing conditions can affect the intended result.
- Removal instructions: Users who cannot follow removal instructions may need a more cautious approach because force-based removal can increase nail surface stress.
This chart shows the main criteria that indicate a need for extra caution when using gel nail kits, grouped by skin conditions, nail conditions, and usage/process factors.