
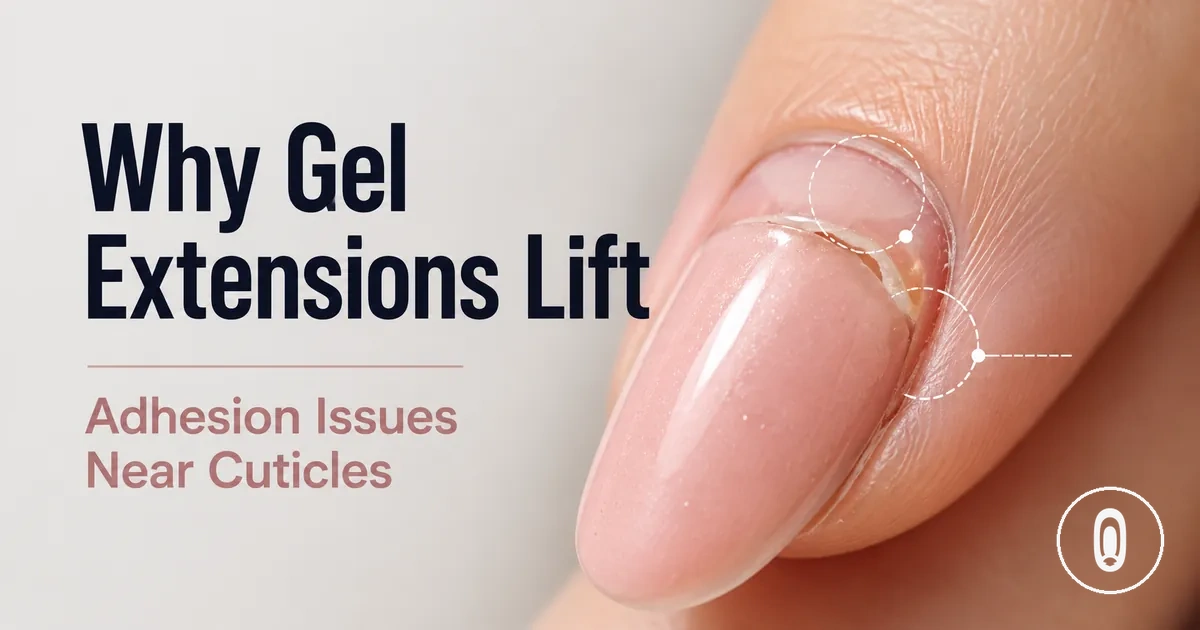
Why at-home gel nail extensions lift
At-home gel nail extensions lift when adhesion between the extension system and the natural nail plate becomes too weak to keep the tip secure. The likely cause may involve nail preparation, tip fit, gel glue placement, curing, natural nail condition, or wear stress.
Oil, moisture, dust, or cuticle residue on the nail plate can reduce contact before the gel extension is applied. Gel glue may also form bubbles, leave contact gaps, or flood the cuticle area and sidewall, while an unsuitable cure time, an opaque tip, or uneven exposure in a UV LED lamp may contribute to undercuring. Because these conditions can overlap, the likely cause is easier to narrow down by checking where the lifting starts and how soon it appears.
Lifting near the cuticle area may suggest surface contamination or flooded edges, while sidewall lifting may relate to tip width, curvature, pressure, or incomplete contact. Separation at the free edge may be influenced by limited adhesive coverage, leverage, impact, or daily wear; although lifting can resemble normal grow-out, lifting involves separation rather than a clean growth gap. A safe fix depends on the size, location, cleanliness, and progression of the lifted area, while prevention depends on correcting the condition that weakened adhesion.
What lifting means for at-home gel nail extensions
Lifting is partial separation between a gel extension system and the natural nail plate or the tip contact area after adhesion has weakened. The separation may involve the gel glue bond even when the extension remains partly attached. This distinction matters because lifting can affect wear and may become more noticeable over time.
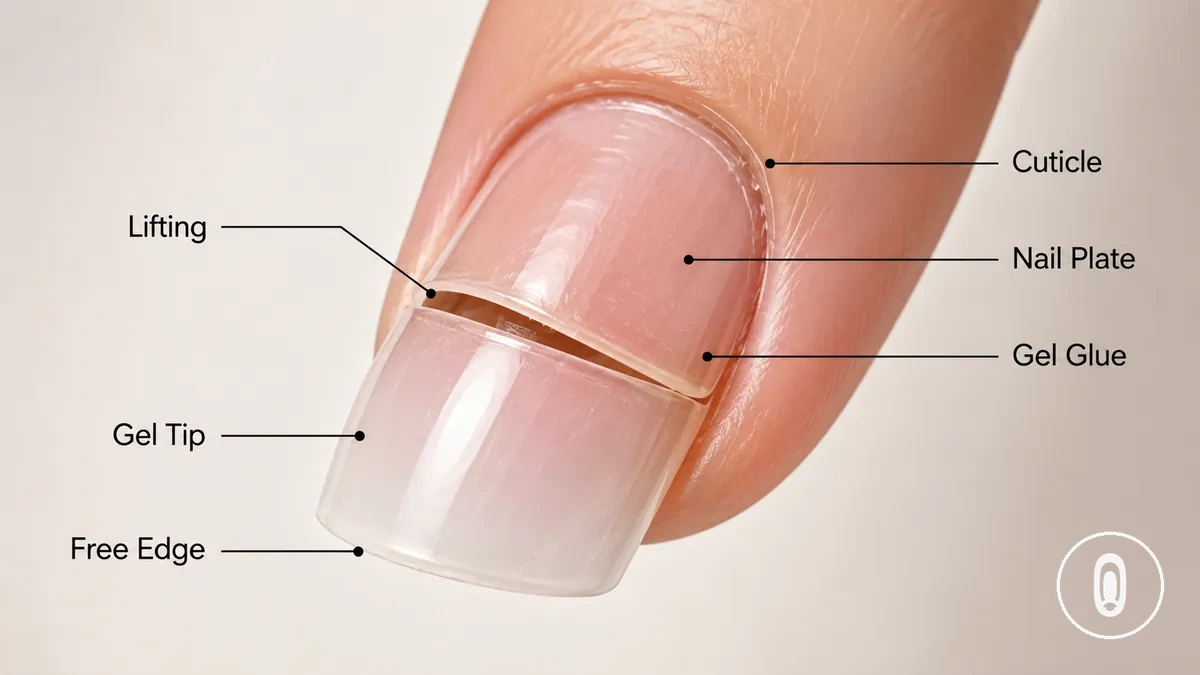
In at-home gel nail extension kits, lifting may appear near the cuticle area, sidewall, free edge, or another part of the tip where contact with the nail plate has started to separate. Changes in tip fit, gel glue placement, or curing can contribute to a weaker bond, although the exact reason depends on the individual application. A lifted area may look like a small raised edge, an air gap, or the beginning of the extension popping off. Although lifting can resemble normal grow-out or minor surface roughness, grow-out reflects new nail growth, while lifting involves separation between the gel extension and the nail plate.
Where gel extensions lift and what each location suggests
A lifting location is the first diagnostic signal because the place where separation begins can help narrow the likely cause without confirming it. The visible symptom should be considered alongside preparation, tip fit, curing, and daily wear because more than one condition may contribute.
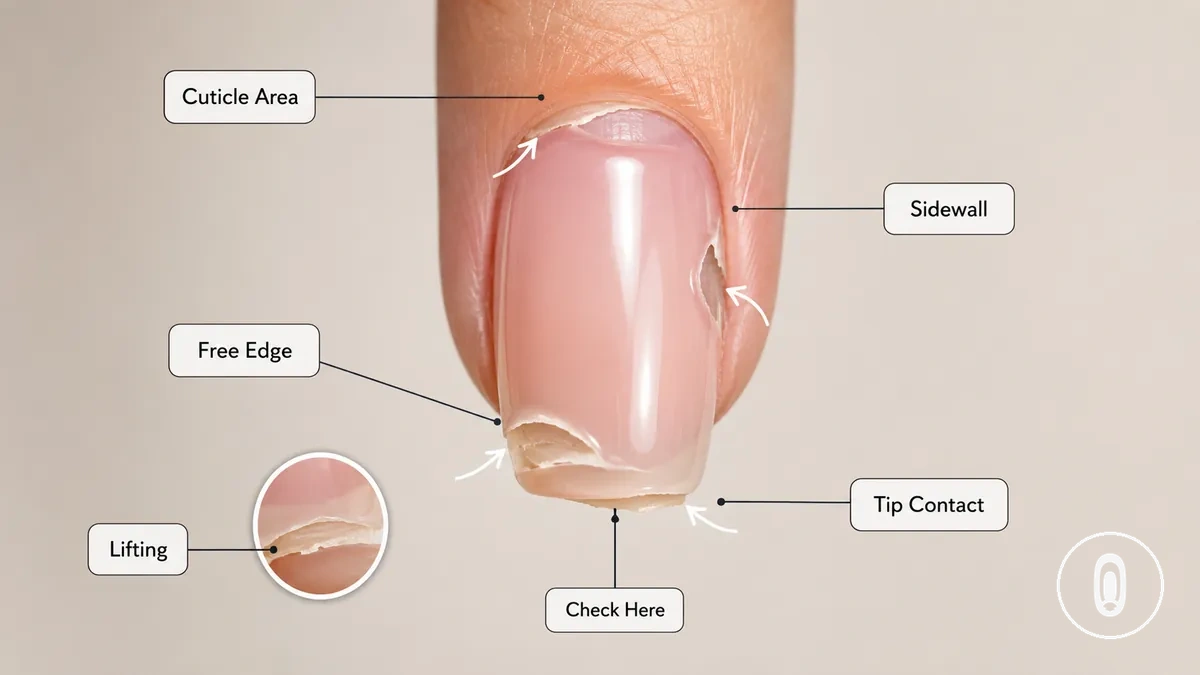
Check whether the separation starts in the cuticle area, sidewall, free edge, or tip contact zone before drawing conclusions. Lifting in the cuticle area may relate to residue or flooded edges, while sidewall lifting may indicate tip width, contact gaps, or pressure during wear. Separation at the free edge may be associated with leverage or repeated impact, and changes around the tip contact area may suggest incomplete contact or curing differences. If more than one lifting location appears together, the next check should consider the full application because overlapping conditions may change the likely diagnostic implication.
The table below groups common lifting locations by likely cause range, what to check next, and a safe diagnostic direction.
| Signal | Likely cause range | What to check | Safe next step |
|---|---|---|---|
| Cuticle area | Residue, flooded edge, reduced adhesion | Surface preparation and gel placement | Review application technique |
| Sidewall | Tip width, contact gap, pressure | Tip fit and side contact | Assess overall fit |
| Free edge | Leverage, impact, edge stress | Wear pattern and edge condition | Inspect edge wear |
| Tip contact | Incomplete contact or curing variation | Bond coverage and contact area | Check the full adhesion surface |
Cuticle area lifting
When cuticle area lifting appears first, the separation often starts close to the proximal nail fold rather than the free edge. This local symptom may indicate residue, flooding, skin contact, oil, moisture, or incomplete preparation on the nail plate. The likely cause usually falls within contamination or gel placement near the cuticle area.
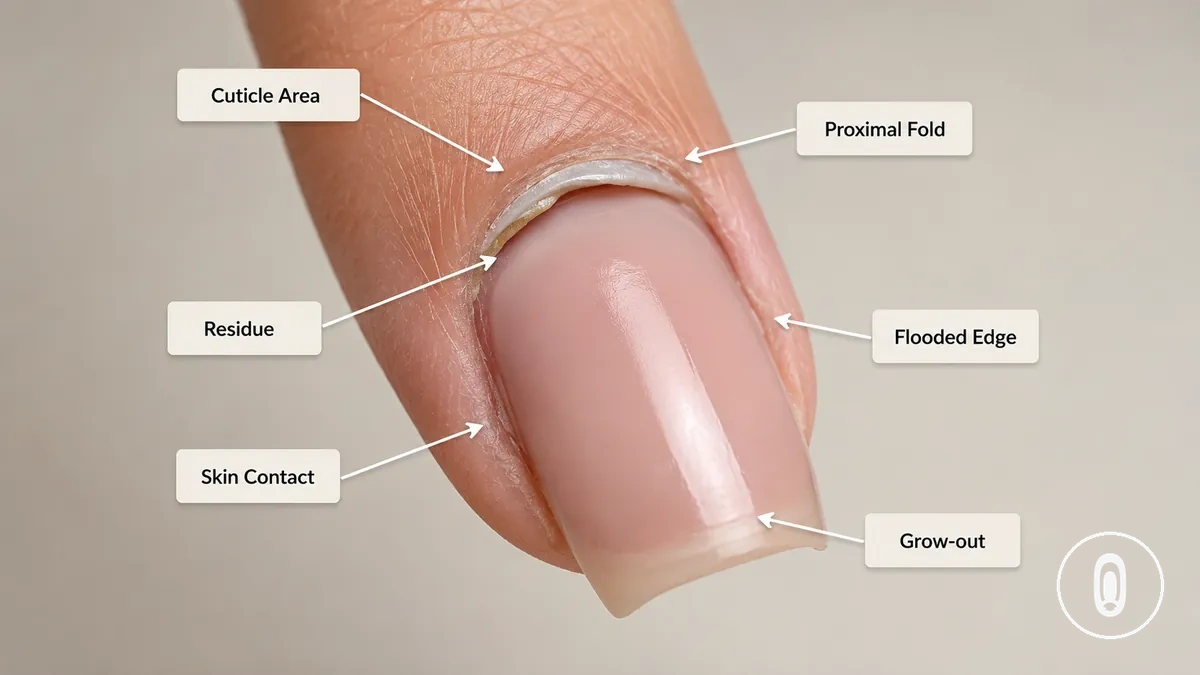
Check for cuticle film, residue, oil, or moisture that may have remained on the nail plate. Gel placement may also contribute when product reaches the skin, forms a flooded edge, or leaves uneven edge sealing near the proximal nail fold. If primer or dehydrator was used, consider whether it covered the nail surface without extending onto the surrounding skin.
A clean gap caused by natural grow-out differs from separation that begins at the cuticle edge. If the pattern remains unclear, reviewing related nail prep problems may help determine whether preparation contributed to the lifting.
Sidewall lifting
When sidewall lifting appears along the nail edge, the separation often points to a contact problem rather than one single cause. The local symptom may relate to tip width, sidewall curvature, a contact gap, a pressure point, or edge prep. The likely cause usually falls within fit, edge contact, or gel placement along the side of the nail.
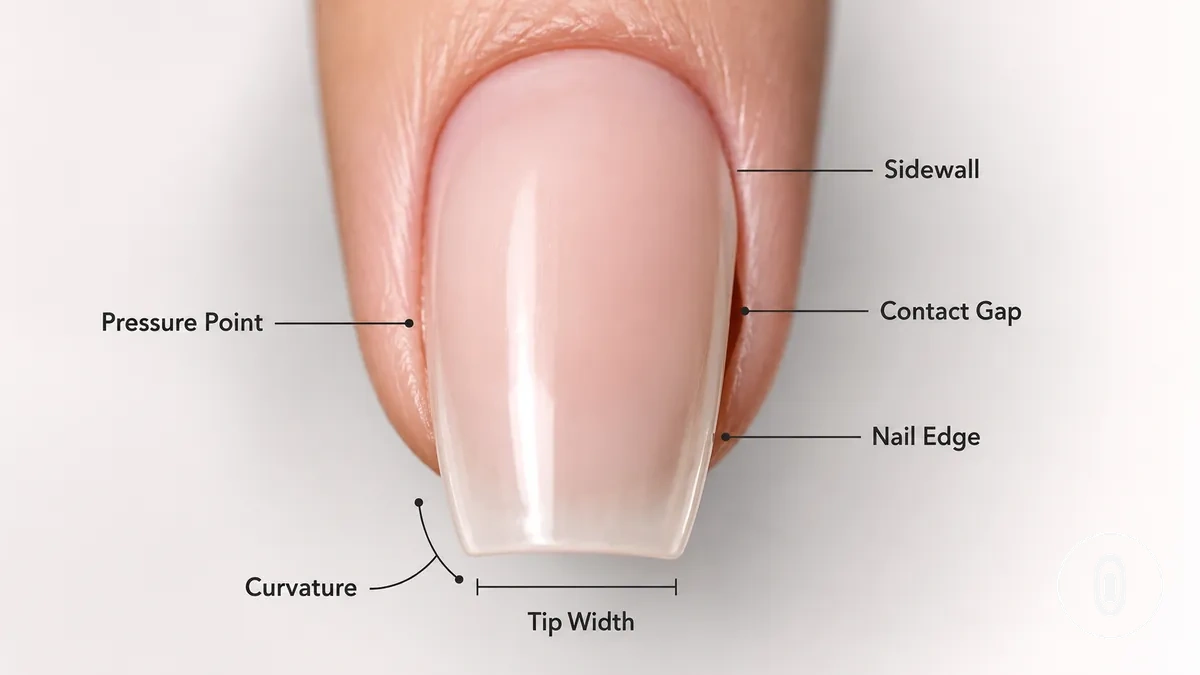
Sidewall lifting depends on consistent edge contact and how well the gel extension follows the natural nail shape. Use the checklist below to identify the most likely condition before assuming a curing problem.
- If the tip width is wider or narrower than the nail, a contact gap may develop along the sidewall.
- If the sidewall curvature differs from the natural nail, a pressure point may form even when the tip looks centered.
- If edge prep leaves uneven edges, gel spread may not create a consistent seal along the nail edge.
- If gel reaches one side unevenly, local separation may begin where contact is incomplete.
A centered-looking tip can still leave a small side gap or pressure point, so reviewing tip fit and lifting may help determine whether shape or width contributed to the problem.
Free edge or tip lifting
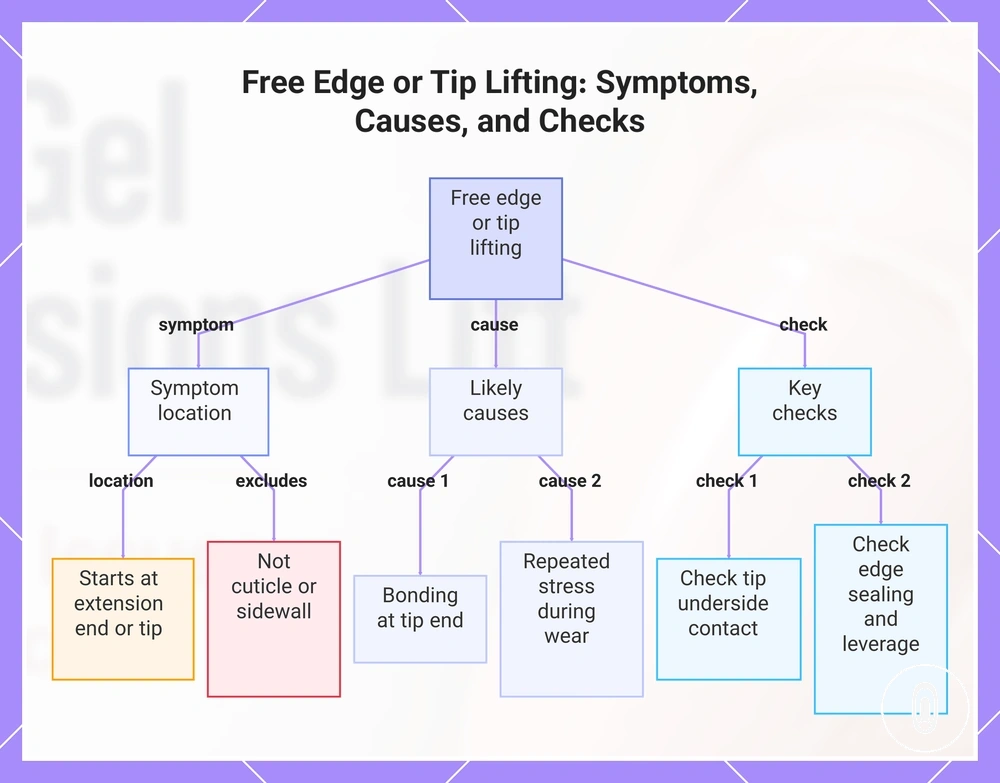
When free edge or tip lifting develops, the separation starts near the extension end or the tip contact zone rather than the cuticle or sidewall. This local symptom may relate to fit gaps, reduced adhesive coverage, leverage, impact stress, or incomplete edge sealing. The likely cause usually falls within bonding at the tip end or repeated stress during daily wear.
The checks below help identify whether the separation is linked to the free edge or the tip contact zone rather than another lifting pattern.
- If the tip underside does not maintain full contact, adhesive coverage may be uneven and separation can begin near the free edge.
- If edge sealing is incomplete, the extension end may be more vulnerable to lifting during normal use.
- If longer nails experience repeated leverage or impact stress, separation may begin near the free edge.
- If tip lifting progresses until the extension starts popping off, it may indicate a broader loss of contact rather than an isolated edge lift.
Free edge or tip lifting should be interpreted together with the location and pattern of separation. When multiple areas lift at the same time, more than one contributing condition may be affecting the overall bond.
This chart shows the symptom location, likely causes, and key checks for free edge or tip lifting in nail extensions.
Why gel extensions lose adhesion
When gel extensions lose adhesion, lifting usually develops because the bond between the natural nail and the extension has weakened rather than from one isolated problem. Adhesion depends on the nail surface, tip contact, gel glue behavior, curing conditions, and nail flexibility working together. The most likely cause often falls within surface preparation, tip fit, gel application, curing, or movement during wear.
Different adhesion failures can produce a similar lifting pattern, so the visible symptom should be interpreted alongside the application conditions. Oil or moisture on the nail surface may reduce adhesion, while poor tip fit can leave a gap or create pressure that increases lifting risk. Gel glue that is too thick, contains bubbles, or floods the edges may not create consistent contact, and limited lamp exposure may contribute to undercure in some situations. Flexible nails may also create repeated movement stress, so the same visible lifting can result from overlapping causes rather than one condition alone.
The table below groups common adhesion signals into broad cause ranges to support diagnosis rather than confirm a single cause. For a broader review of application errors, see common mistakes that cause lifting.
| Signal | Likely cause range | What to check | Safe next step |
|---|---|---|---|
| Oil or moisture on the nail surface | Reduced adhesion | Surface cleanliness and preparation | Review nail surface condition |
| Gap or pressure after fitting | Tip fit mismatch | Tip width and contact | Assess fit across the full nail |
| Bubbles or flooding | Gel glue application | Adhesive coverage and edge contact | Inspect bond consistency |
| Uneven cure | Undercure or curing variation | Lamp exposure and tip coverage | Review the curing process |
| Movement during wear | Nail flexibility and repeated stress | Wear pattern and separation location | Compare the lifting pattern before drawing conclusions |
Cuticle residue, oil, and moisture on the nail plate
When residue, oil, or moisture remains on the nail plate, the gel extension system may not bond consistently to the surface. Cuticle film and contact contamination can reduce adhesion before curing, so the most likely cause range involves nail plate surface condition and preparation.
The checklist below helps verify whether the nail plate surface may have contributed to lifting. Each condition should be interpreted alongside the overall application rather than as proof of a single cause.
- If cuticle film remains on the nail plate, it may interrupt direct contact between the surface and the gel extension system.
- If oil or moisture is present, adhesion may be reduced because the bonding surface is not fully clean and dry.
- If cleanser leaves visible residue, the remaining film may contribute to uneven bonding.
- If dehydrator or primer is applied inconsistently, surface preparation may vary across the nail plate.
- If the prepared nail plate touches skin, hair, or another surface, contact contamination may reintroduce oil or debris.
More primer does not necessarily improve adhesion when residue or moisture remains on the nail plate. Over-filing may create a separate damage risk even when the goal is better adhesion, so the surface condition should be evaluated before additional preparation.
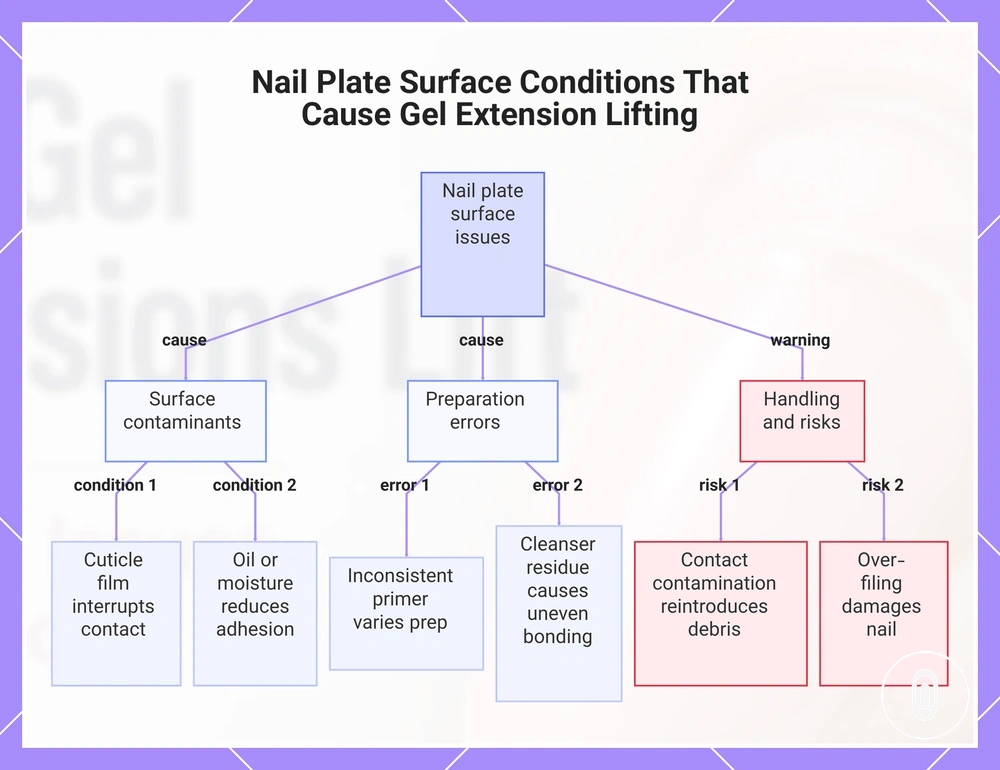
This chart shows the main types of surface contamination and preparation errors that can lead to gel extension lifting, along with handling risks.
Weak or flexible natural nails under the extension
When weak nails or flexible nails move beneath a more rigid extension, repeated movement may reduce bond stability and contribute to lifting. Peeling layers or a damaged nail plate can also limit how evenly the extension adheres. The likely cause range involves nail flexibility, surface condition, and stress transfer during wear.
Check whether the natural nail bends easily, shows peeling, or has visible surface damage beneath the extension. Greater extension length may increase leverage, which can transfer more stress to a flexible nail and make separation more noticeable at the edges. If lifting repeatedly appears on nails with similar movement or damage, the natural nail condition may be contributing alongside fit, preparation, or application factors.
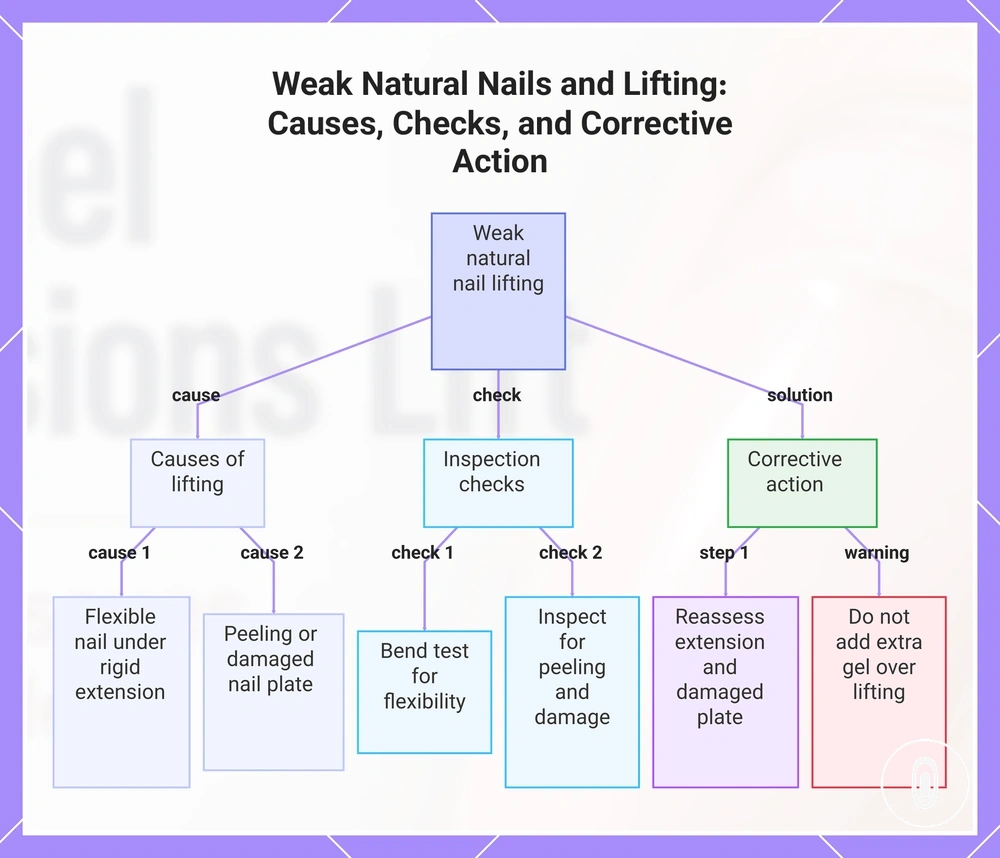
Repeated lifting over a compromised nail should not be managed by adding more gel over the separated area. The existing extension and damaged nail plate may need reassessment because extra material can add stress without addressing the movement or peeling beneath it.
This chart shows the main causes of lifting when natural nails are weak or flexible, the checks to perform, and the recommended corrective action.
Tip fit, etching, and contact gaps
When tip fit is inconsistent, the full-cover tip may not maintain stable contact with the natural nail, which can contribute to lifting. Poor underside contact, insufficient etching, or a contact gap may reduce gel adhesion even when the application looks even. The most likely cause range involves tip fit, underside preparation, and full-cover tip contact.
Tip fit depends on tip width, curvature, and full contact rather than one feature alone. The checklist below helps identify local conditions that may contribute to separation.
- If the full-cover tip is too narrow, it may create a pressure point along the sidewall instead of even contact.
- If the curvature of the tip does not match the natural nail, a contact gap or air gap may remain beneath the extension.
- If a pre-etched tip or hand-etched underside does not provide consistent contact, gel adhesion may vary across the bonded area.
- If a visible air gap remains after fitting, the gap may increase the chance of separation or popping off during wear.
- If a tip is too curved rather than too small, incomplete underside contact may become a more likely cause than edge pressure alone.
If multiple fit or contact issues appear together, the combination of tip fit, etching, and underside contact may explain the lifting pattern more effectively than any single factor.
Gel glue placement, air bubbles, and flooded edges
When gel glue placement is uneven, early lifting may begin because the full-cover tip does not maintain consistent contact with the natural nail. Air bubbles, flooded edges, incorrect gel thickness, or incomplete contact can interrupt the bonded surface even when the extension initially appears secure. The most likely cause range involves gel glue placement, pressure during application, and bond consistency.
Gel glue placement depends on even coverage without excessive overflow or visible gaps. The checklist below helps identify common placement conditions that may contribute to separation.
- If gel glue is applied too thickly, excess material may create uneven contact and can contribute to movement during curing.
- If too little gel glue is used, incomplete contact may leave air bubbles or uncovered areas beneath the full-cover tip.
- If flooded edges reach the cuticle or sidewall, skin contact may increase the chance of separation beginning near the edge.
- If pressure during placement is uneven, trapped air bubbles may reduce continuous contact across the nail.
For example, excess gel glue may overflow into the cuticle area, while too little gel glue may leave small air pockets beneath the tip. If these placement signals appear together, reviewing common application errors may help identify the condition contributing to the lifting pattern.
Undercuring, lamp exposure, and opaque tips
When undercuring occurs, the gel adhesive beneath a full-cover tip may remain weaker than expected and contribute to lifting or popping off. Curing conditions depend on the UV LED lamp, cure time, lamp exposure, gel type, and how effectively light reaches the adhesive. The most likely cause range involves curing conditions, tip transparency, and gel thickness.
Curing conditions should be assessed by checking how light reaches the adhesive rather than focusing on cure time alone. The checklist below helps identify common conditions that may contribute to undercuring.
- If the UV LED lamp is not compatible with the gel system, curing performance may vary.
- If cure time or lamp exposure is insufficient, undercuring may leave the adhesive less fully cured.
- If opaque tips create a shadowed area, light may not reach all parts of the adhesive evenly.
- If gel thickness is greater in one area, curing may vary across the bonded surface.
- If hand placement changes during curing, lamp exposure may become less consistent across the nail.
A sticky surface residue is not necessarily the same as uncured adhesive beneath a full-cover tip. If lifting appears where opaque tips, shadowed areas, or thicker gel overlap, undercuring may be one contributing condition rather than the only cause.
How timing changes the likely cause of lifting
Timing of lifting helps narrow the likely cause after identifying where the separation begins. Lifting after one day may suggest early bond failure, while lifting that develops after one to two weeks may relate more closely to wear stress, nail growth, or repeated daily use. Timing should be treated as a diagnostic clue rather than proof of a single cause because different conditions can produce similar patterns.
Compare when the lifting starts with where it appears and whether the same nail is affected repeatedly. Lifting after one day may indicate a preparation issue, undercuring, or incomplete contact, while lifting during the first week can point toward a weak bond that becomes more noticeable with wear stress. Separation after one to two weeks may reflect nail growth and normal wear rather than an immediate bonding problem. If the recurring same nail lifts repeatedly, tip fit, nail shape, or a local nail condition may deserve closer attention.
The table below uses timing as a secondary diagnostic signal to distinguish immediate bonding concerns from wear-related changes. If the pattern resembles early wear failure, compare both timing and lifting location before deciding whether the extension should be monitored, repaired, or removed.
| Signal | Likely cause range | What to check | Safe next step |
|---|---|---|---|
| Lifting after one day | Early bond failure, preparation, or undercuring | Surface preparation, curing conditions, and initial contact | Inspect the full bond before reapplying |
| First-week lifting | Weak bond combined with wear stress | Fit, edge condition, and daily use | Review both application and wear pattern |
| One to two weeks | Nail growth, wear stress, or gradual separation | Lifting location and extension condition | Assess whether monitoring, repair, or removal is appropriate |
| Recurring same nail | Fit issue, local nail condition, or repeated stress | Tip fit, nail shape, and recurring pattern | Compare repeated lifting before drawing conclusions |
Lifting after one day
One-day lifting usually points to early bond failure, but timing alone does not confirm the cause. The likely cause range includes prep residue, moisture, a tip gap, glue flooding, undercuring, or immediate pressure on the extension.
The checks below help separate a local fit problem from a broader process issue.
- If several nails lift after one day, prep residue, moisture, glue flooding, or undercuring may have affected the application process.
- If one nail lifts while the others remain secure, a local tip gap, uneven pressure, or incomplete contact may be more likely.
- If lifting begins near a flooded edge, gel contact around the cuticle or sidewall may have created an early separation point.
- If the tip shifts, feels unstable, or starts popping off soon after application, undercuring or incomplete bonding may need closer inspection.
Check both the number of affected nails and the lifting location before deciding what caused the early bond failure. A single-nail pattern may point toward fit or pressure, while several affected nails may suggest a shared preparation, placement, or curing condition.
Lifting after one to two weeks
Lifting after one to two weeks may reflect wear stress rather than an immediate bonding problem, although timing alone does not identify the cause. A growth gap, edge exposure, nail flexibility, or a weaker original bond may become more noticeable during normal wear. The likely cause range depends on both the lifting pattern and how the extension has been used.
The checks below help distinguish common wear-related conditions from repeatable fit or preparation issues.
- If a growth gap develops near the cuticle, greater edge exposure may make lifting easier to notice over time.
- If repeated water exposure affects the extension edge, separation may become more visible after one to two weeks.
- If longer extensions experience length leverage or repeated side impacts, stress may concentrate near the lifting area.
- If maintenance habits allow a lifted edge to remain exposed, wear stress may continue to affect the same area.
Check whether the lifting follows normal growth or repeatedly appears in the same location. A recurring location may suggest a repeatable fit or prep issue rather than wear stress alone.
How to fix a lifted gel extension safely
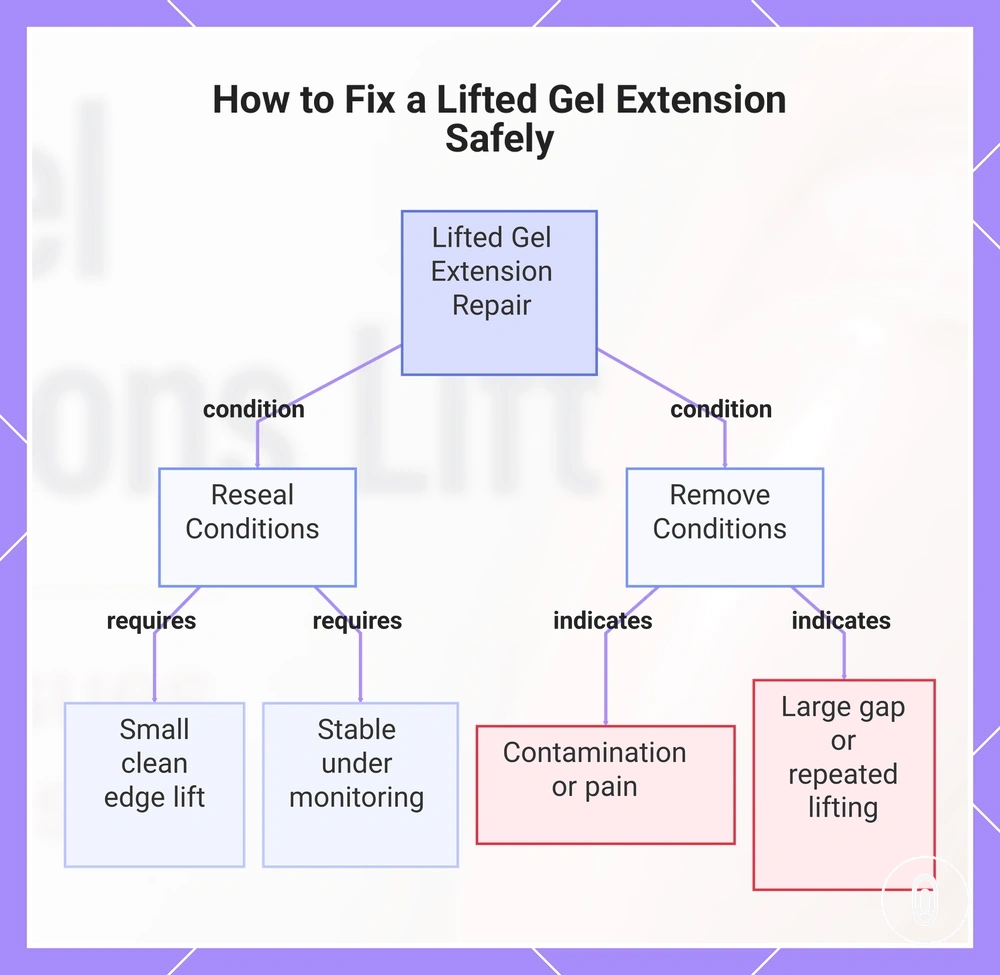
A lifted gel extension should be assessed before any repair because the safe fix depends on the lift size, location, contamination, and whether pain is present. A small clean edge lift may be suitable to reseal in limited cases, while moisture, a large gap, repeated lifting, or discomfort may make removal the safer response.
Use the steps below to decide whether to reseal or remove the lifted gel extension. Stop the process if the separation spreads, contamination is visible, or the nail becomes painful or unstable.
- If the lift is small, clean, and limited to the edge, a careful reseal may be considered. Stop if the edge continues to lift or no longer remains secure.
- If moisture, dirt, or other contamination is present beneath the lift, remove the extension rather than sealing over it. Stop until the nail is clean and the cause has been assessed.
- If pain, tenderness, or discomfort develops, remove the lifted gel extension instead of attempting further repair. Stop if symptoms increase or the nail feels unstable.
- If a large gap, extensive separation, or repeated popping off is present, remove the extension instead of trying to reseal it. Stop if the lifting continues to worsen because the original bond may no longer be reliable.
Temporary edge management may suit only a small, clean lift that remains stable during monitoring. A large separation, repeated lifting, or signs of contamination usually support full removal before another gel extension is applied.
This chart shows the conditions that determine whether to reseal or remove a lifted gel extension.
When resealing a lifted edge is reasonable
Resealing depends on whether the lifted edge is small, clean, painless, and still has stable remaining adhesion. A small lift may be suitable for temporary resealing, while a large, dirty, painful, recurring, or spreading separation usually indicates that removal is the more appropriate response because the underlying adhesion may already be failing.
The checklist below helps determine whether resealing is a reasonable short-term option or whether the extension should be removed instead.
- If the lifted edge is a small lift at one edge location, resealing may be considered while the remaining adhesion remains stable.
- If the clean edge contains moisture, debris, or other contamination, avoid resealing because trapped material may continue to affect the bond.
- If the area is painless and the separation is not increasing, temporary resealing may be reasonable with continued monitoring.
- If remaining adhesion is firm across the rest of the extension, the lift may be limited to the affected edge rather than the whole bond.
- If the lift keeps returning, continues spreading, or starts popping off, remove the extension and reassess the underlying cause instead of resealing it again.
Resealing should not hide an active adhesion failure that is still spreading. Before deciding what to do next, check whether the lifted edge remains small and clean or whether moisture, pain, or increasing separation has changed the situation.
When the lifted extension should be removed
Remove a lifted extension when repair could trap moisture or debris, increase discomfort, or leave a large separation that continues to move. Pain, discoloration, a damaged natural nail, or movement across the full tip are stronger removal signals than a small, clean edge lift.
The checklist below helps identify when removal is more appropriate than resealing. Do not force off the extension, especially when the natural nail appears damaged.
- If pain, tenderness, or increasing discomfort is present, stop using the extension and arrange careful removal.
- If green or dark discoloration appears beneath the lifted extension, stop covering the area and seek appropriate professional advice.
- If a large gap contains trapped moisture or debris, remove the extension rather than sealing material underneath it.
- If repeated lifting returns in the same area, removal may allow the fit, preparation, and natural nail condition to be reassessed.
- If the damaged natural nail is visible, avoid pulling or forcing off the extension because additional separation may worsen the damage.
- If the full tip moves or starts popping off, the remaining adhesion may be too limited for a stable repair.
Discomfort, suspected infection, visible nail damage, or worsening discoloration should prompt professional assessment rather than another repair attempt. Removal should be controlled and gentle, not forced.
How to prevent gel extensions from lifting again
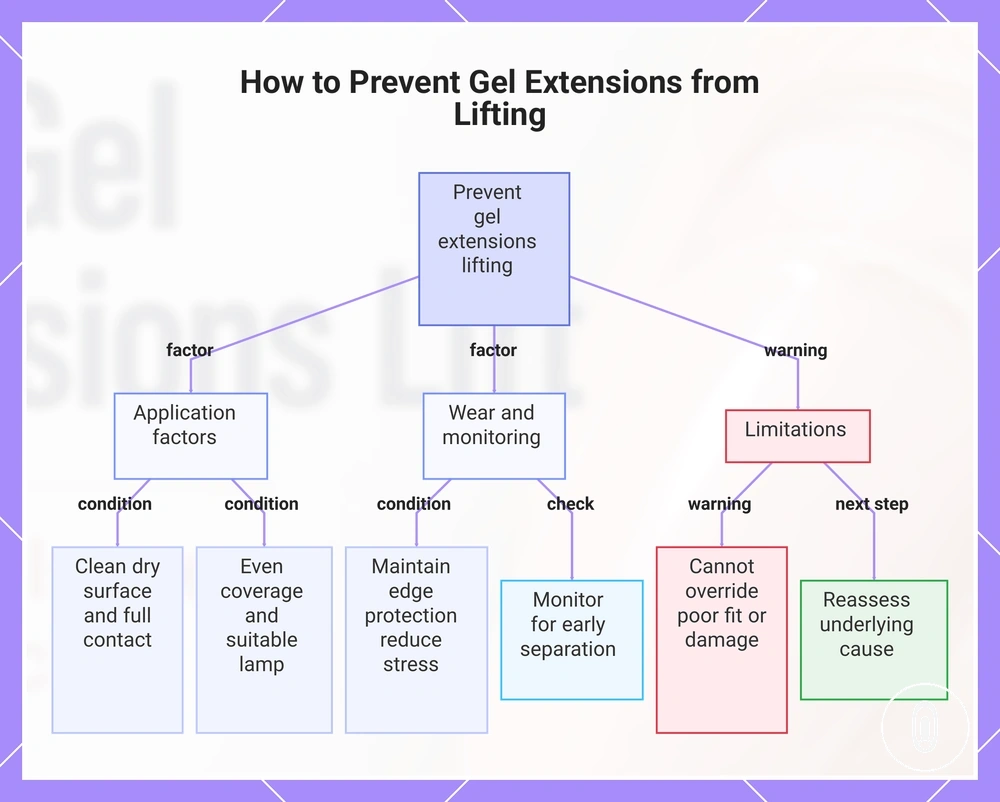
Prevent lifting by turning the earlier diagnosis into consistent application and wear habits rather than relying on one corrective step. Prevention depends on prep, fit, glue control, curing, edge protection, and wear habits working together because each factor supports stable adhesion under normal use.
The checklist below helps confirm whether the key prevention conditions are in place before and after application. Each point focuses on one factor that may reduce the chance of repeat lifting when the overall application remains consistent.
- If prep leaves a clean, dry nail surface, adhesion is less likely to be affected by oil, moisture, or residue.
- If fit provides full tip contact with minimal gaps, pressure points and early separation may become less likely.
- If glue control creates even adhesive coverage without bubbles or a flooded edge, the bonded surface may remain more consistent.
- If curing matches the gel type and receives suitable lamp exposure, uneven curing conditions may be less likely.
- If edge protection is maintained and daily wear habits reduce repeated edge stress, exposed lifting points may develop less often.
- If the extensions are monitored for early separation, small changes may be identified before they become larger lifting areas.
These prevention checks can reduce lifting risk, but they cannot override poor fit, nail damage, or incompatible curing conditions. If the same nail or location continues to lift, reassess the underlying cause instead of repeating the same application process.
This chart outlines the prevention conditions for gel extensions, covering application factors, wear and monitoring practices, and key limitations to avoid repeat lifting.
Prep checks before application
Prep checks verify that the nail is ready for application by confirming a clean nail plate, a dry surface, and light surface preparation before gel extensions are applied. Consistent prep conditions help support adhesion by focusing on cuticle film removal, gentle buffing, dust removal, cleansing, and appropriate use of a dehydrator or primer.
The checklist below verifies the key prep conditions before application. Each check focuses on one local condition that may improve bond consistency without unnecessary preparation.
- If cuticle film has been removed from the clean nail plate, the bonding surface may provide more consistent adhesion.
- If gentle buffing creates a lightly prepared surface and loose dust is removed, remaining debris is less likely to affect the bond.
- If cleansing leaves a clean nail plate with a dry surface, oil and residue are less likely to interfere with adhesion.
- If a dehydrator or primer is used where appropriate for the application system, surface conditions may become more consistent.
- If the prepared nail does not contact skin, hair, or other surfaces before application, new contamination is less likely.
More prep is not always safer when the natural nail is thin or damaged because additional filing may increase surface stress. A clean, dry, lightly prepared nail surface is usually a more appropriate goal than increasing preparation beyond what the nail condition requires.
Fit, glue, and curing checks
Fit checks, glue checks, and curing checks organize the main mechanical conditions that may contribute to early lifting. Even bonding depends on tip width, matching curvature, etched contact, controlled gel amount, bubble control, and curing conditions that suit the gel system.
The checklist below verifies the main application conditions before the gel extension is fully cured. Each check focuses on one local factor without replacing the full application process.
- If tip width and curvature follow the natural nail, the extension may achieve fuller contact with fewer gaps.
- If the contact area is etched where required by the application system, adhesion may remain more consistent across the bonded surface.
- If the gel amount is even and bubble control limits trapped air or edge flooding, local contact interruptions may be less likely.
- If lamp placement provides consistent exposure and cure compatibility matches the gel type, undercuring may be less likely.
- If opaque tips or thicker gel layers reduce light transmission, the curing conditions may require closer assessment.
These fit, glue, and curing checks help identify application conditions that may need adjustment before normal wear begins. If one factor remains inconsistent, correcting that local condition may reduce repeat lifting more effectively than repeating the same application unchanged.
Wear habits that reduce edge lifting
Wear habits mainly affect edges, sidewalls, and free-edge leverage after gel extensions are applied. Daily wear behavior may reduce edge stress when it limits repeated strain, but it cannot compensate for poor preparation, poor fit, or an unstable bond. The main control factors include water exposure, impact, picking, nail length, cuticle oil use, and monitoring small lifts.
The checklist below helps verify daily habits that may reduce edge stress during normal wear. Each habit supports ongoing maintenance rather than replacing correct application.
- If water exposure is prolonged, check the edges afterward because early edge lifting may become easier to notice.
- If repeated impact or using nails as tools places force on the free edge, reducing nail length or leverage may help limit additional stress.
- If picking begins around a lifted area, stop because it may increase separation and the risk of damaging the natural nail.
- If cuticle oil is applied to the surrounding skin, avoid working it under a lifted area where it may interfere with assessing the separation.
- If small lifts appear, monitor them early instead of allowing the lifted edge to catch repeatedly during daily use.
These wear habits may help reduce edge stress during normal use, but recurring lifting should prompt a review of the likely underlying cause rather than relying on habit changes alone.