At-Home Gel Nail Extension Kit Mistakes That Cause Failed Sets
At-home gel nail extension kit mistakes are setup, application, wear, or removal errors that can weaken gel extensions and create visible failure symptoms. When preparation, fit, bonding, or curing conditions are unsuitable, a set may develop lifting, gaps, weak wear, or popping off.
Small errors can affect the result even when the finished nails initially look secure. An at-home gel nail extension kit guide defines the connected tools and materials, while this page focuses on how incorrect use can turn those components into failure points.
Nail prep affects whether residue interferes with adhesion. Tip fit affects pressure, gaps, and contact with the natural nail. Gel adhesive, curing, wear behaviour, and removal affect the bond and stability after placement.
The outcome depends on the natural nail condition, tip shape, gel system, adhesive placement, curing lamp performance, and user technique. A mistake may increase the risk of a failed set without producing the same symptom for every person or product combination.
Preventable beginner mistakes usually begin before or during application, while visible lifting, separation, or damage requires correction rather than being covered or forced back into place. The first diagnostic step is to identify which stage created the failure symptom.
- Incomplete nail prep may leave oil, dust, moisture, or cuticle residue near the bonding area.
- Poor tip fit may create pressure at the sidewalls or gaps beneath the nail tip.
- Uneven gel adhesive placement may leave air pockets, weak contact, or flooded edges.
- Insufficient or uneven curing may leave the gel system unstable.
- Daily stress or ignored lifting may weaken an already vulnerable bond.
- Forceful removal may increase the risk of natural nail damage.
Why Gel Extension Mistakes Cause Lifting, Popping Off, and Weak Wear
Gel extension failure usually develops when adhesion is weakened, tip fit is unsuitable, curing is incomplete, or daily stress exceeds the strength of the bond. Although these symptoms can look similar, the visible pattern often provides clues about which stage of application or wear contributed to the failed set.
Lifting often begins where adhesion is reduced, such as around the cuticle area or another edge of the extension. Popping off may be associated with poor fit or a bond that separates as pressure builds beneath the tip, while weak wear usually develops more gradually as curing, bond quality, or repeated stress reduces stability.
Why Gel Extension Mistakes Cause Lifting, Popping Off, and Weak Wear becomes clearer when visible separation patterns are matched to likely causes rather than treated as the same problem. The image below highlights these symptom areas, while lifting mistakes provides a more focused explanation of one failure pattern.
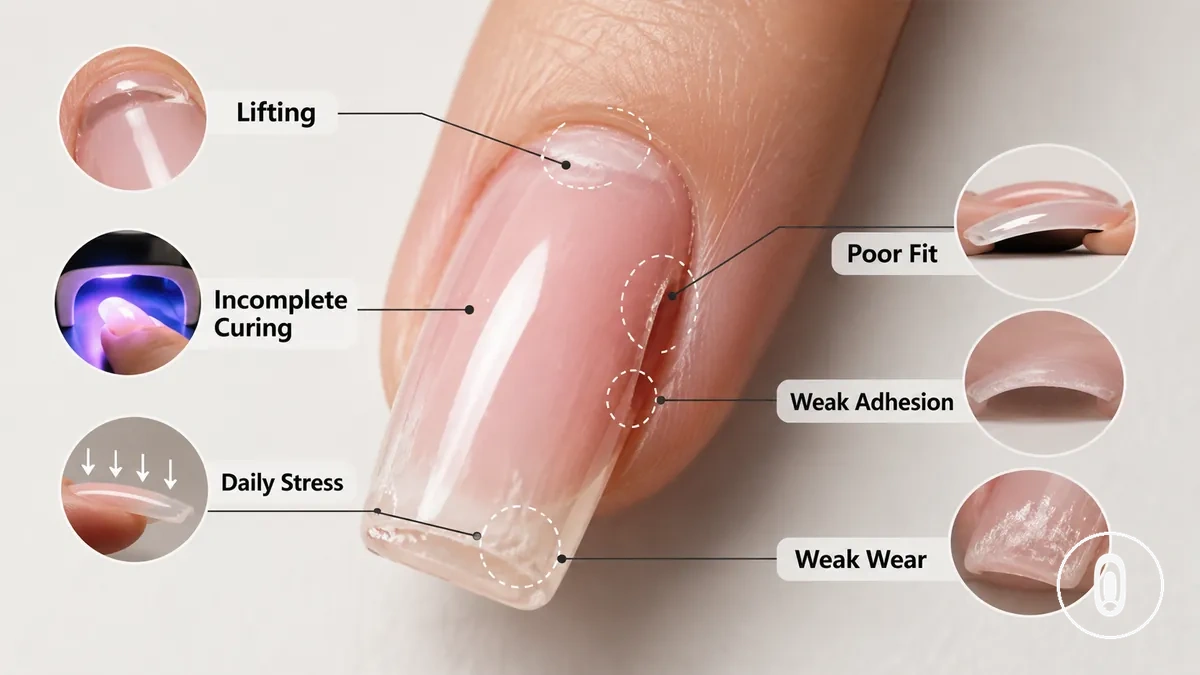
- Lifting near the cuticle area may indicate weak adhesion linked to residue, skin contact, or incomplete surface preparation.
- Popping off can occur when poor tip fit creates pressure, gaps, or an unstable bond.
- Soft or unstable gel may point to incomplete curing or a mismatch between the curing process and the gel system.
- Weak wear may appear after repeated stress at the free edge even when the extension remains attached.
- Visible separation can result from more than one mistake, so the symptom should be matched to the application stage before correction.
These symptom groups support diagnosis only. The following sections examine each mistake mechanism separately rather than treating every gel extension failure as having the same cause.
Nail Prep Mistakes That Break Adhesion
Nail prep mistakes break adhesion by leaving the natural nail unable to hold gel adhesive evenly across its surface. Oil, dust, residue, or unsuitable surface conditions can weaken the bond even when application and curing appear correct.
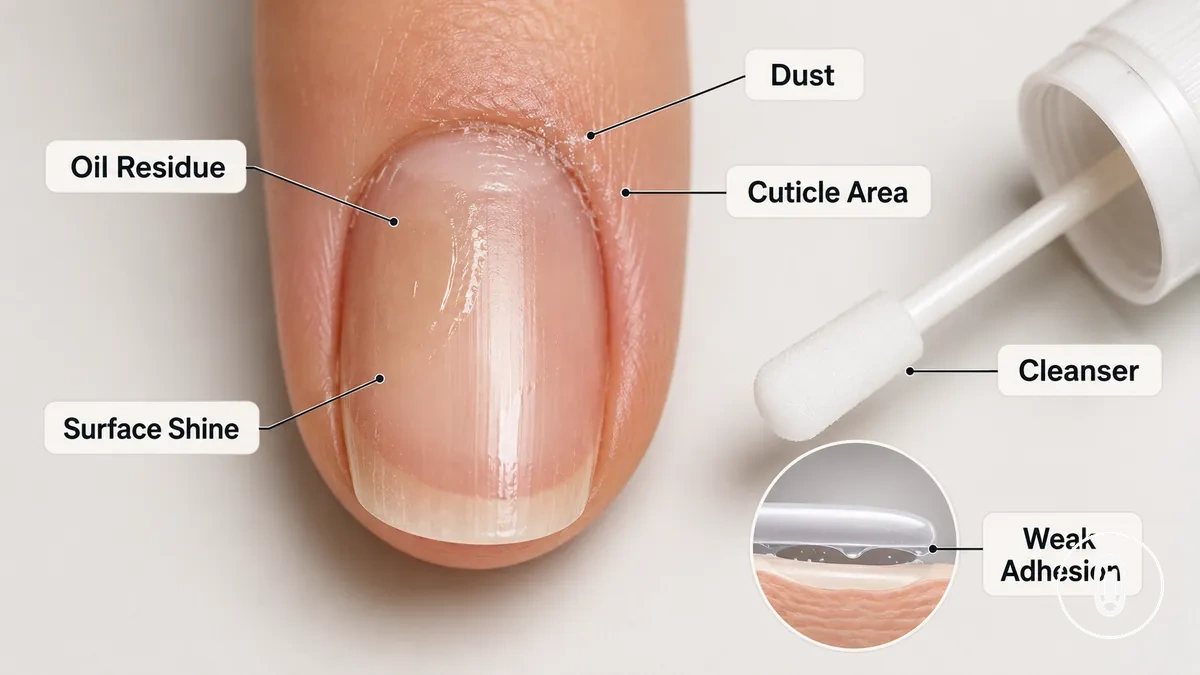
Prep conditions determine how well gel adhesive contacts the natural nail. Residue near the cuticle area, excess surface shine, or inconsistent use of cleanser, dehydrator, or primer may reduce adhesion depending on nail condition, product tolerance, and where contamination remains. A small amount of contamination in a critical bonding area can contribute to lifting even if the rest of the extension appears secure.
The image above highlights prep conditions that can interrupt adhesion before gel application. Use this checklist to verify the most common conditions that affect bond strength rather than as a complete nail prep routine.
- Check the natural nail for oil, dust, or visible residue before applying gel adhesive.
- Inspect the cuticle area for remaining skin or debris that may interfere with adhesion.
- Confirm the surface texture is even without unnecessary shine that may reduce bond quality.
- Use cleanser, dehydrator, and primer according to the nail condition and gel system rather than automatically.
- Look for overlooked areas where contamination could remain on the nail plate.
For example, a small amount of residue near the cuticle area may contribute to lifting even when the gel adhesive cures normally, although the outcome depends on its location, the natural nail, and the gel system. For broader guidance on avoiding these conditions, see prep mistakes.
Leaving oil, dust, or moisture on the natural nail
Leaving oil, dust, or moisture on the natural nail can reduce contact between the nail plate and the gel adhesive. When surface residue remains in the bonding area, the bond may become less consistent, although the outcome depends on the type, amount, and location of the contamination.
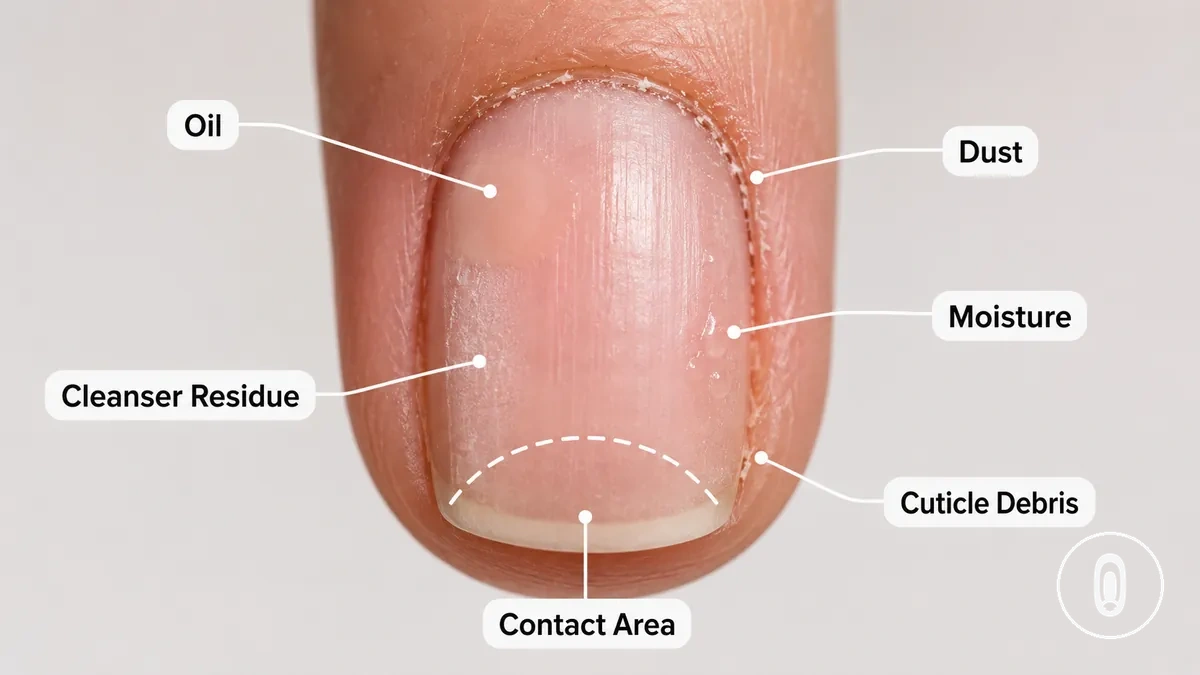
The image above clarifies residue locations that can interrupt gel adhesive contact rather than proving a universal failure outcome. Check for oil, dust, moisture, cleanser residue, and cuticle debris because each type of residue can reduce surface connection differently depending on where it remains on the natural nail.
- Oil on the nail plate may reduce direct gel adhesive contact.
- Dust or cuticle debris can remain near the bonding edge and contribute to weaker surface connection.
- Moisture in the adhesive contact area may reduce bond quality if it remains before application.
- Cleanser residue can interfere with adhesion when it is left on the natural nail.
A small amount of residue may not produce the same result on every natural nail, but contamination close to the bonding area can increase the likelihood of weaker adhesion or early lifting.
Over-filing or under-preparing the nail surface
Over-filing or under-preparing the nail surface can reduce adhesion for different reasons. A balanced nail surface texture supports more consistent gel adhesive contact, while excessive thinning or too much remaining shine may reduce adhesion readiness depending on the natural nail and application technique.
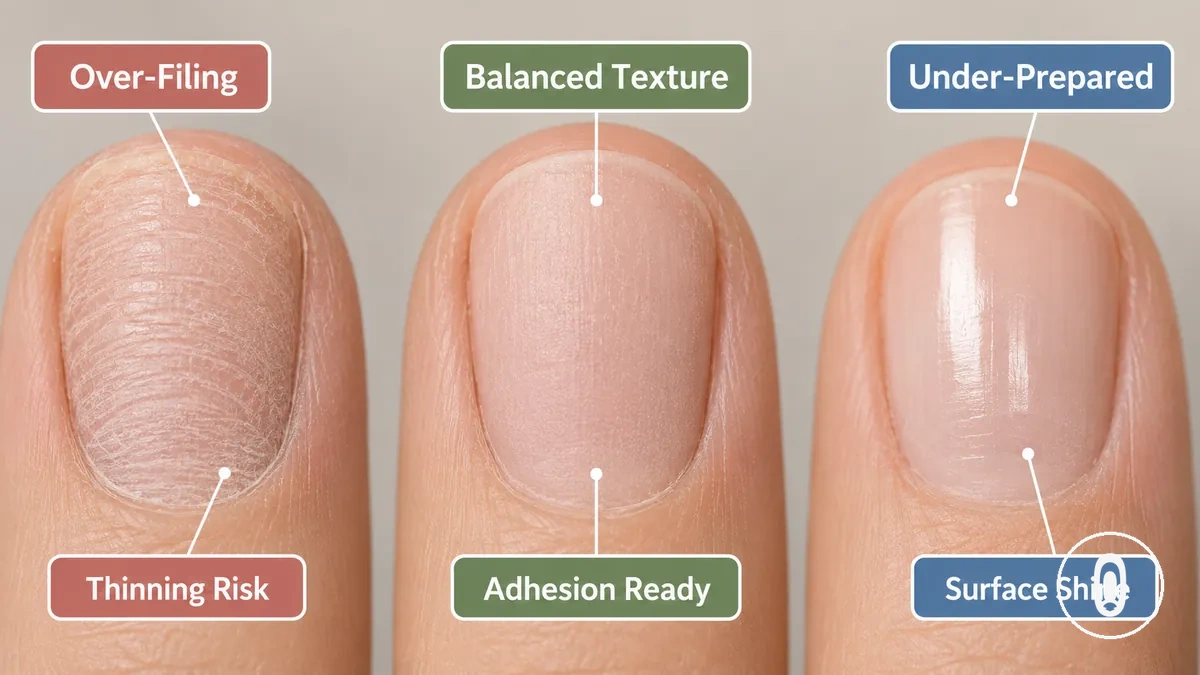
The comparison below clarifies the difference between too much and too little surface preparation. It compares surface conditions rather than recommending a specific filing method, pressure, or timing.
| Over-filing | Under-preparing |
|---|---|
| Too much roughness or thinning may increase sensitivity risk and reduce nail protection. | Too much surface shine may leave the nail surface less ready for consistent adhesion. |
| Excessive roughness can weaken the nail plate depending on its condition. | Limited surface texture may reduce gel adhesive contact with the nail surface. |
| The goal is balanced texture rather than maximum roughness. | The goal is to reduce excess shine without leaving the nail surface completely smooth. |
Balancing surface texture with protection of the natural nail is more important than creating the roughest possible finish. The appropriate level of surface prep varies with nail condition and technique, so more filing does not necessarily improve adhesion.
Using primer or dehydrator without matching the nail condition
When primer or dehydrator is used without matching the nail condition, adhesion or comfort may be affected. These prep liquids work differently, so the appropriate product, product amount, and placement can depend on nail moisture, nail oil, and the condition of the natural nail rather than a universal routine.
Consider the nail condition before deciding how primer or dehydrator is used:
- Oily nails: Primer or a dehydrator may support adhesion when excess nail oil is present, depending on the gel system and application.
- Dry nails: Using more prep liquid than needed may increase surface dryness without necessarily improving wear.
- Sensitive nails: Product amount and placement may influence irritation risk, so unnecessary contact with surrounding skin should be avoided.
- Damaged nails: Nail condition may affect how prep liquids perform, so a conservative approach can be more appropriate than adding extra product.
No single primer or dehydrator routine suits every natural nail. Matching the prep liquid to the nail condition while using only the amount needed in the intended placement can help support adhesion without assuming that more primer or dehydrator always improves wear.
Tip Fit Mistakes That Create Pressure and Gaps
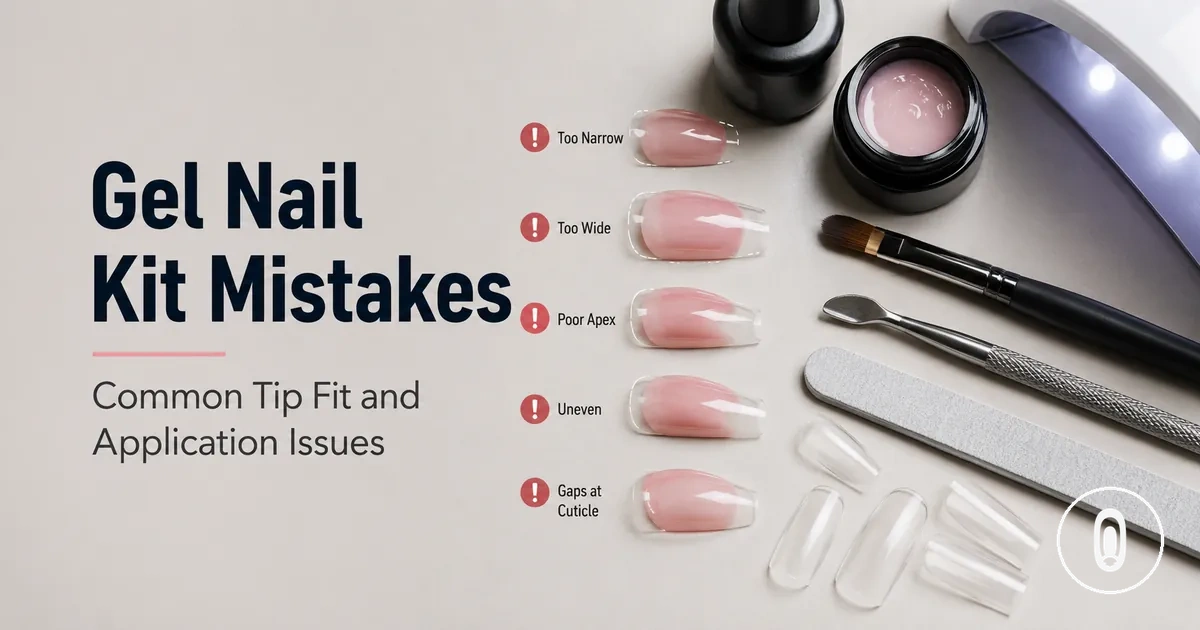
Tip fit mistakes create pressure, gaps, and uneven contact before gel adhesive or curing can perform as intended. A gel nail tip that does not match the nail bed shape or curve may appear acceptable from above while leaving poor contact along the sidewalls or contact area, which can weaken attachment.
Tip fit depends on the relationship between the gel nail tip and the natural nail rather than appearance alone. Nail tip width, curve, sidewall coverage, nail bed shape, free edge alignment, and overall contact area all influence how evenly the tip sits. A tip that is too narrow may create pressure, while a mismatch in curve or sidewall coverage may leave gaps that increase the likelihood of lifting or popping off.
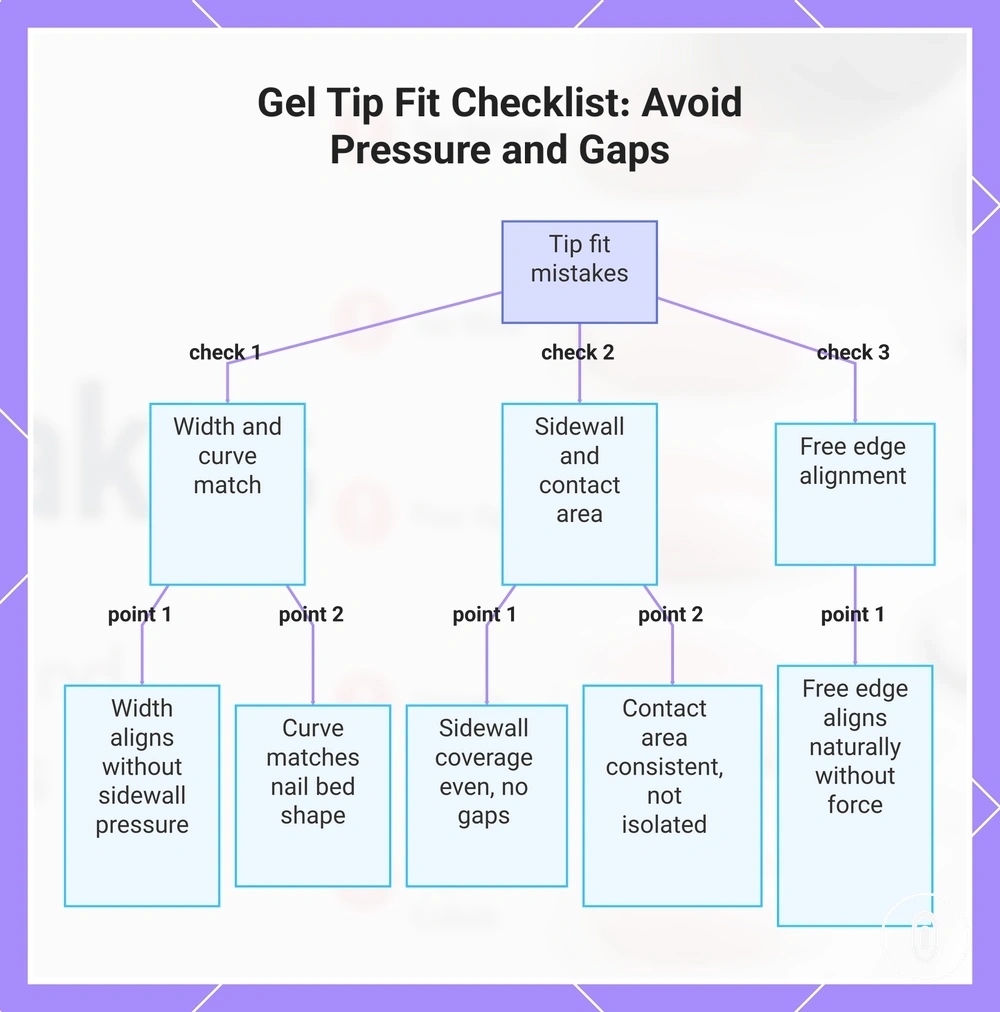
The checklist below helps verify structural tip fit before adhesive is applied. It focuses on contact and sizing rather than style or shape preference.
- Check that the gel nail tip width aligns with the natural nail without creating excessive pressure at the sidewalls.
- Compare the curve of the full-cover tip with the nail bed shape to identify uneven contact.
- Confirm sidewall coverage is even and does not leave visible gaps.
- Inspect the contact area across the nail to ensure the tip sits consistently rather than touching only at isolated points.
- Check that the free edge aligns naturally without forcing the tip into position.
Tip fit is a structural condition rather than a style choice. Because nail beds vary, sizing should be assessed by pressure, gaps, and contact area instead of assuming one tip size or shape suits every nail.
This chart shows three groups of checks to identify gel nail tip fit mistakes that cause pressure, gaps, and weak attachment.
Choosing tips that are too small or too curved
Choosing tips that are too small or too curved can create fit tension because the gel nail tip must be forced onto the nail bed. When this happens, sidewall pressure, uneven center contact, or edge gaps may develop, which can increase the likelihood of lifting or popping off depending on the nail bed shape, tip material, and C-curve.
The comparison below highlights how these two fit conditions differ while keeping the focus on width and curve rather than appearance.
| Small Tips | Curved Tips |
|---|---|
| Undersized tips may create sidewall pressure when they are forced onto the nail bed. | Over-curved tips may contact the center first while leaving edge gaps. |
| Stored fit tension may increase the likelihood of lifting or popping off over time. | A C-curve that does not match the natural nail may reduce even center contact. |
| Tip width should be assessed together with the nail bed rather than visual length alone. | Curve suitability depends on the natural nail bed instead of a universal curve. |
For example, a gel nail tip may appear to fit when viewed from above but still develop pressure or edge gaps after placement if the width or C-curve does not match the natural nail. Checking both attributes together can help reduce unnecessary fit tension before adhesive is applied.
Ignoring sidewall coverage and nail bed shape
Ignoring sidewall coverage and nail bed shape can prevent a gel nail tip from sitting evenly across the natural nail. Stable contact depends on how well the tip follows the nail bed shape, so unsupported corners, uneven sidewall coverage, or poor free edge alignment may increase the likelihood of gaps or lifting.
Use the checks below to verify whether the tip is supported across the nail rather than touching only selected areas.
- Check that sidewall coverage reaches both side edges without leaving unsupported corners.
- Compare the tip width with the nail bed width to identify pressure or exposed edges.
- Assess whether flat nails or curved nails allow even contact across the fit area.
- Confirm the free edge alignment follows the natural nail without twisting or forcing the tip into position.
- Look for unsupported corners or visible gaps that may reduce stable contact after placement.
Sidewall coverage and nail bed shape should be assessed together because stable contact depends on both conditions rather than either one alone. beginner kit advice can provide additional fit criteria without turning this check into product selection.
Gel Adhesive Mistakes That Weaken the Bond
Gel adhesive mistakes can weaken the bond when the adhesive layer does not fill the contact area evenly or flows onto the surrounding skin. Bond quality depends on adhesive volume, placement, and seating pressure working together, so improving these conditions may help create more consistent contact without cuticle flooding or sidewall overflow.
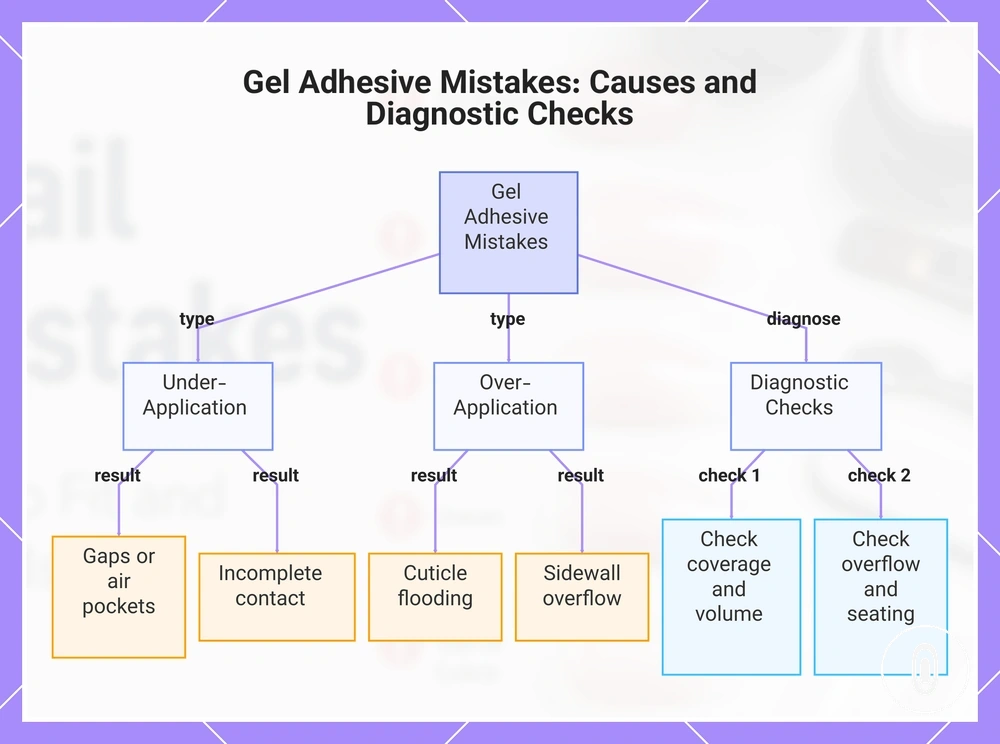
Too little gel adhesive may leave gaps or an air pocket where the bonding layer does not fully contact the nail tip, while too much adhesive may increase the likelihood of cuticle flooding or sidewall overflow. The same gel adhesive can perform differently depending on product viscosity, tip fit, nail condition, and curing, so under-application and over-application may weaken the bond for different reasons.
Use the checklist below to diagnose adhesive-related bond problems before assuming another stage caused the failure.
- Check whether the gel adhesive covers the contact area evenly without leaving an air pocket or bubble.
- Look for cuticle flooding that may interrupt the bonding edge.
- Inspect for sidewall overflow that can create an unstable edge.
- Confirm seating pressure allows the tip to settle evenly without forcing excess adhesive outward.
- Check whether adhesive volume appears balanced rather than leaving dry gaps or excessive overflow.
If bond quality remains inconsistent, reviewing application mistakes can help place adhesive amount, placement, and seating pressure within the wider application sequence without repeating the full procedure.
This chart shows the two main types of gel adhesive mistakes that weaken the bond and the key diagnostic checks to identify them.
Using too little gel adhesive under the tip
Too little gel adhesive under the tip can leave unbonded space where the bonding layer does not fully contact the natural nail. This partial bond may create air gaps, weak contact, or early lifting, although the outcome can vary with tip transparency, nail shape, adhesive consistency, and seating pressure.
Adhesive coverage is often easier to assess than adhesive amount alone. Transparent gaps beneath the tip, incomplete sidewall contact, weak contact near the free edge, or uneven pressure distribution may indicate under-application because parts of the contact area remain unfilled rather than evenly supported.
Look for these observable signs of under-application:
- Transparent air gaps remain visible beneath the tip.
- Unbonded space appears near the free edge or sidewall contact.
- Weak contact affects only part of the bonding surface.
- Pressure distribution appears uneven after the tip is seated.
Using too much gel adhesive around the cuticle or sidewalls
Too much gel adhesive around the cuticle or sidewalls can create overflow that reaches the surrounding skin or forms raised, unstable edges. Whether this affects the bond depends on adhesive amount, placement, edge thickness, and whether the gel contacts the skin before curing, so controlled adhesive coverage is generally more reliable than allowing overflow beyond the intended contact area.
The cuticle and sidewall areas are the primary overflow risk zones. Cuticle flooding, sidewall pooling, increased edge thickness, or skin contact may affect bond stability when adhesive overflow prevents the tip from seating evenly or creates a raised edge.
Check these caution points before curing if excess gel adhesive is visible:
- Look for cuticle flooding around the bonding edge.
- Check for sidewall pooling instead of even adhesive coverage.
- Inspect for adhesive overflow that reaches the surrounding skin.
- Watch for raised edge thickness that may contribute to an unstable bond.
- Confirm cleanup timing allows visible overflow to be removed before curing when appropriate.
Trapping air before the tip is fully seated
Trapped air before the tip is fully seated can interrupt contact between the natural nail, the adhesive gel, and the tip underside. An air pocket may create weak contact that can become a later lifting point, although the outcome depends on bubble size, seating angle, pressure, bubble visibility, and where the air remains before curing.
Bubble visibility is often the clearest diagnostic cue. A visible bubble beneath the tip underside, interrupted contact at the contact center, or a gap extending toward the side edges may indicate that trapped air remained during seating instead of the tip making even contact across the bonding surface before cure timing is reached.
Look for these observational signs:
- A visible air pocket remains beneath the tip underside.
- The contact center appears uneven before curing.
- A bubble or gap extends toward one of the side edges.
Application Thickness Mistakes That Affect Structure
Application thickness mistakes can affect gel extension structure by changing curing stability, edge bulk, and wear stress. A balanced gel layer is more likely to support even structure, while thin, thick, or uneven areas may create weak points or raised edges depending on the gel type, opacity, and curing conditions.
Application thickness influences how the gel layer supports the stress area, cuticle edge, sidewalls, and curing depth. Thin sections may provide less structural support, while excess edge bulk or sidewall buildup can create lifting or snagging points. An uneven layer may also distribute wear stress inconsistently across the extension.
The comparison below highlights how different thickness conditions may affect structure without implying that one thickness suits every gel system.
| Application thickness | Possible effect on structure |
|---|---|
| Thin gel layer | May leave the stress area with reduced support and contribute to a weaker structure during wear. |
| Thick gel layer | May reduce curing stability at greater curing depth, depending on gel type, opacity, and lamp exposure. |
| Uneven layer | May create inconsistent wear stress and local weak areas across the extension. |
| Cuticle edge bulk or sidewall buildup | May form a raised edge that can become a lifting or snagging point. |
The goal is controlled, even application thickness rather than maximum gel buildup. Appropriate gel layer distribution depends on the product and curing conditions, so this section remains focused on structural balance instead of advanced sculpting techniques.
Building layers too thick for stable curing
Building thick layers can reduce stable curing because greater layer thickness may limit consistent cure exposure through the gel. The outcome depends on gel opacity, lamp strength, placement, and cure depth, so thicker applications may increase the likelihood of reduced underside stability rather than curing evenly under all conditions.
Thick gel layers can respond differently across products and curing systems. Greater gel opacity, increased layer depth, or differences in lamp strength may influence how effectively light reaches the underside, which can affect curing stability without implying that every thick layer becomes an under-cured layer.
Conditions that may influence stable curing include:
- Thick layers may reduce light penetration as cure depth increases.
- Greater gel opacity can influence how cure exposure reaches the underside.
- Lamp strength and gel compatibility may affect curing consistency.
- Reduced underside stability may contribute to a weaker bond when curing remains incomplete.
Leaving the cuticle area bulky or flooded
Leaving the cuticle area bulky or flooded can create a raised edge that may catch during daily use, contribute to lifting, or increase the chance of product contacting the surrounding skin. Maintaining cuticle clearance with controlled edge thickness can help produce a smoother transition during later grow-out.
Structural bulky gel differs from adhesive overflow because the concern is the thickness of the cured gel near the cuticle area rather than excess adhesive beneath the tip. Bulky gel or flooded gel can create a thick edge that may become more noticeable as the nail grows out, while cleanup before curing can help reduce excess edge thickness before the gel sets.
For example, a cuticle area with appropriate clearance may grow out with a smoother edge, while a bulky cuticle area can leave a raised edge that is more likely to catch, lift, or contact the surrounding skin depending on product placement and edge thickness.
Curing Mistakes That Leave Gel Extensions Unstable
Curing mistakes can leave gel extensions unstable when light exposure does not reach the gel as intended. Stable curing depends on the UV LED lamp, gel type, cure time, hand angle, thumb placement, gel thickness, and other application conditions rather than a universal setting.
Curing results may vary across lamp and gel systems. Differences in gel thickness, opacity, lamp exposure, or hand position can influence curing depth, so a surface that appears cured may still have reduced underside stability if light does not reach all areas consistently.
The table below organizes common curing conditions by symptom, likely issue, what to check, and what the observation may indicate.
| Symptom | Likely curing issue | Check | What it means |
|---|---|---|---|
| Surface appears cured but the extension feels unstable | Reduced curing depth | Gel thickness and gel opacity | The underside may remain weaker even when the surface appears set. |
| Uneven curing along the sides | Limited light exposure | Hand angle and sidewall positioning | Uneven exposure may leave some areas less fully cured. |
| Thumb cures differently from other nails | Thumb placement changes exposure | Thumb placement inside the curing lamp | Different positioning may affect light distribution. |
| Inconsistent curing between applications | Lamp and gel system mismatch | UV LED lamp compatibility, gel type, and cure time | Curing performance depends on the lamp and gel system working together. |
A surface-cured appearance does not confirm complete underside or bond stability. This edge case depends on the lamp, gel system, opacity, and layer thickness, so visible surface cure should be treated as one observation rather than proof of complete curing.
Using the wrong lamp or weak curing time
Using the wrong lamp or weak curing time can leave gel soft, weak, or poorly bonded when the curing lamp does not match the gel system or cure duration is insufficient. UV LED compatibility, lamp strength, gel opacity, and manufacturer instructions should be considered together because curing performance depends on the specific lamp and gel combination rather than a universal timing rule.
Compatibility checks are more reliable than extending cure duration alone. A lamp mismatch may reduce curing stability for a particular gel type, while insufficient cure time may leave the gel less stable depending on gel opacity, lamp strength, and the manufacturer instructions.
Check these compatibility conditions before assuming cure time is the only issue:
- Confirm UV LED compatibility between the curing lamp and the gel type.
- Check that lamp strength is suitable for the intended gel system instead of assuming all curing lamps perform the same way.
- Consider whether gel opacity may influence the cure duration recommended in the manufacturer instructions.
- Compare the curing process with the manufacturer instructions for the specific lamp and gel combination.
A longer cure duration does not necessarily resolve every lamp mismatch. Stable curing depends on compatibility, gel opacity, lamp strength, and the manufacturer instructions rather than a guaranteed cure or universal timing.
Positioning the hand so light does not reach the gel evenly
Uneven hand positioning can reduce light exposure across the gel surface and side areas, which may lead to less consistent curing. Hand positioning, thumb angle, nail tilt, and placement within the lamp center all influence how evenly light reaches the gel, although the outcome depends on the lamp shape, nail angle, and gel placement.
Even light exposure depends on how the hand is positioned inside the lamp rather than on one fixed placement. The checklist below highlights practical observations that can help improve curing consistency without implying a universal curing position.
- Keep hand positioning steady so the gel surface remains exposed to the available light.
- Check whether the thumb angle creates a shadowed area that limits sidewall exposure.
- Observe whether nail tilt changes how light reaches the side areas.
- Position the hand near the lamp center when appropriate for the lamp design.
- Look for shadowed areas that may receive less light exposure than the rest of the nail.
For example, a thumb positioned away from the main light path may receive less even exposure than the other nails. The effect depends on the lamp shape, nail angle, and gel placement rather than an exact placement guarantee.
Wear Mistakes That Make Extensions Lift Early
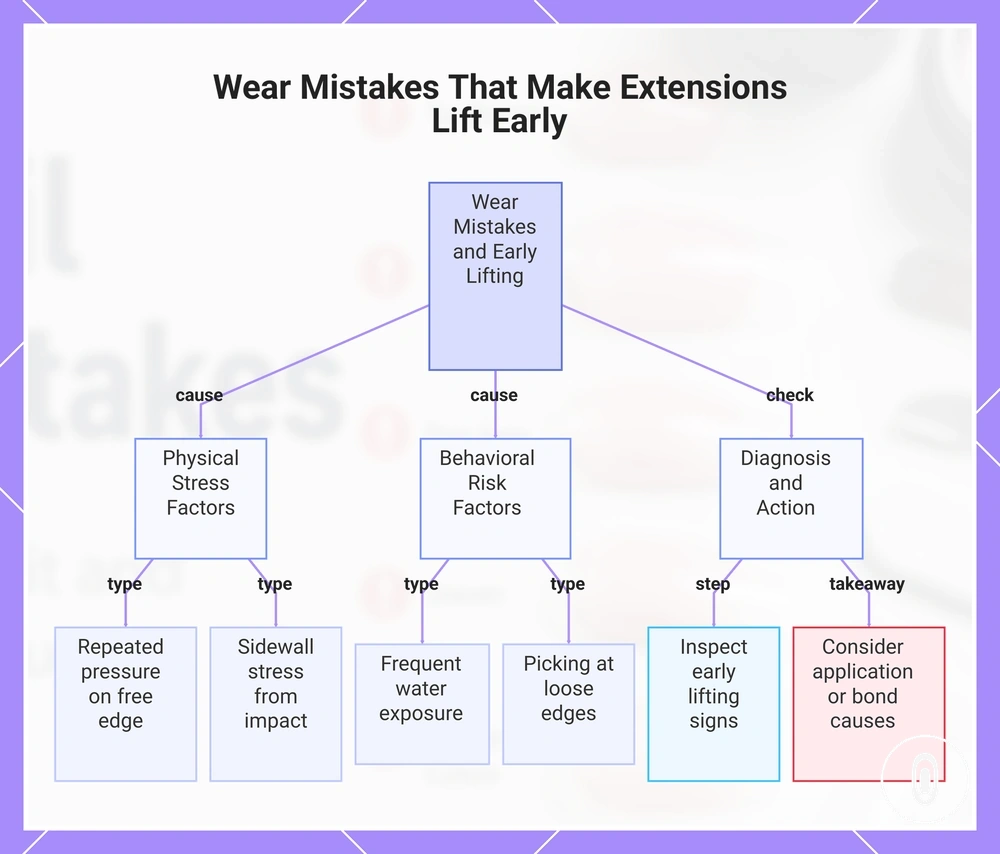
Wear mistakes can make extensions lift early when daily pressure, water exposure, or ignored damage places additional stress on the bond after application. The likelihood of early lifting depends on application quality, daily activity, water exposure, and the existing bond condition rather than a fixed wear duration.
Normal wear may gradually affect an extension over time, while avoidable stress can accelerate separation. Repeated pressure on the free edge, sidewall stress, frequent water exposure, impact, or picking may place extra strain on bonded areas and contribute to early lifting.
Use this checklist to identify wear behaviour that may increase lifting risk:
- Check for repeated pressure against the free edge during daily tasks.
- Look for sidewall stress or separation after impact or frequent contact.
- Notice whether water exposure is followed by signs of early lifting.
- Avoid picking at loose edges, as picking may increase separation.
- Inspect early lifting signs so changes can be addressed before they become more noticeable.
If lifting appears earlier than expected, everyday wear may not be the only cause. The lifting mistakes guide clarifies how wear-related stress differs from application- or bond-related causes.
This chart shows how daily wear mistakes like pressure, water exposure, and picking cause early lifting, and how to check and differentiate from bond-related issues.
Using extensions as tools during daily tasks
Using extensions as tools can place leverage on the free edge and gradually weaken the bond when pressure is directed through the extension instead of the fingertip. Prying, scraping, opening, tapping, or repeated impact may increase free-edge stress, although the effect depends on the task, applied pressure, extension length, and existing bond condition.
Mechanical leverage concentrates force where the extension extends beyond the natural nail. During a daily task, prying or opening an object may transfer pressure back toward the bonded area, while scraping or repeated tapping can add smaller impacts that contribute to edge stress, sidewall stress, or a weak bond over time rather than from a single action alone.
For example, lifting a tight tab with the free edge creates more leverage than using the fingertip pad. This type of behaviour does not mean every daily task causes damage, but repeated use of extensions as tools may increase bond risk when pressure is consistently applied through the extension.
Ignoring early lifting at the free edge or sidewall
Early lifting at the free edge or sidewall should not be hidden or forced down because the separation may worsen as pressure continues to act on the extension. This warning sign can increase the risk of moisture entry, snagging, and additional stress on the bonded area, although the outcome depends on the location and extent of the separation.
When a lifted edge catches during normal use, repeated pressure may increase separation over time. To reduce the risk of worsening the condition without attempting a repair, keep these points in mind:
- Do: Check whether early lifting begins at the free edge or the sidewall.
- Do: Watch for moisture entry if the separated area becomes more noticeable.
- Avoid: Hiding, pressing, or forcing a lifted edge back into place.
- Do: Minimise snagging and repeated pressure on the affected area where possible.
- Do: Consider correction timing before the separation becomes more extensive.
Not every lifted extension requires the same response because the appropriate approach depends on the extent of separation, moisture exposure, discomfort, and overall condition. For broader guidance on causes and assessment, see lifting mistakes.
Removal Mistakes That Damage Natural Nails
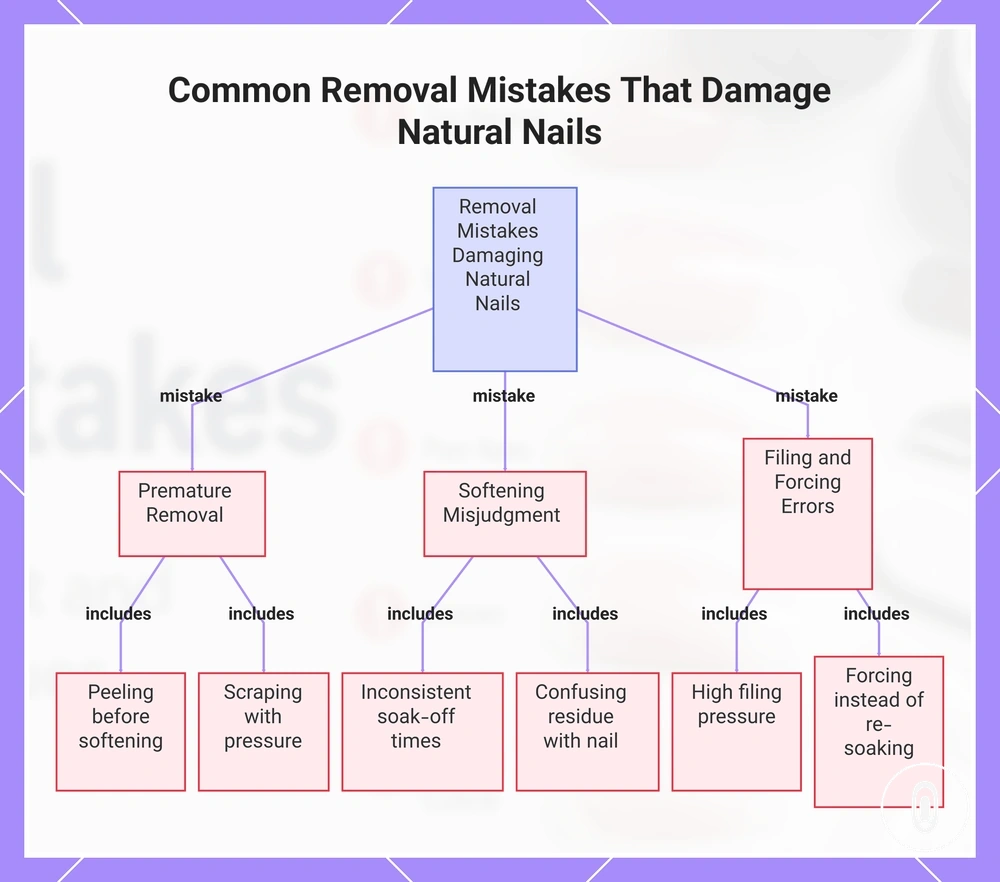
Removal mistakes can damage natural nails when an extension is forced off before enough gel softening has allowed it to release. Allowing the gel to soften before removal may reduce the need for peeling, scraping, or excessive tool pressure that can affect the natural nail layers.
Release can vary with product type, gel thickness, filing, and soak-off conditions, so removal resistance does not always mean more force is needed. For example, softened gel residue may remain on the surface after partial removal, while peeling or scraping through resistant material may disturb the natural nail layers instead of removing only leftover product.
Keep these warning points in mind during removal:
- Avoid peeling the extension before sufficient gel softening and release.
- Limit scraping that concentrates tool pressure on the natural nail.
- Do not rely on one soak-off time for every gel system.
- Distinguish softened gel residue from natural nail layers before removing additional material.
- Reduce filing pressure as the remaining product becomes thinner.
- If resistance remains, allow more gel softening instead of forcing the extension off.
This section highlights common removal risks rather than the complete take-off process. For a broader explanation of safer removal methods and decision points, see removal mistakes.
This chart summarizes the key warning points to avoid damaging natural nails during gel extension removal, grouped by mistake type.
Picking, peeling, or forcing off gel extensions
Picking, peeling, or forcing off gel extensions can pull natural nail layers away with the product when the gel has not released sufficiently. Even if a lifting edge is already present, peeling force or forced removal may increase the risk of visible surface damage and tenderness depending on the remaining adhesion strength and the amount of force applied.
The damage mechanism begins when force is transferred from the lifting edge into the attached nail plate layers instead of releasing only the gel extension. If part of the extension remains firmly bonded, picking, peeling, or forcing off the remaining product can pull natural nail layers with it rather than separating cleanly.
For example, a loose corner may appear ready to come away, but peeling from that lifting edge can continue into an area that is still firmly attached. This may leave visible surface damage or tenderness, so a partially loose extension should not be treated as safe to force off.
Stopping the soak-off process before the gel has softened
Stopping the soak-off process before the gel has softened can increase resistance and lead to scraping or prying because the product has not released cleanly. Allowing softened gel to release more easily may reduce the need for excessive tool pressure, while recognising that soak-off conditions depend on the product thickness and application.
Gel softening can vary with product thickness, top-layer filing, remover contact, and wrap fit, so resistance does not necessarily mean more force should be used. If remover contact is uneven or the top layer remains difficult for the remover to penetrate, the gel may stay firm and require further softening rather than added pressure.
When resistance remains, check these conditions before increasing tool pressure:
- Check whether the gel has reached a softened state before attempting release.
- Consider whether top-layer filing allows consistent remover contact.
- Check whether the removal wrap or clip maintains suitable wrap fit and contact with the gel.
- If resistance continues, avoid increasing tool pressure or scraping to force release.
When a Gel Extension Mistake Needs Correction
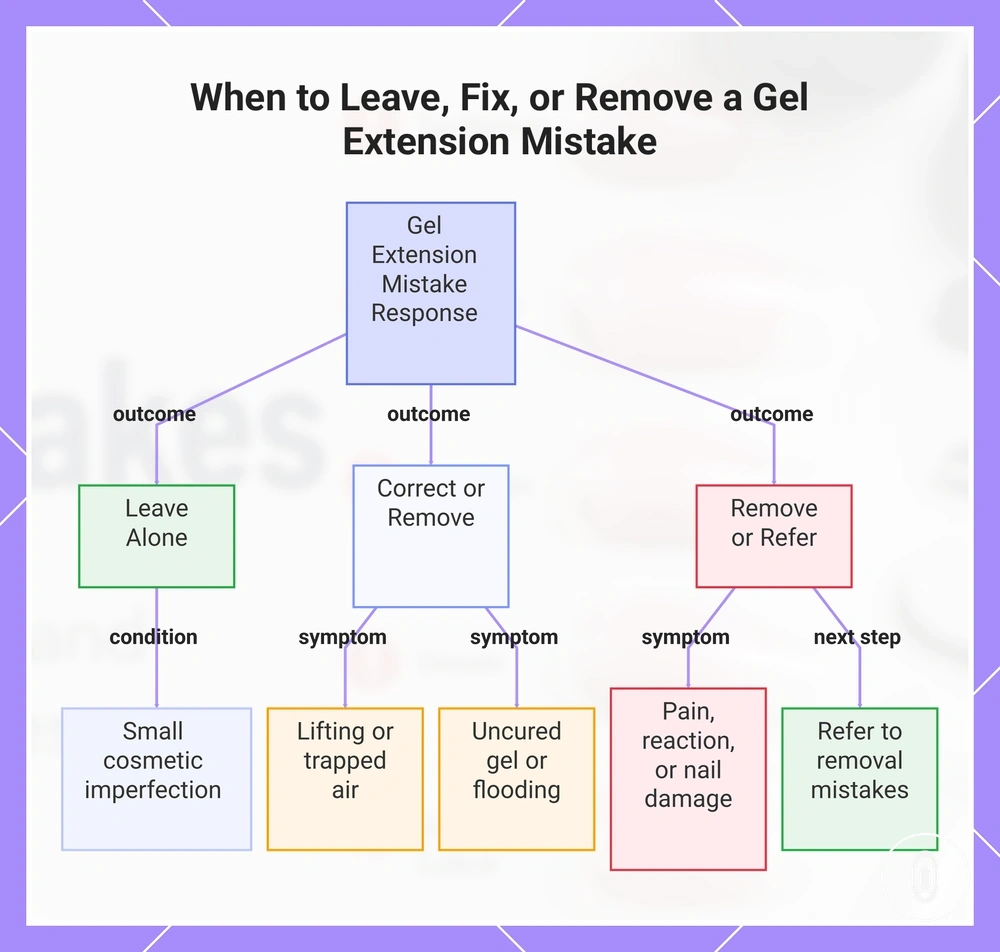
A gel extension mistake needs correction when it affects adhesion, curing stability, comfort, or natural nail safety rather than appearance alone. Small cosmetic imperfections may be left alone when they do not affect wear, comfort, or safety, while lifting, uncured gel, pain, trapped air, flooding, or visible nail damage may indicate that the set should be fixed, removed, or reassessed depending on the symptom and its severity.
Correction decisions should be based on the type of mistake and the risk it creates. A minor surface imperfection differs from increased lifting severity, trapped air beneath the extension, flooding that contacts surrounding skin, signs of uncured gel, or nail damage that affects comfort. When pain, an unusual reaction, or more serious damage appears, routine correction may not be appropriate.
The checklist below separates symptoms by likely risk and correction need rather than assuming every failed set requires the same response. If recurring application issues are causing these warning signs, reviewing application mistakes may help clarify the underlying cause.
- If the issue is a small cosmetic imperfection with no effect on adhesion, curing stability, comfort, or natural nail safety, leaving it alone may be reasonable.
- If lifting severity increases or trapped air becomes visible, correction or removal may be more appropriate than ignoring the separation.
- If uncured gel, flooding, or reduced curing stability is suspected, the set should not be left unchanged.
- If pain, increasing discomfort, a reaction, or visible nail damage occurs, avoid assuming a simple repair is suitable.
- Choose whether to fix, remove, or leave the set alone according to the symptom, risk, and overall condition rather than appearance alone.
Cosmetic flaws and structural problems should not be treated the same way. When removal becomes the safer boundary because of the condition of the set or the natural nail, refer to removal mistakes instead of forcing a repair.
This chart shows how to decide whether to leave, correct, or remove a gel extension based on the type and severity of the mistake.